
Complete the following steps to delete records:
1. Download the Table
2. Identify the Records
3. Validate Delete
4. Execute Delete
Download the Table
Make sure to download the “TAD Sandbox” Table for All Companies so you see the records below.

Identify the Records
With your table downloaded, you need to identify which records you want to delete.
1. Identify those records by changing the Action column to Delete.

Validate Delete
The Validate Delete button deletes the records from the database to see if the transactions will be successful. If the transactions fail, then an error message will be returned for each individual record.
1. Click the Validate Delete button on the ribbon.

2. You want to see Validated in the Result column. If you see Failure then you should see an error in the ErrorMsg column. Make the appropriate corrections before validating until successful.

Execute Delete
Once all records validate click the Execute Delete button on the ribbon to delete the records from the database.
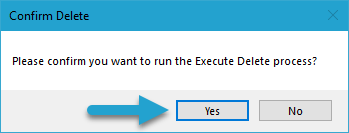
1. Click the Execute Delete button on the ribbon.

2. You will be prompted with the message below. Click Yes to continue with the delete.
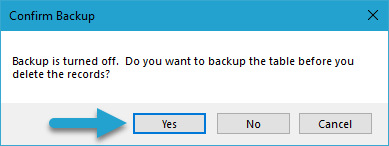
3. You will be prompted with the message below if Backups are turned off. Click Yes to create a backup, No to not create one and Cancel to stop the process.
3. If you see Deleted in the Result column then the record was deleted from the database.

4. You can now Download the table again to see the updated record.
Option 1 – Using Download Button on Ribbon

Option 2 – Using Download Action Button

5. When prompted for Parameters, remove the value for the (Companies) parameter so that you download records across all companies. Click the Download button.
![]()
6. Once downloaded, you should no longer see the record you deleted.

Post your comment on this topic.