In order to deploy the Lightning Forms for Modern Sites in SharePoint Online or SharePoint 2019 On-Premises, please follow the relevant steps below. You may also find this tutorial video helpful as well.
Installing Lightning Forms Modern in SharePoint Online
- Unzip the LightningForms-1.ZIP file.
- Open a browser and navigate to your AppCatalog. The URL will vary between tenants, but is likely to be: https://companyname.sharepoint.com/sites/appcatalog.
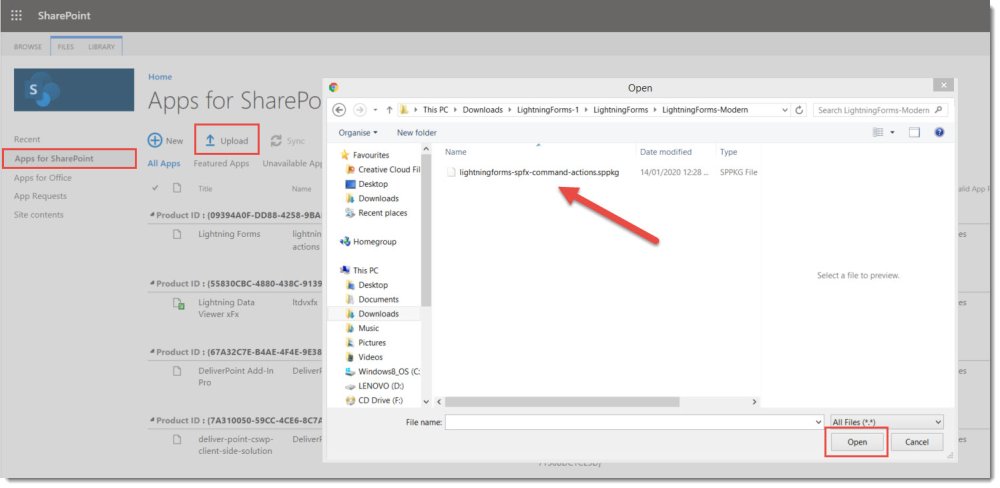
- On the Left hand Navigation Pane, click Apps for SharePoint.
- Click Upload, and browse to the lightningforms-spfx-command-actions.sppkg file that you unzipped. (Note: This file may be located under the LightningForms-Modern folder)
- Click Open on the Open dialog box.
- Click OK to the Add a document dialog box.
- You should now see a green banner indicating that the web part was uploaded successfully.
Installing Lightning Forms Modern in SharePoint 2019 On-Premises
- Extract content of the LightningForms-1.ZIP file to one of the SharePoint WFE servers.
- Open a browser and navigate to your AppCatalog. The URL will vary between tenants, but is likely to be: https://companyname.sharepoint.com/sites/appcatalog.
- On the Left hand Navigation Pane, click Apps for SharePoint.
- Click Upload, and browse to the lightningforms-spfx-command-actions.sppkg file that you unzipped.
- Click Open on the Open dialog box.
- Click OK to the Add a document dialog box.
- You should now see a green banner indicating that the web part was uploaded successfully.


Post your comment on this topic.