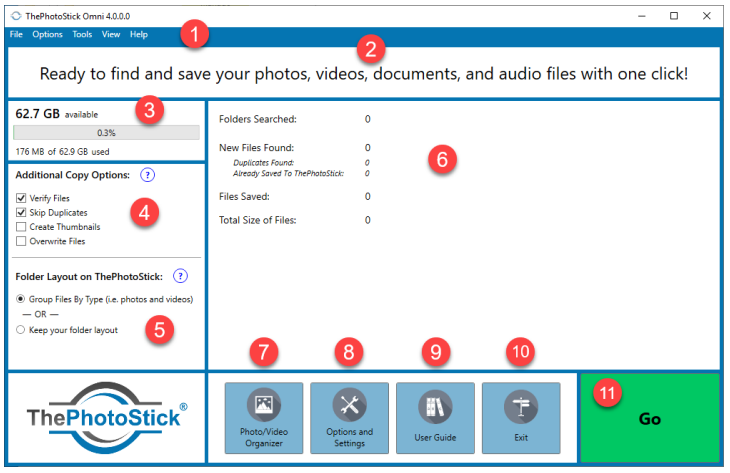
Getting to Know ThePhotoStick® Omni Interface

- Main Menu — Allows for access to various features of ThePhotoStick® Omni, including your
photos/videos/documents/audio settings, tools, and checking for ThePhotoStick® Omni software updates - Status Area — Provides status messages before, during, and after a backup is run.
- ThePhotoStick® Omni Capacity Chart — Provides a quick snapshot of how much used and free space is
currently on your ThePhotoStick® Omni. - Additional Copy Options — Provides easy access to setting common copy options. You can also access
these settings by clicking on the “Options and Settings” button. - Folder Layout on ThePhotoStick® Omni — Choose the folder structure for files saved to your
ThePhotoStick® Omni. - Backup Statistics — Provides information for your current backup.
- “Photo/Video Organizer” Button — Opens ThePhotoStick® Omni Organizer that will show your photos,
videos, documents, and audio files that are currently backed up to ThePhotoStick® Omni. - “Options and Settings” Button —Opens the Settings window for ThePhotoStick® Omni. Here you can set
which photo, video, document, and audio file types that ThePhotoStick® Omni will find and save as well as
other application settings. - “User Guide” Button — Takes you to ThePhotoStick® Omni online user guide.
- “Exit” Button —Closes ThePhotoStick® Omni application.
- “Go” Button — Starts a backup of your photos, videos, documents, and audio files.


Post your comment on this topic.
Carmine Zambrotto wrote: Mar 27, 2025
Works just like you guys said. 5 STAR all the way.
Ron Haley wrote: Aug 10, 2024
How do I download "The Photo Stick Omni" app for windows 10.