Time Machine readers that have a -X after the name have inbuilt WiFi. Connecting via WiFi will give the same functionality as using the Ethernet network cable.
Remember, a direct Ethernet connection is always the most reliable way of communication between your timing computer and your reader. i.e the fastest and most reliable network communications is always through a cable. WiFi connections can be compromised by outside factors including objects in-between you and the reader and interference from other wireless sources.
Your readers wireless network name should be configured by your distributor prior to shipping the reader to you. A easy way to find it is to simply look at your wireless connections prior to turning on the reader, once you turn the reader on the network name will appear in the available wireless network list on your computer.
The default password to connect to the network is 12345678
Once connected to the wireless network you will be able to connect to your TM Readers IP address and appropriate TCP Ports
Changing and Configuring WiFi Settings on your Time Machine.
The best method of changing configurations on the Inbuilt DHCP / WiFi unit in your TM Reader is by connecting up via Ethernet Cable
Once connected to the network following the steps below:
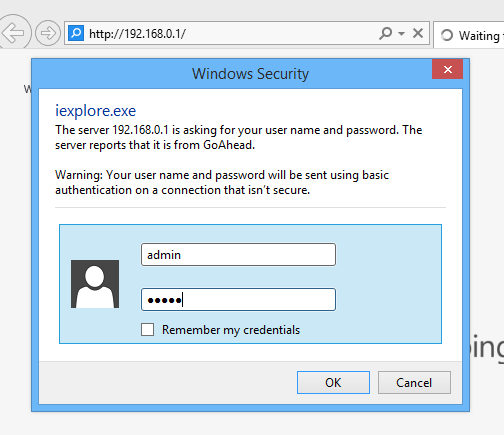
- Open a web-browser, type the default IP address “192.168.0.1” in the address field, and press Enter. At the prompt, enter the default User name: admin and Password: admin. Click OK to enter the router’s management page.
 192.168.0.1 Username: Admin , Password: Admin
Changing the Network Name and Password.
- Once logged in select the “ System Settings” icon.
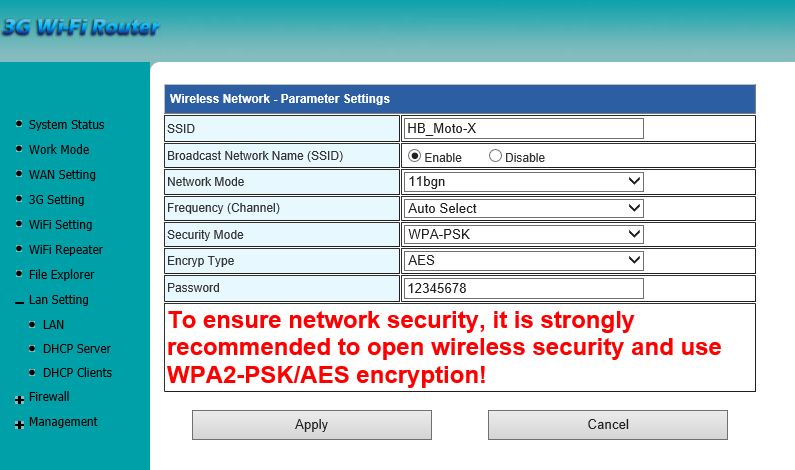
- From the left hand list select “WiFi Settings “.
- You can change the Network Name overwriting the name in the SSID line.
- You can change the Password by overwriting the Password in the Password line.
- You must select the Apply button to save. The system will then re-boot.
 Network Name and Wifi Password
Correct Work Mode
The 3G WiFi Router should be set to “3G Mode”.
- To check or assign the correct mode, once logged in select the “ System Settings” icon.
- From the left hand list select “Work Mode”.
 Correct Operation Mode showing
Changing the IP Address
You can change the IP address that the 3G WiFi Router assigns to your computer and that the TM Reader uses.
- Once logged in select the “ System Settings” icon.
- From the left hand list select “ LAN Setting “. Sub categories will appear. From these select “LAN”.
- Change the IP address and select Apply. The system will then re-boot.
- You will then need to change the IP address on your computer and log back in to the 3G WiFi Router using the IP address entered.
 Local Area Connection Setting
- Next you will need to change the DHCP settings that your 3G WiFi Router uses to assign a IP address to your computer.
- Once logged in select the “System Settings” icon.
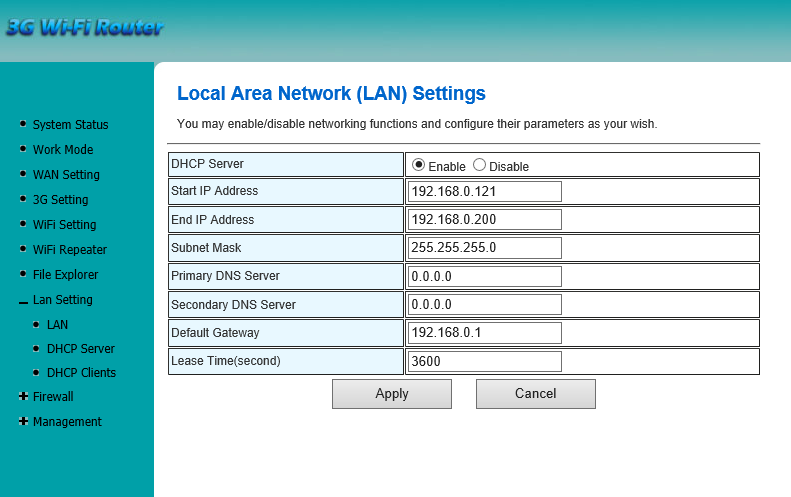
- From the left hand list select “LAN Setting”. Sub categories will appear. From these select “DHCP Server”.
- Change the “Start IP Address” to match the new IP address that you have set the LAN to. i.e LAN is 192.168.1.1 then set Start IP Address to 192.168.1.121
- Change the “End IP address” to match the new IP address that you have set the LAN to. i.e LAN is 192.168.1.1 then set Start IP Address to 192.168.1.200
- Change the “Default Gateway” exactly new IP address that you have set the LAN to.
- Select Apply. The system will then re-boot.
 Local Area Network Settings
- Start the IP pool range at 121, this allows room for future readers.
When Connecting to multiple readers via a wireless router or router with DHCP capabilities , make sure that the DHCP pools assigned by router does not overlap with the readers connected. If repeaters are required for a wireless network, these must be standalone units. Do not attempt to use the repeater mode in the Reader (this must always be set to 3G router mode).

