STEP 1: Edit Reserved Routing Profile (MULT_USER_ROUTE)
During the initial installation of One Look Windows, the MULT_USER_ROUTE will be automatically created.
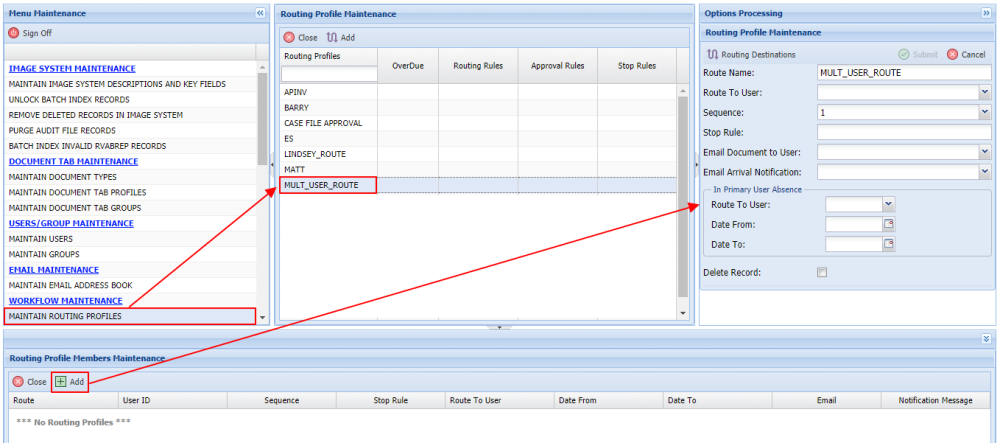
- Click Menu, Maintenance, Maintain Routing Profiles.
- Double-click MULT_USER_ROUTE profile.
- Click Add to edit the routing profile.
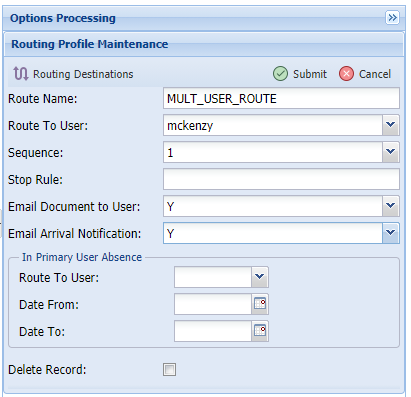
- Route Name: will default to MULT_USER_ROUTE (can not be changed).
- Route To User: will remain blank unless you want to use email arrival notifications. A user MUST be specified if email notifications are enabled. You only need to specify one user here. Each user that will receive email notifications MUST have an email address specified under Maintain Users.
- Set Sequence: = 1
- Stop Rule:
- Email Document to User: = Y (Optional)
When using Route Multiple Users button in workbasket, it email a copy of the document ot the users. A defined email address in Maintain Users is required.
- Email Arrival Notification: = Y (Optional)
When using Route Multiple Users button in workbasket, it will send an email to the users they have a document in their workbasket. A defined email address in Maintain Users is required.
Emails will be sent for initial routes and Approval process.
NOTE: for MULT_USER_ROUTE, leave In Primary User Absence section blank.
- Click Submit to finish the creation of the routing profile member.
STEP 2: Create Overdue Notification
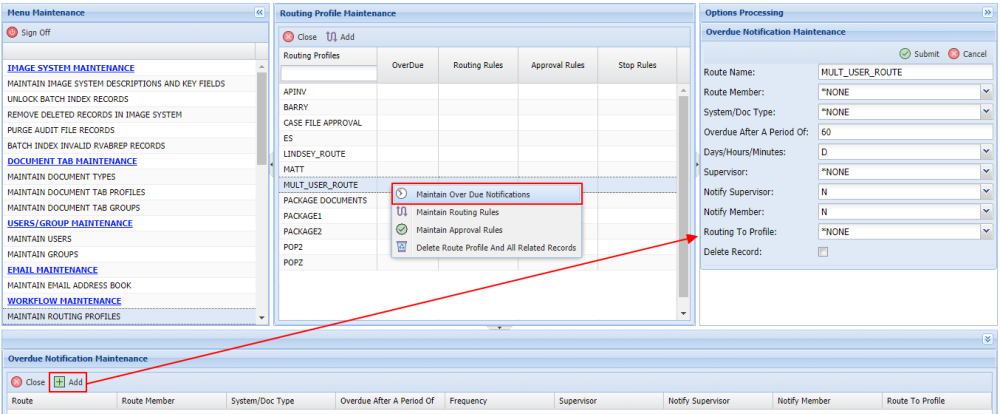
- Click Menu, Maintenance, Maintain Routing Profiles.
- Right-click the routing profile MULTI_USER_ROUTE.
- Select Maintain Overdue Notifications.
- Click Add.
- Fill in the following fields:
Route Name: Automatically populated with MULTI_USER_ROUTE
Route Member:
System/Doc Type:
Overdue After A Period of: Set the numeric value for the Overdue notice.
Days/Hours/Minutes: Set the increment of time.
Supervisor:
Notify Supervisor:
Notify Member:
Routing To Profile:
STEP 3: Create Approval Rule
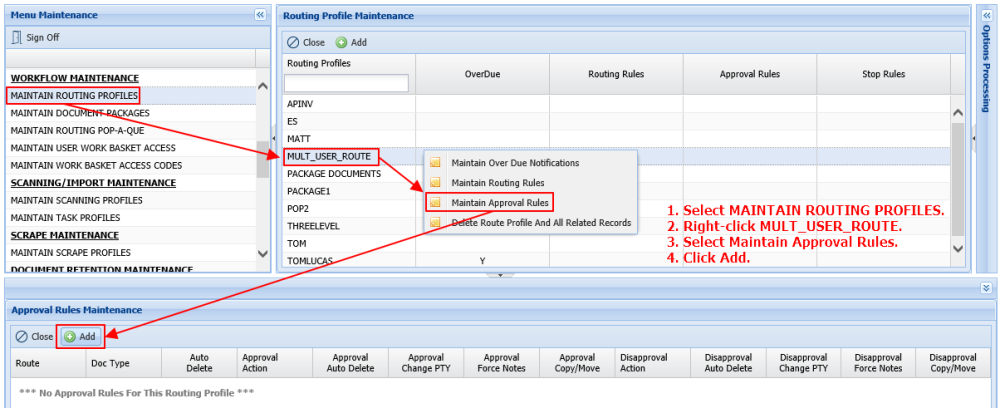
- Click Menu, Maintenance, Maintain Routing Profiles.
- Right-click the routing profile MULTI_USER_ROUTE.
- Select Maintain Approval Rules.
- Click Add.
- Fill in the following fields:
Route Name: Automatically populated with MULTI_USER_ROUTE
Approval
Action To Take: ORIGINATOR
Force Notes: A (Auto Notes on Approval/Disapproval)
Disapproval
Action To Take: ORIGINATOR
Force Notes: A (Auto Notes on Approval/Disapproval)
Setup for Route To Multiple Users is now COMPLETE!
NOTE: Users can be notified via email when new items have been routed to their workbasket. Click WorkBasket Email Notification Controls for a list of control values. You must be authorized to maintain system values in order to change these controls.



Post your comment on this topic.