
When creating a series, there are two primary decisions to make:
1. Who will get scheduled:
- Individual Employee: In this case, every day in the schedule entry will have just one known employee.
e.g. John Smith, Monday-Friday.
- Multiple Employees: In this case, each day in the schedule entry can be unique.
e.g. John Smith and Frank Jones Monday & Tuesday, but Sally Johnson on Friday.
- Any Employee: In this case, every day in the schedule entry will have the special “Any Employee” with a count. e.g. Any Employee with count of 3, Monday-Friday. In this case, the system does not know who will work, but it does know that 3 people must clock in.
2. The frequency of the schedule:
- Recurring schedules: For example, every Friday from 8pm to 11pm, or every 3rd Wednesday of the month from 2pm to midnight. Any type of recurrence is supported.
- One-time schedules: For example, November 26th from 5pm to 9pm.
3. Schedules can be viewed in four ways:
- Show All Schedules: This allows you to view all schedules regardless if they are disabled, expired, etc.
- Show In Progress Schedules: You can view all the schedules that are currently in progress.
- Show Inactive Jobs: All inactive jobs will be shown when this is selected
- Filter Employee Count:
Creating A New Schedule
You can create a new series by either using the ![]() icon in the upper right corner or use the
icon in the upper right corner or use the  in the lower left corner of the Schedules section of the portal.
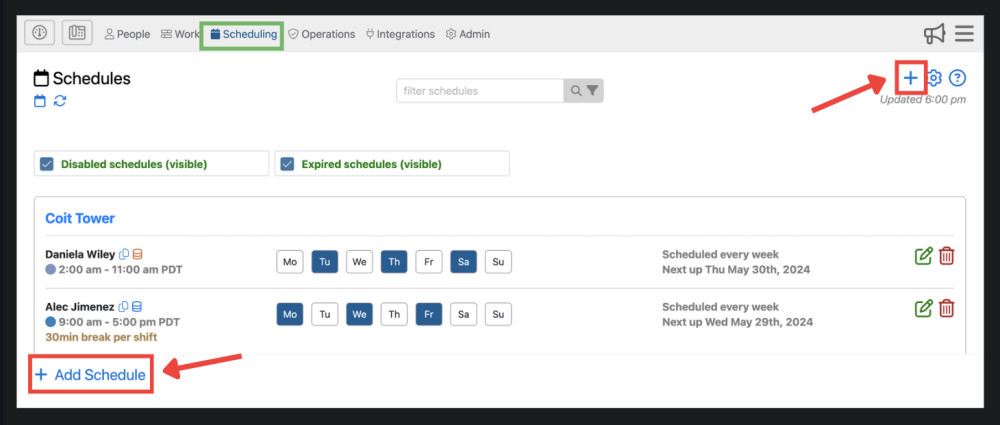
This will bring you to the New Schedule form where you can enter the employee(s), job, and days of the week, start date, end date, etc.
Highlights Of This Form
Employee
Here you will select either any employee, which means employee who will do the job is unknown. For example, if the employee is provided by a 3rd-party vendor, or if more flexibility is needed you can enter in the number of employees needed and the system will handle the rest.
You can also assign individual employees to a specific schedule.
Job
This is where you select the job that you are scheduling and where the employee will be working. You must create a job before you start the scheduling process
Start/End Time
Here you can select the start and end time of your shift. The start and end time of the shift must be consistent for every assigned work day for this schedule. However, you can edit individual shift start and end times.
Repeat/One Time
You can select if this schedule is either recurring or completed one time. If the job is reoccurring, you can select how often it will reoccur.
On
This will be where you assign the days that the employee will work at that job.
Start/End Date (Advanced Options)
Here you can select your start and end date for this scheduled job. You can select 3 different ways to end a schedule:
1. Never: This allows the schedule to run infinitely.
2. End Date: The last day of this schedule can be chosen using a calendar selector. For example, the last day of the schedule is October 3rd, 2024.
3. Count Reached: In this case, the schedule ends after a certain number of occurrences. For example, a daily schedule with a count of 5 would end after 5 days. A weekly schedule with a count of 5 would end after 5 weeks.
Schedule Details (advanced options)
Schedule Details are displayed in the Date/Details column of the time entries screen and may optionally be exposed to employees in the employee web portal during clock in.
Notes For Scheduler (advanced options)
Employees will not see these notes. They are only available in the admin portal to those who maintain the schedule.
Notify For Schedule Changes
Enter the email address of a supervisor, employee, or other individual to be notified if the schedule changes.
Break Length (advanced options)
Here you can determine the amount of unpaid break time that will automatically be subtracted from the total hours worked. These breaks are not controlled by the employee. This means the employee won’t start and end their break during this shift. The Break Length entered here overrides any Break Length assigned to the Job.
Auto-apply Break (advanced options)
Here, you can assign the number of hours that must be worked before the unpaid break time is subtracted from the total hours worked. For example, you could assign 4 hours to this field. Then, if an employee works less than 4 hours, no break will be subtracted. The Auto-apply Break entered here overrides any Auto-apply Break assigned to the Job.
Budgeted Time for This Shift (advanced options)
This field allows you to assign a budgeted time to the shift. This is useful for reporting when you want to see how many hours were actually worked, compared to how many hours were budgeted for the shift. The value entered here will override any budgeted time assigned to the Job.
Highlight Color (advanced options)
A specific color can be assigned to this schedule to differentiate it in the Shifts view.
Schedule is Enabled/Disabled
Allows you to freely enable or disable a specific schedule.
Schedule Snapshot (advanced options)
Here, you can visualize how your schedule will look once it has been saved. You can check this field to ensure the schedule was entered correctly.
Hide Past Schedule Dates (advanced options)
When looking at your Schedule Snapshot, you can hide scheduled dates that have already passed.
Mark Schedule as Pending
The option to mark a schedule as pending is disabled by default, but can be turned on by contacting support@telephonetimesheets.com. If enabled, you can mark a schedule as pending. This will creating a new tab for pending schedules. If a schedule is pending it will be considered inactive. The pending feature can be used to create schedules that have yet to be assigned to an employee. This is most often used with companies that supply employees through a vendor. This allows the company to create the schedule before an employee has been assigned. Once an employee has been assigned, that’s schedule can be approved and no longer be pending.
![]()
Need more help with this?
Telephone Timesheets Support