
In the Devices section of the menu you can access Designer. To create a template click on the New Skin button. What you will see next is a representation of the screen in grey, with a grid to help you place the elements on the canvas.
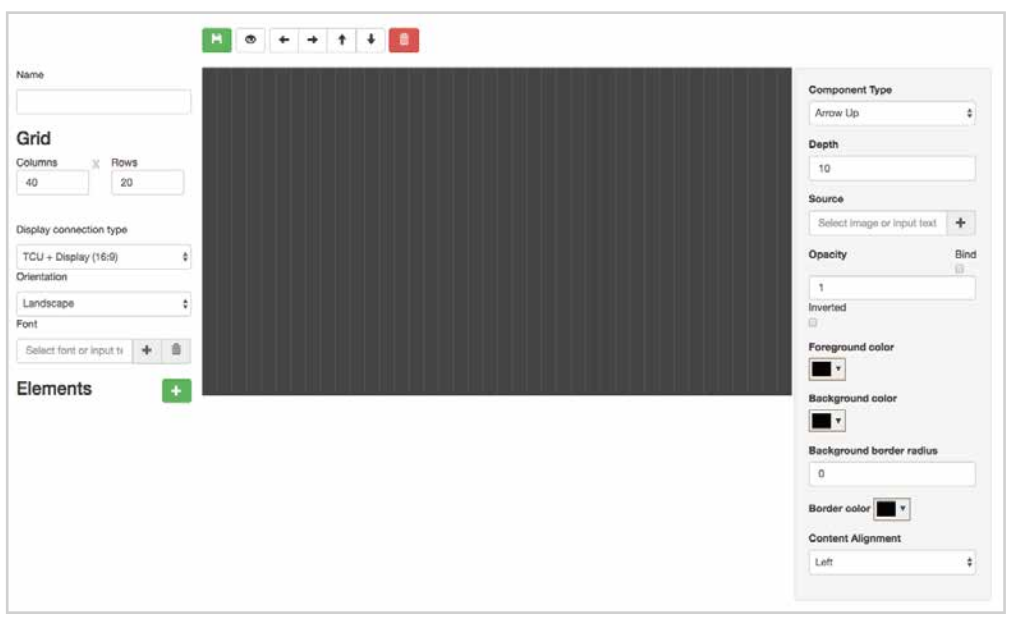
- NAME: Here you can change the name of the template.
- COLUMNS X ROWS: By varying these values you can increase or decrease the number of rows and columns in the help grid. This will help you when placing the elements on the canvas. This grid will not appear on the screen.
- DYSPLAY CONNECTION TYPE: In this section you can choose the type of Advertisim device for which you are optimising the template. Even if it is applied to a different type of device, the appearance will be correct although there may be slight variations.
- ORIENTATION: Advertisim devices can be placed either horizontally or vertically, so templates for both orientations are required. By changing this option you can switch between the two and create templates for vertically positioned screens without any problems.
*Remember that the orientation option chosen here must be applied to those Advertisim devices with the same orientation in their configuration. For example, if you create a template in portrait orientation, for the result to be correct you must check that the orientation in the display configuration is also portrait. You can access the Advertisim device configuration from the Device List via the Configure Device button.( ![]() ).
).
- FONT: Here you can add a font file to change the font of the Advertisim device.
- SAVE: Once the template has been defined, you can save it to apply it to one or more screens.
- DISPLAY ELEMENT INFORMATION: Allows you to see the name of the elements already included in the template.
- MOVEMENT ARROWS: With these arrows you can move the position of the elements on the canvas more precisely, but it is also possible to do this by dragging and dropping with the mouse.
- DELETE ALL THE ELEMENTS: This button removes all previously placed elements.
- ELEMENTS: To create the template step by step, the first thing to do is to place the first element on the canvas. The steps are always the same:
1. Add a new item by pressing the button( ![]() ).
).
2. A new element will appear on the canvas. You can drag it to change its position or stretch its bottom right edge to change its size.
3. Once you have placed the element where you want it, you will have to decide the element type from the list of available elements (Component type). At this point you can decide whether you are going to place a multimedia zone, a still image, weather information, etc.
4. In the same way, certain characteristics can be configured and may vary according to the type of element selected:
- Depth: If you want to place one element on top of another you can give it different depth values. A higher value will place the element on top of a lower value.
- Origen: From here you can select the image file to be added to the template.
- Opacity: Level of element transparency.
- Source text: Select image or input text.
- Foreground color: If the element contains text you can change the font colour here.
- Background color: From here you can change the background colour of the element.
- background border radius: With this option you can make the edges of the elements rounded.
- Content alignment: Some elements allow you to choose left, right or centre alignment.
Once all the elements have been placed on the canvas, the only thing left to do is to save the template with the Save button. You can identify it with a name and it will automatically be saved in our Template list. From this moment on it is available to be applied to any Advertisim device you wish.