
| |
This is the Copy icon |
| |
This is the Help icon |
- Once you select the External type, enter a name for the subscription. You may want to use a name specific enough that you can easily identify it in the list (such as Receiving Entrance Swipe).

- Next, use the drop-down list to select a category. The category will provide additional information about the subscription and will improve sorting. (Refer back to the earlier topic for category definitions.)
- To add tags (available with Orchid Recorder versions 24.9 and later), click the + icon under Event Subscription Tags.
When the New Event Subscription Tags section appears, you will have the ability to assign a new or existing tag to this subscription. (All of the subscription tags that have been created on this Orchid Recorder will appear in a list for easy selection.)
- To add a new tag to the system, click into the Event Subscription Tag Name field.
- Type the new tag name into the field.
- Click on it to select it.
- If you want to add a value to this tag (which will further define the tag), click the expand icon to the right of the Event Subscription Tag Name field.
- Then type the value in the Event Subscription Tag Value field.
- If this is the only tag you need to add, move to step 8.
- If you want to add another tag to this subscription, click the Add Tag button.
- To select an existing tag, click on one of the tags in the list.
- If you want to add a value to this tag (which will further define the tag), click the expand icon to the right of the Event Subscription Tag Name field.
- Then type the value in the Event Subscription Tag Value field.
- If this is the only tag you need to add, move to step 8.
- If you want to add another tag to this subscription, click the Add Tag button.
- If you want to add a value to this tag (which will further define the tag), click the expand icon to the right of the Event Subscription Tag Name field.
- To remove a tag from the selected subscription, click the X to the right of the tag name.
- To clear a tag from the list, select the tag, then click the Trash Can icon to the right of the list.
- Click Next to continue.
The next screen will allow you to select one or more associated cameras.
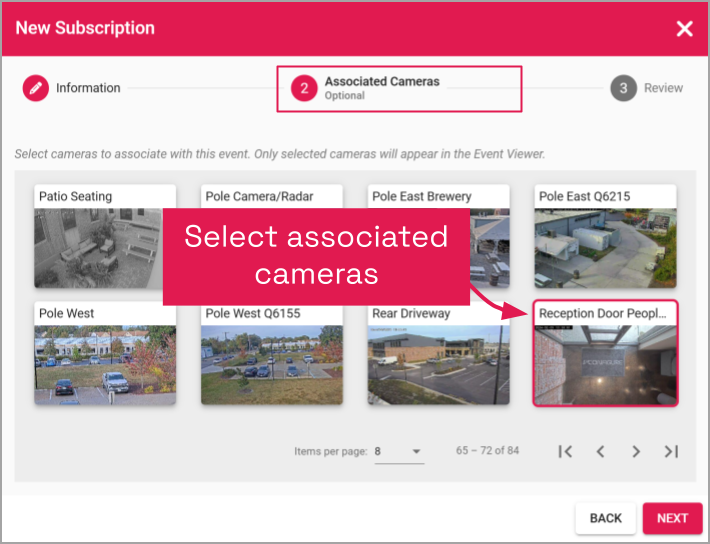
- Select cameras that may provide video relevant to the event.
- Adding associated cameras is optional, but adding video to an event notification makes for a powerful combination.
- Video available in the Event Viewer will be limited to the cameras you select here.
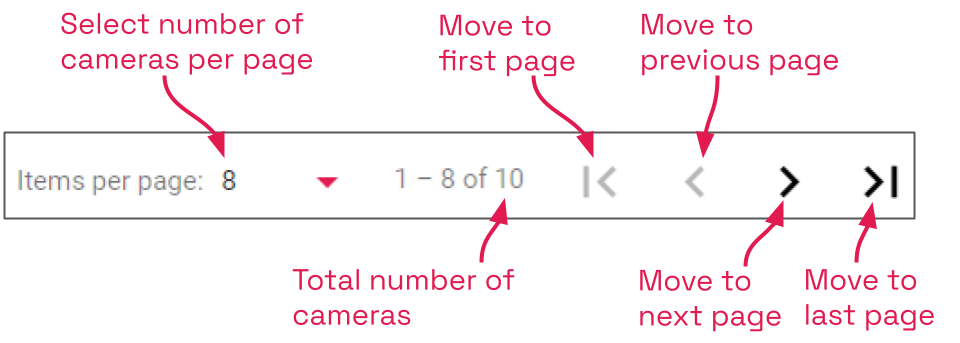
- You may need to scroll down or move to another page to find the camera you want to use. (Use the paging toolbar, if needed.)
- When you’re finished selecting cameras, click Next.
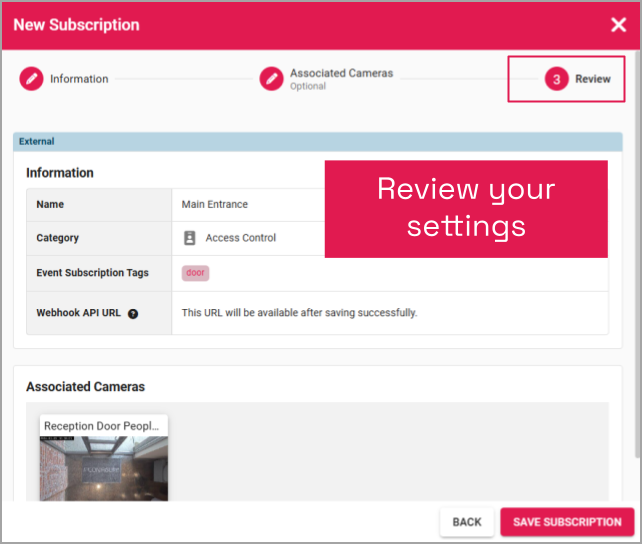
- The last step is to review your selections.
- If you need to change anything, click on the step you want to return to (Information or Associated Cameras).
- Notice that the system has inserted a placeholder for a Webhook API URL. (Reference the next paragraph for more info.)
- When you are satisfied with your settings, click Save Subscription. The new subscription will be added to the Event Subscriptions list.
When you save the External subscription, the system creates a Webhook API URL that contains the subscription ID. The external system will need this URL to send updates to Orchid Recorder.
- For the next step, click on the new external subscription in the list. The configuration dialog for the subscription will open.
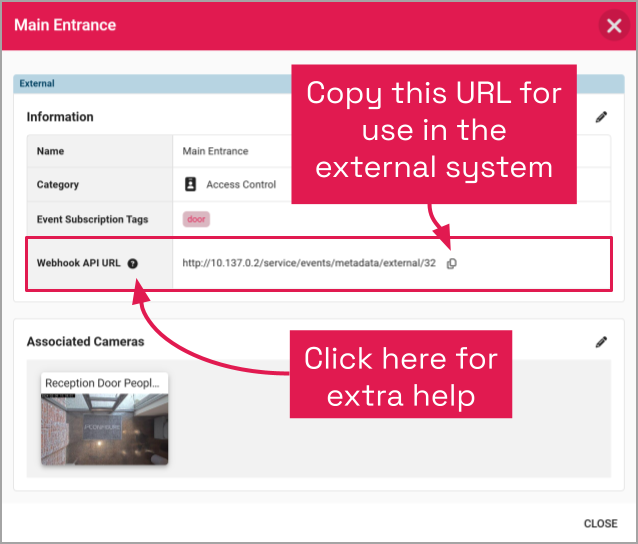
As you can see, the Webhook API URL for this subscription has been created. (The Webhook API URL now has a defined value.)
- Click the Copy icon to copy the Webhook API URL.
- Now you can paste the URL into the webhook settings on the external system. This tells the external system where to send the event data.
- Click on the Help icon for additional information on the proper format for the POST being sent by the external system.
Post your comment on this topic.