
The Timeline track list uses a hierachical structure comprised from parent Pin groups and their children. When creating a new timeline the user must select the required Pin groups to include from the HippoNet PinTree. After expanding a parent group and a single pin has been exposed as its own track, keyframes can be added and edited to store data values for recall during playback.
Track Controls
Mixes

The Mix track represents one of the mixes created in the OutputManager. The block of numbers to the right are the visbility buttons for layers within the Mix. The ‘A’ button represents ‘All Mixes’ and can be selected to expand all included tracks of the mix, and ‘M’ are the Mix controls.
Layers

The Layer track has three seperate controls within the track header, pin group visbility buttons, a level readout of the mixes/level pin and the keyframe controls. Selecting the visibility group exposes the pins within it, multiple layers can be selected using Shift+ Left Mouse Button and then by selecting one of the pin groups all selected layers will expand at once.
Keyframe Control
![]()

The keyframe control can be used to navigate and create keyframes in a track. The left and right arrows jump to the previous or next keyframe and the center square creates a keyframe at the playhead location. These controls will either be red or clear; red represents a keyframe is active either before (left), after (right) or at the playheads position (square); clear controls represent no keyframes to be active.
Track Filters
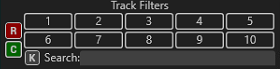
This bank of 10 custom track filters are programmable by the user. Use these to store the current expanded categories of tracks for easy recall. To use this feature create the hierarchy you wish to store, select the record button and then select the bank number. This filter is now stored and can be recalled by selecting the filter bank.
Search
You can filter tracks by inputting keywords into the search bar. Seperate keywords using a comma to apply multiple filters. Search filtered views can be stored into a track filter slot.
Only show tracks with keyframes
 Filter tracks to only show those with keyframes stored within them.
Renaming Tracks
Right-clicking on a track and selecting rename will open a entry form for users to apply custom names to a track. This feature can be used on every track.
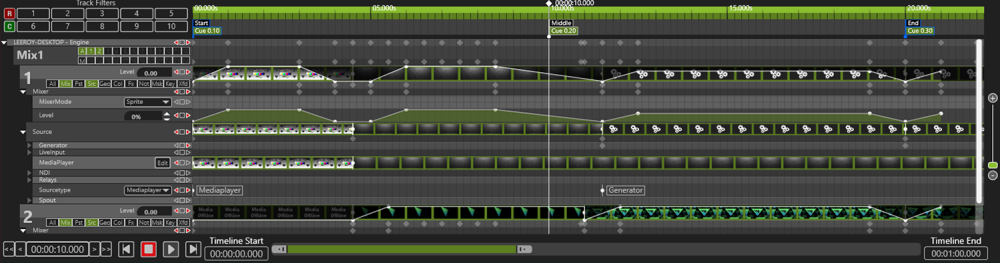
Command Track

Located at the top of any timeline. The command track is where commands keyframes can be created using the Edit Mode Add tool. Commands keyframes can be used as labels, commands, and/or cue numbers.
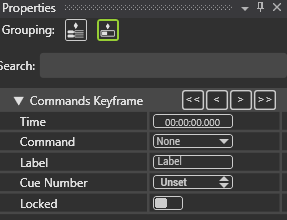
Labels
Labels are user defined for easy recognition of parts within a timeline.
Commands
There are three different command types:
| None | When the command is being used as a label or cue without an action. |
| Stop | Stops playback of the timeline upon reaching this command keyframe. |
| Jump | Upon reaching the command keyframe skip to another command keyframe, start, or end of the timeline. |
Cues
Cue Number is referenced by Multicontroller and external protocols when recalling cues.
Locking
Command keyframes can be locked to their current time index to avoid accidentally moving them while editing.
Post your comment on this topic.