
- After completing the Personal Data (0002) infotype, the (blank)_*Infotype Copy Organizational Assignment (0001)*_ screen appears. The Subarea field should be defaulted to the Personnel Subarea entered in the Index Number request. You can also change the field if required.
- The Payr. Area field is always defaulted to 99 = No Payroll Relevant
- The Pos. Type field generally must remain empty for Employee Group E (and 7) but must be filled for Employee Group X and defaulted to Non Staff -Non T, which means that this category of personnel is not paid through payroll.
- The Position field always defaults to 99999999. It remains 99999999 for all Subgroups of Employee Group E and X except for the Employee Subgroup Consultants (X1) for whom a position may be created and associated to the record.
- If, for reporting purposes, you need to indicate the Organization Unit to which the non-staff reports (e.g., for consultants or interns), click on the Assignment
![]() icon and enter or search the relevant Organizational Unit ID.
icon and enter or search the relevant Organizational Unit ID. - Click the Enter
![]() icon to confirm the record validity.
icon to confirm the record validity. - Click the Save
![]() icon to save the record. This step MUST be saved and cannot be skipped. If the Save icon is not clicked, the individual will not receive the required travel privileges in the system.
icon to save the record. This step MUST be saved and cannot be skipped. If the Save icon is not clicked, the individual will not receive the required travel privileges in the system.
![]()
Click image to open expanded view
![]()
Click Enter to confirm the record validity. Even if you have not entered or changed any field, IT0001 must be saved to correctly generate the Mini Master.
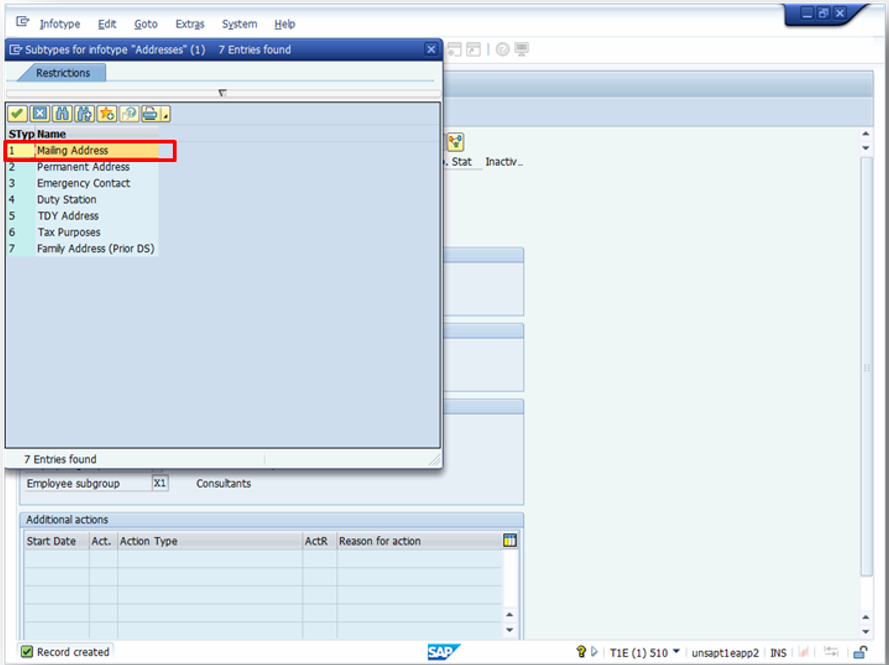
- After clicking the Save
![]() icon, the Subtypes for infotype “Addresses” pop-up screen appears. Double-click Mailing Address *from the list.
icon, the Subtypes for infotype “Addresses” pop-up screen appears. Double-click Mailing Address *from the list.
![]()
*Click image to open expanded view
![]()
Selecting the Mailing Address Subtype triggers the creation of the Business Partner (BP) record, which is essential to enable payment through Umoja. It is, therefore, critical to create a mailing address for every Individual Master Record (staff and non-staff and make the record available to issue a meeting participant’s contract or initiate travel.
- The screen for the next infotype appears, Create Addresses.
 icon and enter or search the relevant Organizational Unit ID.
 icon to save the record. This step
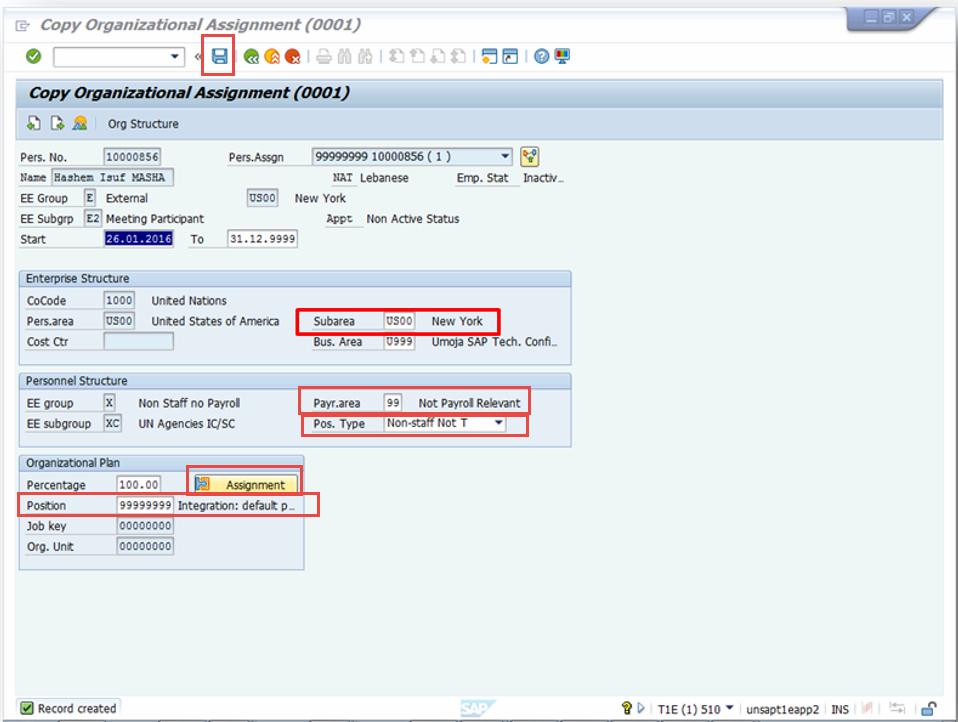

)footnote1
Last modified:
15 August 2021