
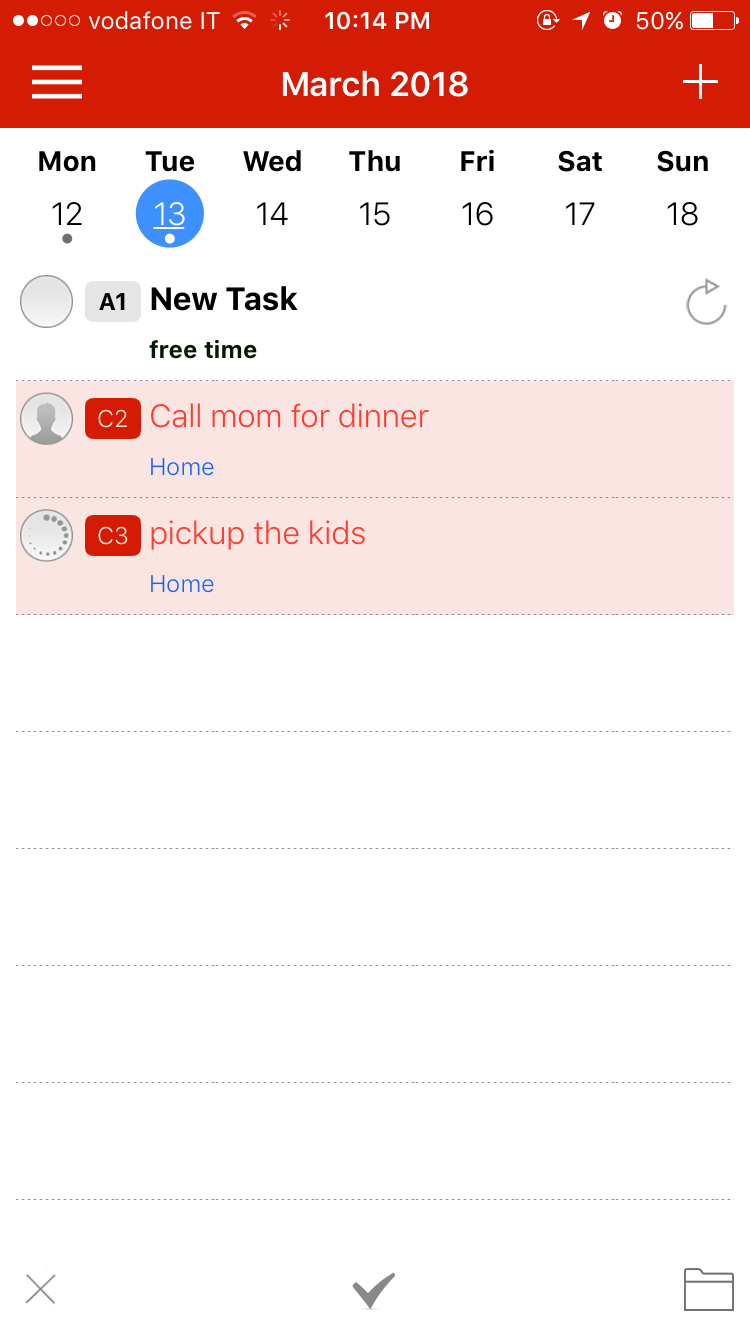
CHAPTER 4: Daily Tasks
Daily Tasks
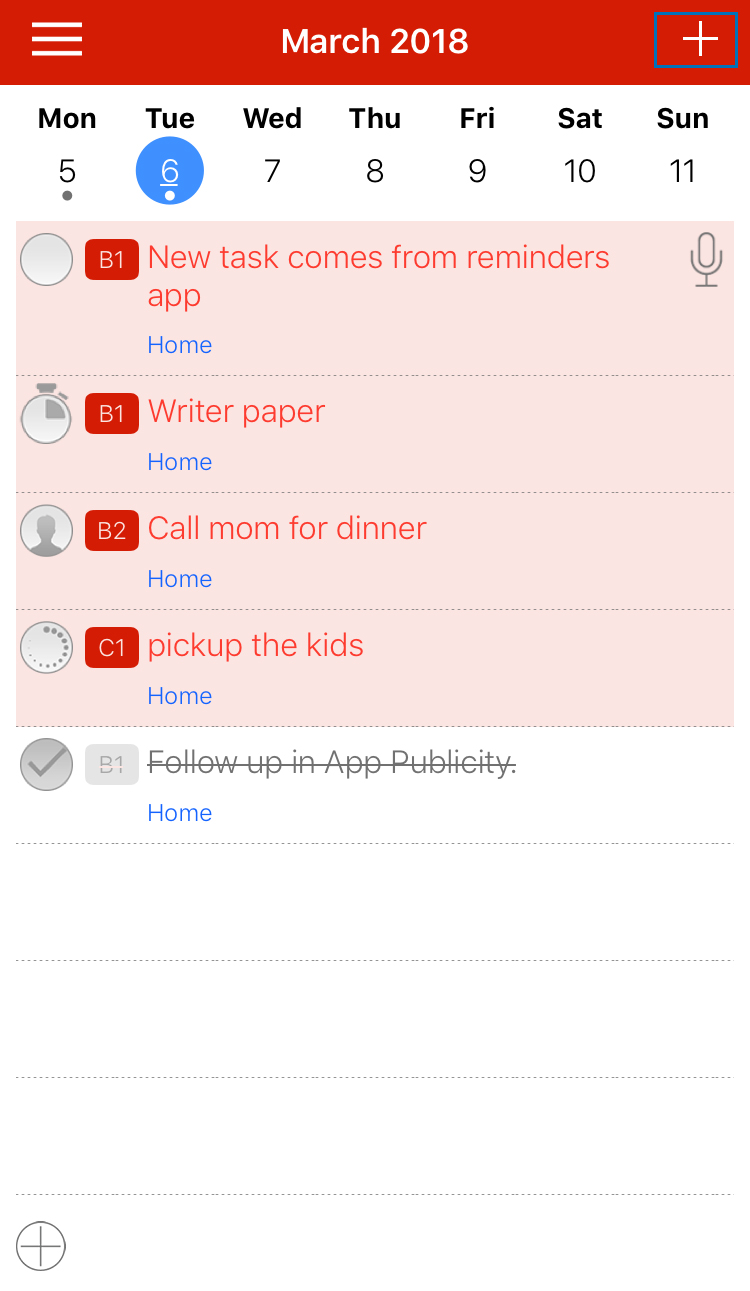
The daily tasks list is the place where you can keep all of today’s to dos. Each task will be assigned a name, a priority (A1, A2, B1, C4, etc.), a status and a category.
Adding Daily Tasks
To add a Daily Task:
1. Place the cursor where “Add Task” text is.
40. Enter the task’s name.
41. Press “Enter” or the plus (+) sign.

In iOS:
 |
 |
When adding a task you can add a priority and category.
To add a task with a specific priority enter the priority before the task’s name. To assign a specific category, type it before the task’s name between brackets:
For instance, instead of Task, type A1 Task or A1 [Opus One] Task
To add a Daily Task on a different date:
1. Go to the calendar above the daily schedule.
42. Select a date. The planner will now show the Daily Task List for this date.
43. Place the cursor where “Add Task” text.
44. Add a task.
To go back to today’s list simply click on the month’s name.
Adding Daily Tasks from Reminders
Opus One has the ability to import tasks from Reminders. To set up this feature refer to the “Reminders” section of this manual.
To add a Daily Task using Reminders:
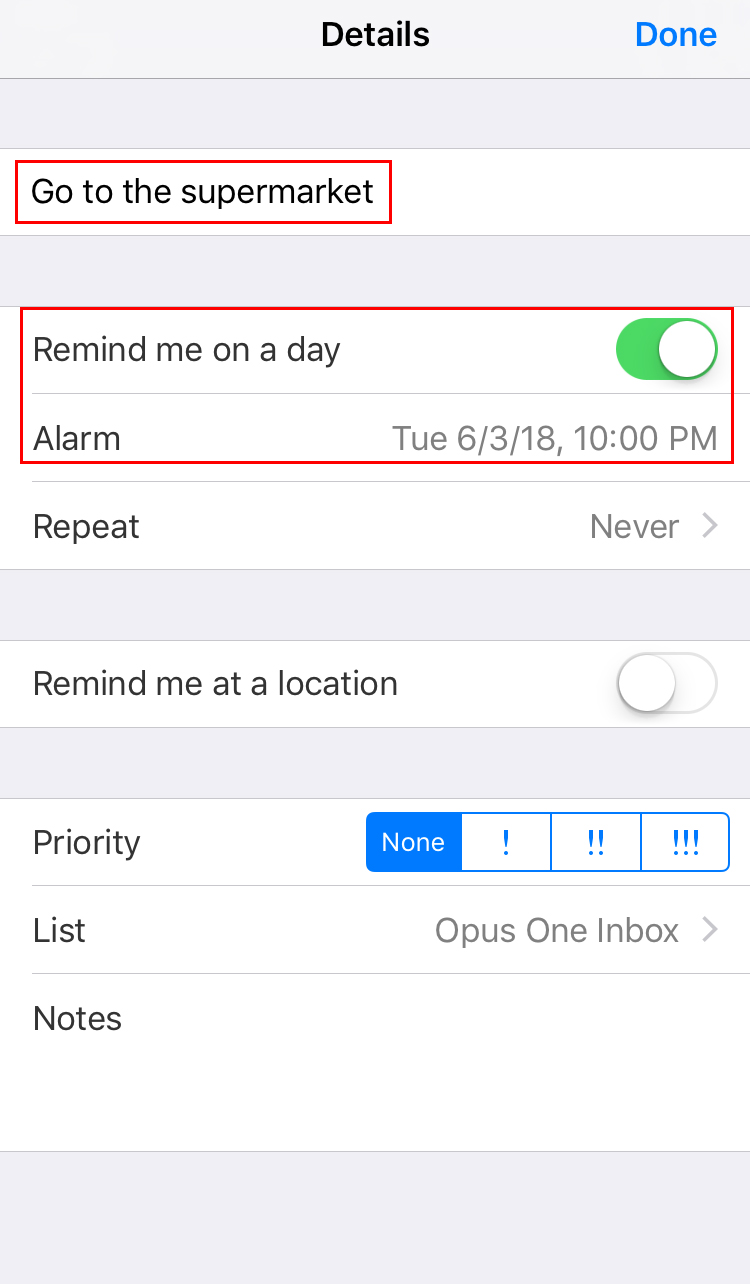
1. Add a task to the “Opus One Inbox” Reminder list. Or the the list you have chosen to import to Opus One
45. Activate the “Remind me on a Day” option
46. Select the date in which the task should be added.
 |
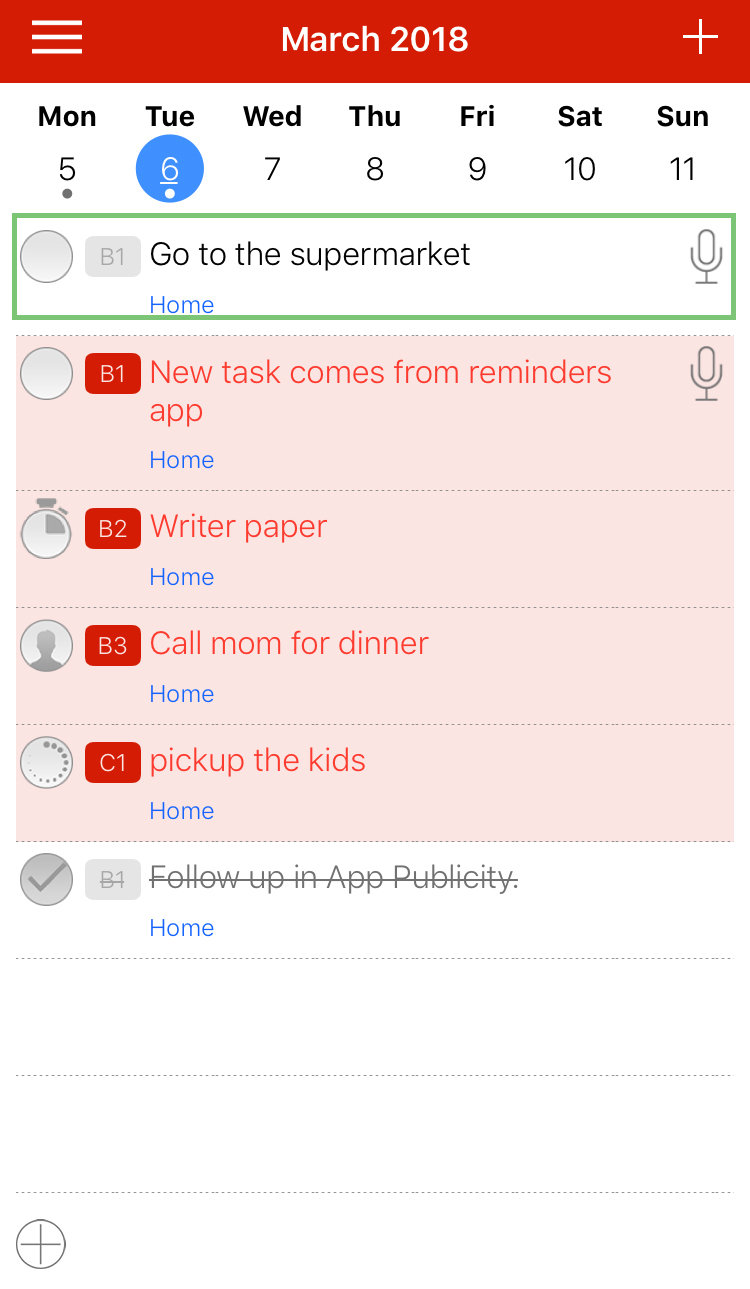 |
Tasks added via Reminders:
Will always have a “B1” priority.
Will be listed under your default category.
And will show a microphone icon next to the task’s name, so you can quickly identify them.
Editing Daily Tasks
There are several ways in which you can edit a task.
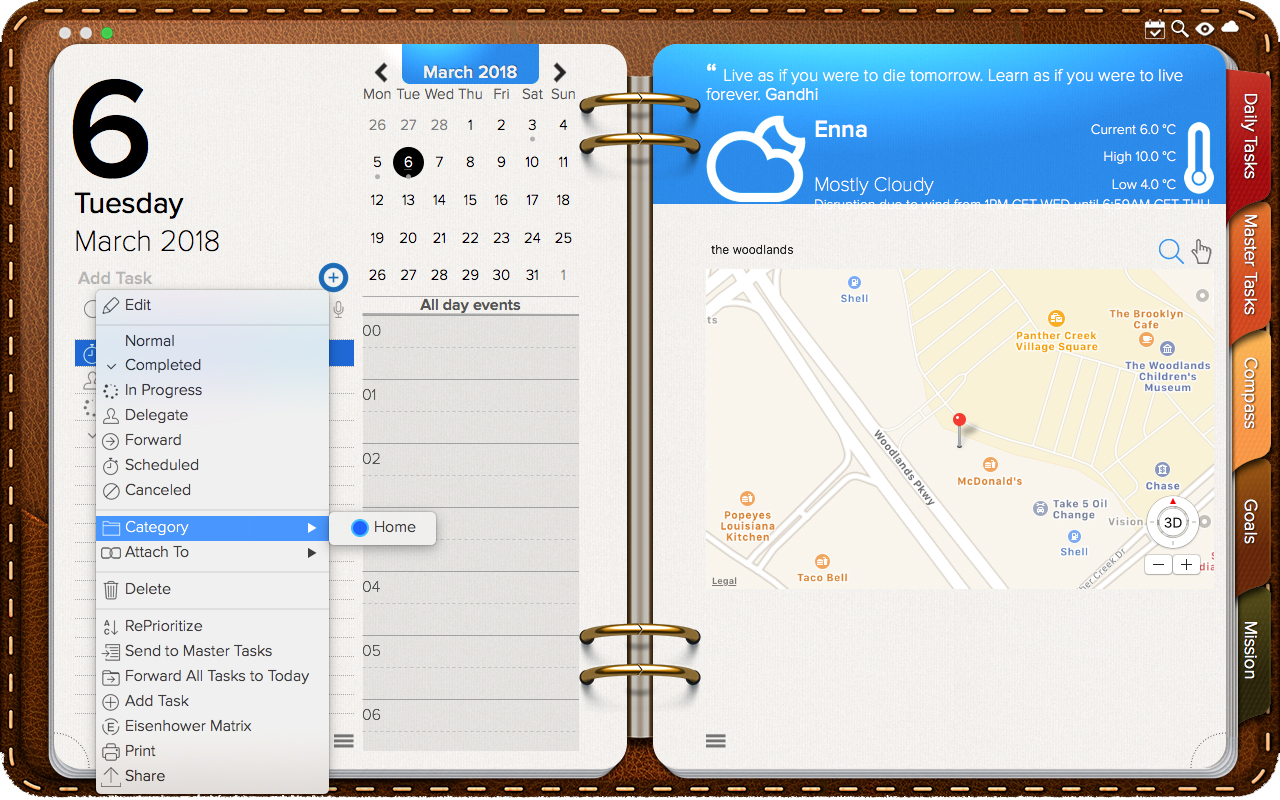
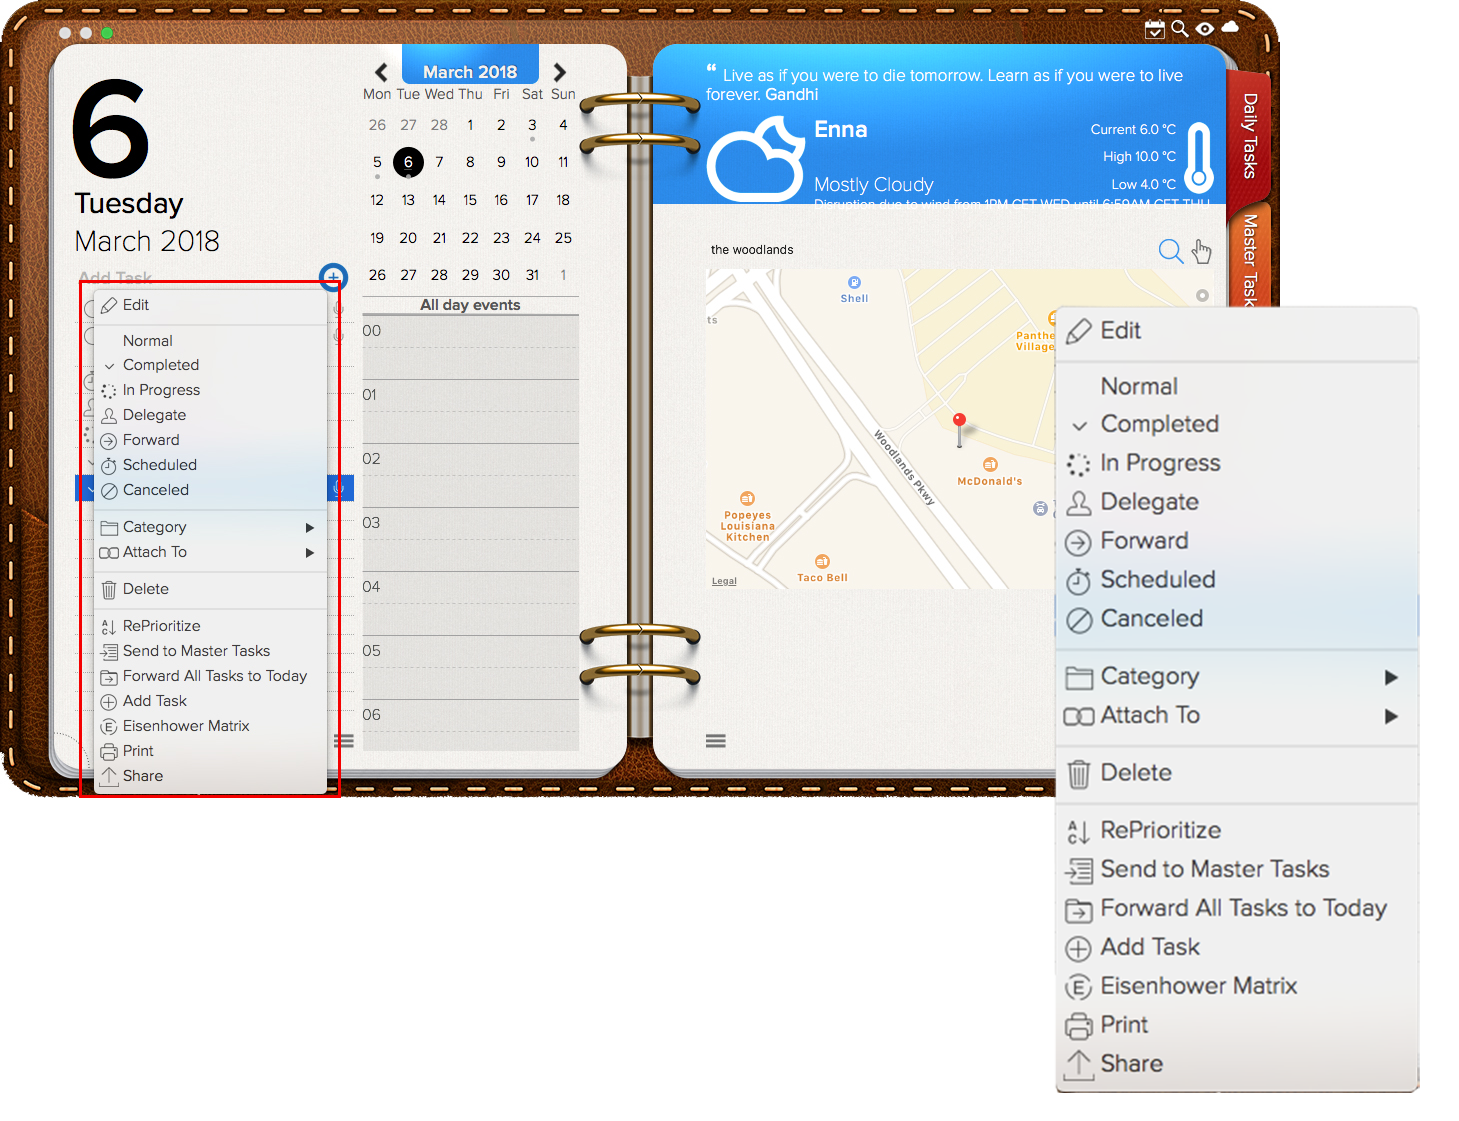
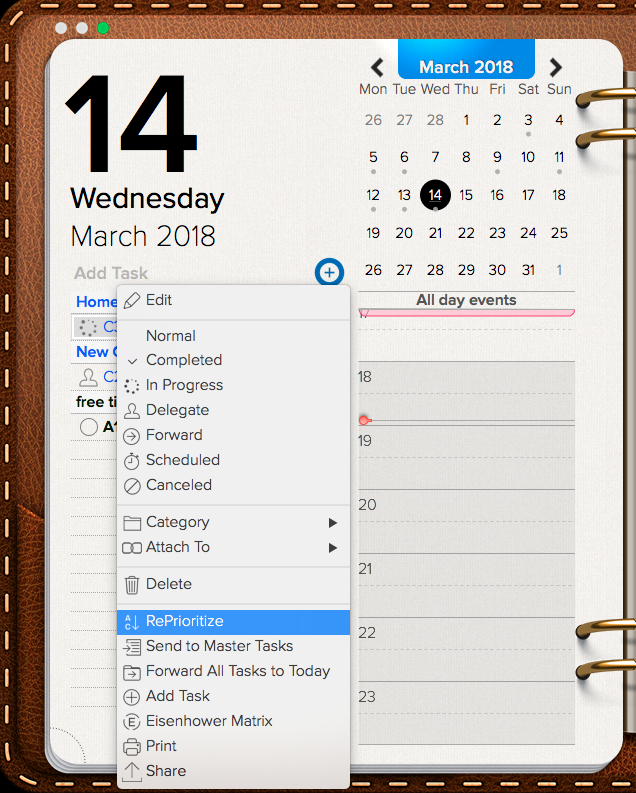
A click to the circle located before the task’s priority will mark a task as completed. Double clicking the task’s name or priority will allow you to quickly edit these. Just double click and type the new name or priority. Dragging the task to a new date will remove the task from today’s list and automatically set a new date. Dragging the task to a new category will change the task’s category. Dragging the task to a new place on the list will change the task’s priority. The task will take the priority from the task above +1.A secondary click to the priority will open a Quick Option menu where you can quickly:
Change the task’s status. Choose from: Normal, Completed, In Progress, Delegate, Forward, Scheduled or Canceled.
Select a Category
Delete the task
Reprioritize your task list
Send a task to the Master Task list
Forward all uncompleted tasks to today
Add a task
Open the Eisenhower Matrix
Print the current page (Today’s Daily Task List).
Share the current page the Daily Task List
In iOS:
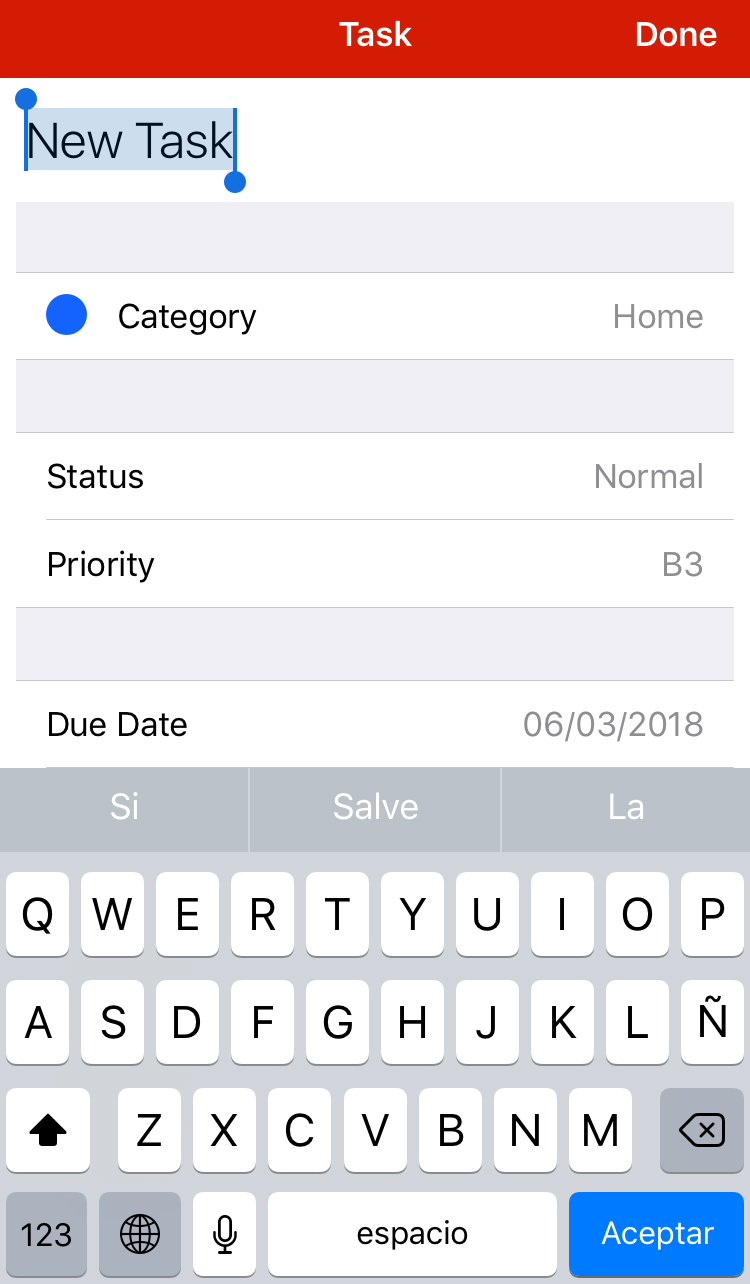
You can also edit a task by entering the Task’s Information Card. To access this menu, select a task, give a secondary click and choose “Edit”. Here you can edit the task’s:
Status
Priority
Start & Due date
Category
Alarm
Time Zone
Repeating Rule
Forward Count
Notes, and
Tags
Bulk Editing Tasks
You can bulk edit tasks’ status, tasks’ due date, tasks’ category or send several task to the Master Task List. You cannot bulk edit tasks’ priorities, alerts or time zone using this method.
To edit several tasks at once:
1. Press the Command Key (⌘) and select the tasks to be edited. Tasks to be edited will be highlighted.
47. Give a secondary click for the Quick Option Menu to appear.
48. Select a new status, delete or send all these tasks to the Master Tasks list.
To send several tasks to a new date:
1. Press the Command Key (⌘) and select the tasks to be edited. Tasks to be edited will be highlighted.
49. Drag the tasks to a new date on the calendar found at the top of the Daily Schedule.
Daily Task Priority
With Opus One you can prioritize your tasks using an ABC – 123 method. The default priority is B1. It does not matter whether you are viewing your task list according to priority or category, whenever you add a task without a priority it will take the next available B-number.
You cannot change the default but you can assign a different priority. To change the priority of a task:
1. When entering the task: type the priority before the task’s name. i.e. “A1 Task”.
2. Double click over the priority and type a new one.
3. Select the task and drag it to a new position within the list.
4. Give a secondary click to the task, open the task’s Quick Option Menu, select “Reprioritize”. This option will renumber the active tasks setting the first task to either A1, B1 or C1 priority.
5. Give a secondary click to the task, open the task’s Quick Option Menu, select “Edit” and on the next window make the necessary adjustments.
6. Give a secondary click to the task, select “Eisenhower Matrix” and rearrange your tasks. Changes in priority will be saved to the Daily Tasks List.
Daily Tasks List Views.
Tasks can be viewed:
- As a single list.
- Arranged by categories.
And in any of the chosen above, you can view:
- All tasks. Completed and incomplete, or
- Active tasks only.

To switch between viewing tasks as a single list or by category:
1. Drag the cursor to the bottom left corner of the Daily Task List.
2. Select or unselect the folder icon.
- When the icon is active (blue) tasks will be listed by categories.

IMPORTANT: To view tasks by categories you need to add categories first, for more
information please refer to the “Daily Tasks by Category” section.
To switch between viewing all tasks and viewing only active tasks:
1. Drag the cursor to the bottom left corner of the Daily Task List.
2. Select or deselect the checkmark icon.
- When the icon is active (blue) all tasks will be shown.
 |
 |
For iOS:
 |
 |
Daily Tasks by Category
To view tasks by categories you need to add categories first.
To add a category:
1. Add a task.
2. Give a secondary click to this task and select “Edit” to open the task’s
information card.
3. Click on “Category” for the Categories Panel to open.
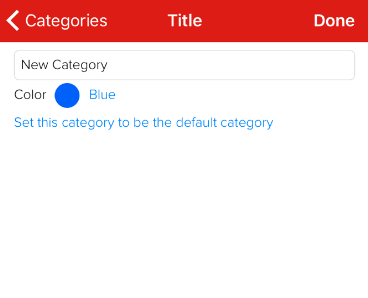
4. Click “Add Category”.
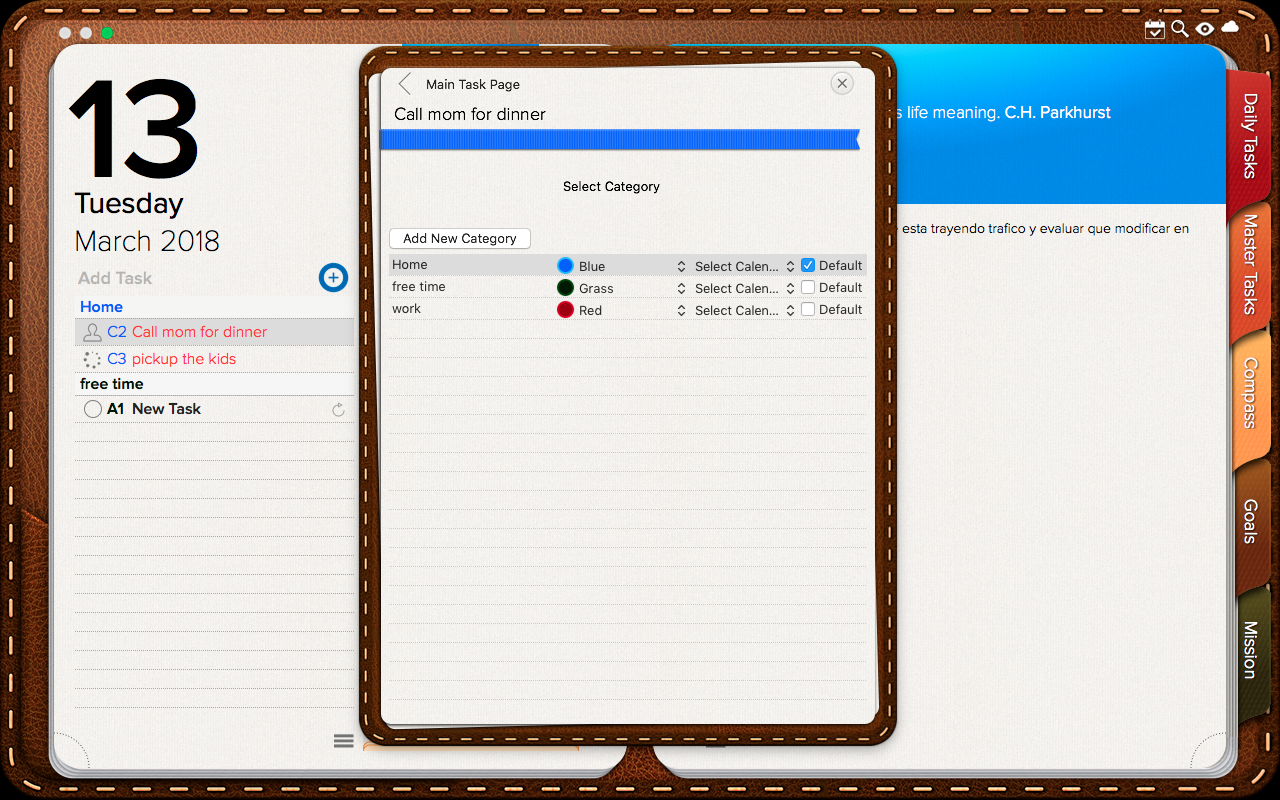
5. A “New Category” will be added. Double click and type a name for this
category.
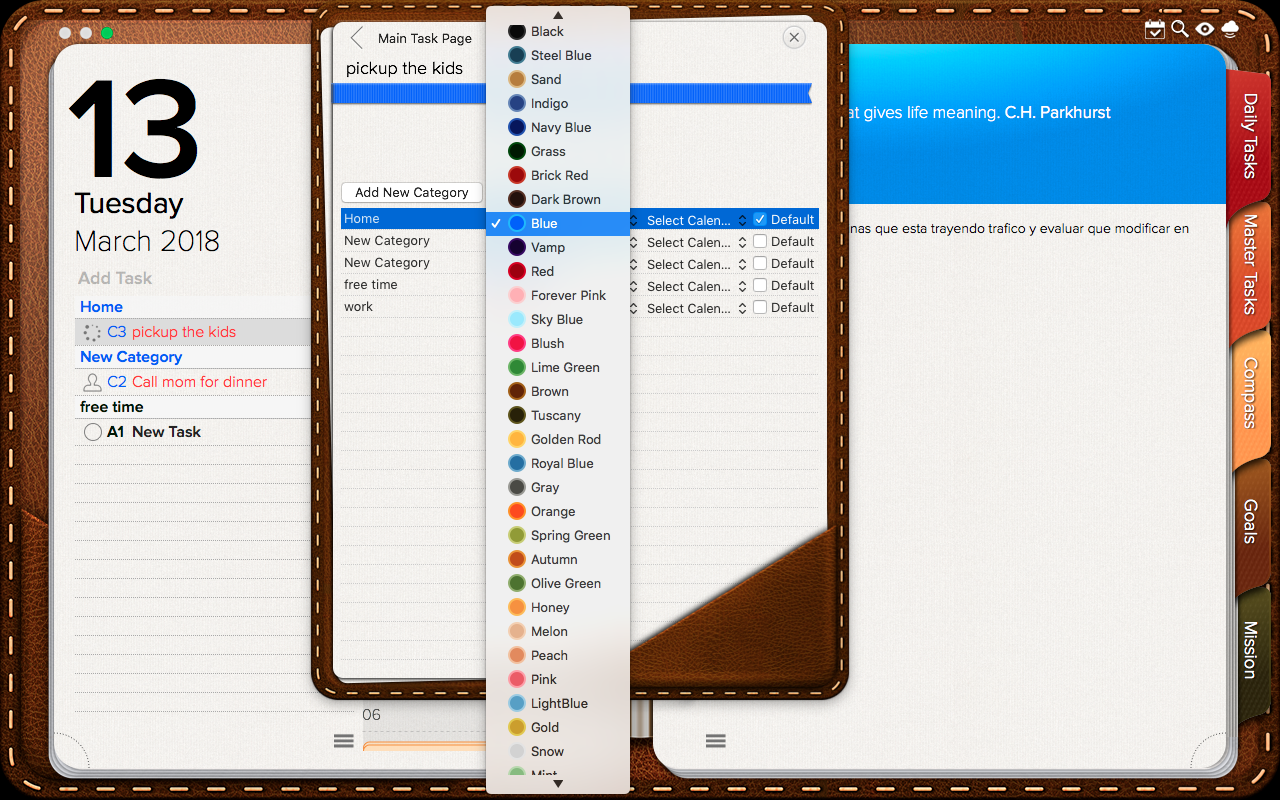
6. The new category will be assigned by default a blue color, to change this
click over “Blue” and select a new color from the list.
7. If you wish to make this your Default Category for all new tasks, check the
“Default” box
- To add more than one category repeat steps 4, 5 & 6 as many times as you like.
8. To automatically assign Events created from tasks in a specific Category to
a specific Calendar set a Calendar for said Category
9. Close the Task’s Information Card to save changes.
To view the Daily Task List by categories:
1. Drag the cursor to the bottom left corner of the Daily Task List.
2. Several icons will appear, select the first – the folder icon.
Some additional information:
- Categories by default will appear in alphabetical order. To change the order
please refer to the Editing Categories section of this manual.
- Tasks within each Category will be listed according to their Priority.
- If you were to add a new task, it will be assigned the next available B Priority
from the task list (not the category)
- If you use the re-prioritize feature while viewing tasks by category, the first A,B
& C tasks from each category will be set to “1”.
Changing the Default Category
1. Give a secondary click over any task’s name or priority to open the task’s
Quick Option Menu.
2. Select “Edit” to open the task’s information card.
3. Select “Category” to open the Categories Panel.
4. On the next window you will see a list with all your categories, check the
corresponding “Default” box.
All new tasks will be assigned to this category, however past entries will not be
affected by this change.
Editing Categories (Default Category, Name, Display Order, Color & Calendar)
Give a secondary click over any task’s name or priority to open the task’s Quick
Option Menu. Select “Edit” to open the task’s Information Card and select
“Category”. On the next window your current categories will be listed
alphabetically or in the order they were last set.
- To change a category’s name. Double click the name of the category and type
a new name.
- To change a category’s color. Click over the color name or the arrows next to
the color’s name and scroll up / down until you find the color of your choice.
- To link a category to a specific Calendar. Click “selected calendar” and choose
a calendar from the list. Note that Calendars cannot be added from Opus One.
For more information on how to add Calendars, refer to the corresponding
section of this manual.
- To change the default category for tasks simply check or uncheck the
corresponding “Default” box.
- To change the order in which the categories should be displayed in the Daily
Tasks List: Select a category, click & hold while you drag and drop it to a new
place in the list.
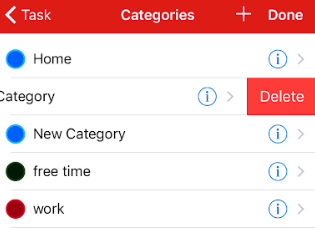
Deleting Categories
1. Give a secondary click over any task’s name or priority to open the task’s
Quick Option Menu.
2. Select “Edit” to open the task’s information card.
3. Select “Category”.
4. On the next window, select the category you want to delete and give a
secondary click.
5. Select “Delete”.
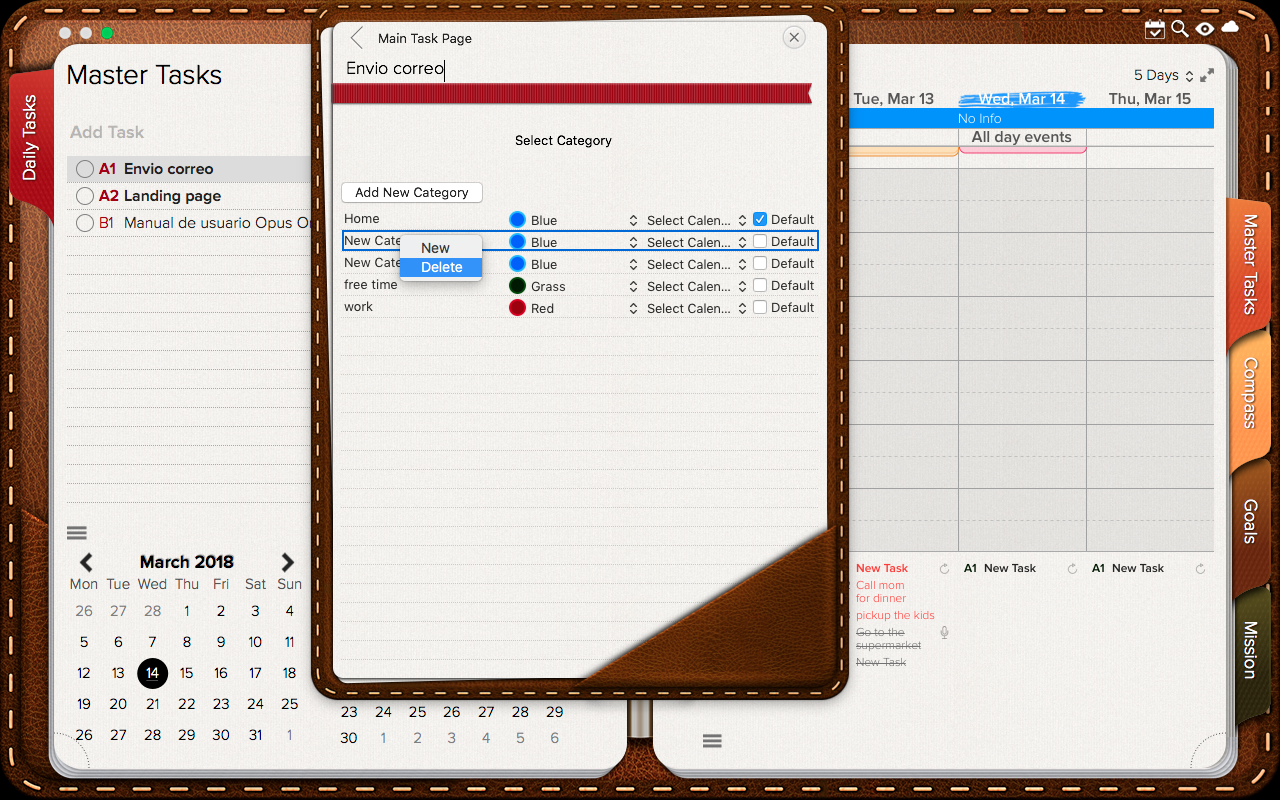
IMPORTANT: Tasks formerly listed under the now deleted category will be added to
the current Default Category.
For iOS:
Task’s Quick Option Menu
To open the task’s Quick Option Menu give a secondary click to any task.
This menu will allow you to quickly change the task’s status or delete the task.
You will also be able to:
• Reprioritize. Renumber currently active tasks, resetting the top priorities to
either A1, B1 or C1.
• Send a task to the Master Task list.
• Forward all uncompleted tasks to today.
• Add a task.
• Open the Eisenhower Matrix.
• Print the current page.
• Share the current page via Mail, Message, Facebook, Twitter and more.
For more information on any of these features please refer to the corresponding
section of this manual.
Task’s Status
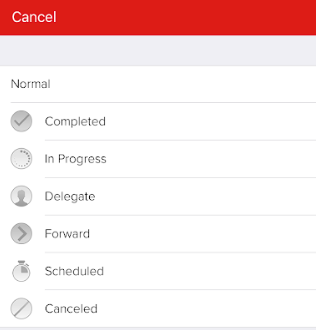
A task can have one of the following status:
● Normal – a task due today
● Completed – a task that has been finished.
● In Progress – a task on which have started working but is not yet finished.
● Delegate – a task that has been assigned to someone else.
● Forward – a task due that is sent to a future date.
● Scheduled – a task that has been assigned a specific time, today.
● Canceled – a task that no longer needs to be done.
For iOS:
The default status is “Normal”. To change the task’s status:
• To quickly complete a task, click the circle next to it.
• Give a secondary click to the task and select a new status from the Quick
Option Menu
• Or give a secondary click, from the Quick Option Menu select “Edit” open
the task’s Information Card and select a new status.
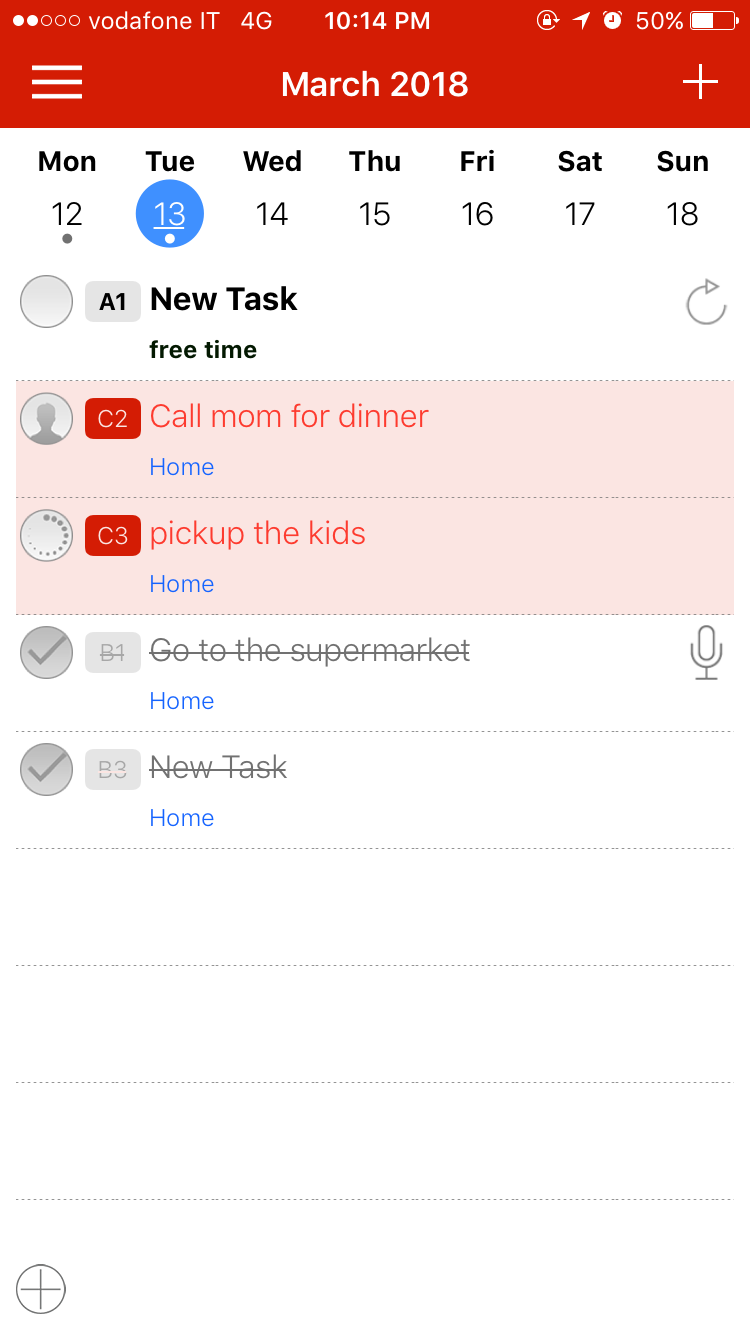
Please note that “Overdue” is not a status that can be selected, instead overdue
tasks will show in your Daily Tasks List, they will preserve their priority but will
appear in red color to get your attention.
Scheduling a Daily Task
A scheduled task is a task that has been assigned to a specific time of the day.
To change the task’s status you will need to drag the task to the Schedule, access
the Quick Option Menu or the Task Information Card and change the status.
Once this is done the corresponding icon will be shown.
To create an Event from a Task or to separate some time for any given task,
simply:
- Click over the task to select it
- Hold the click, and
- Drag the task to a specific time slot from your Daily Schedule. You will
notice the task’s status will automatically change to Scheduled.
IMPORTANT: The new event will be added to the Calendar that linked to the task’s
category. To learn more about linking task categories and calendars, please refer to
the “Editing Categories” section of this manual.
Also note that if instead of dropping the task on your Daily Schedule, you drop it
into one of the dates of the Calendar that appears above said schedule, the task
will be sent to that day’s Daily Task List.
Finally, if what you’d like is to be reminded of a task at a certain time and date,
instead of Scheduling add a Task Alarm. For more information see Task Alarms
section of this manual.
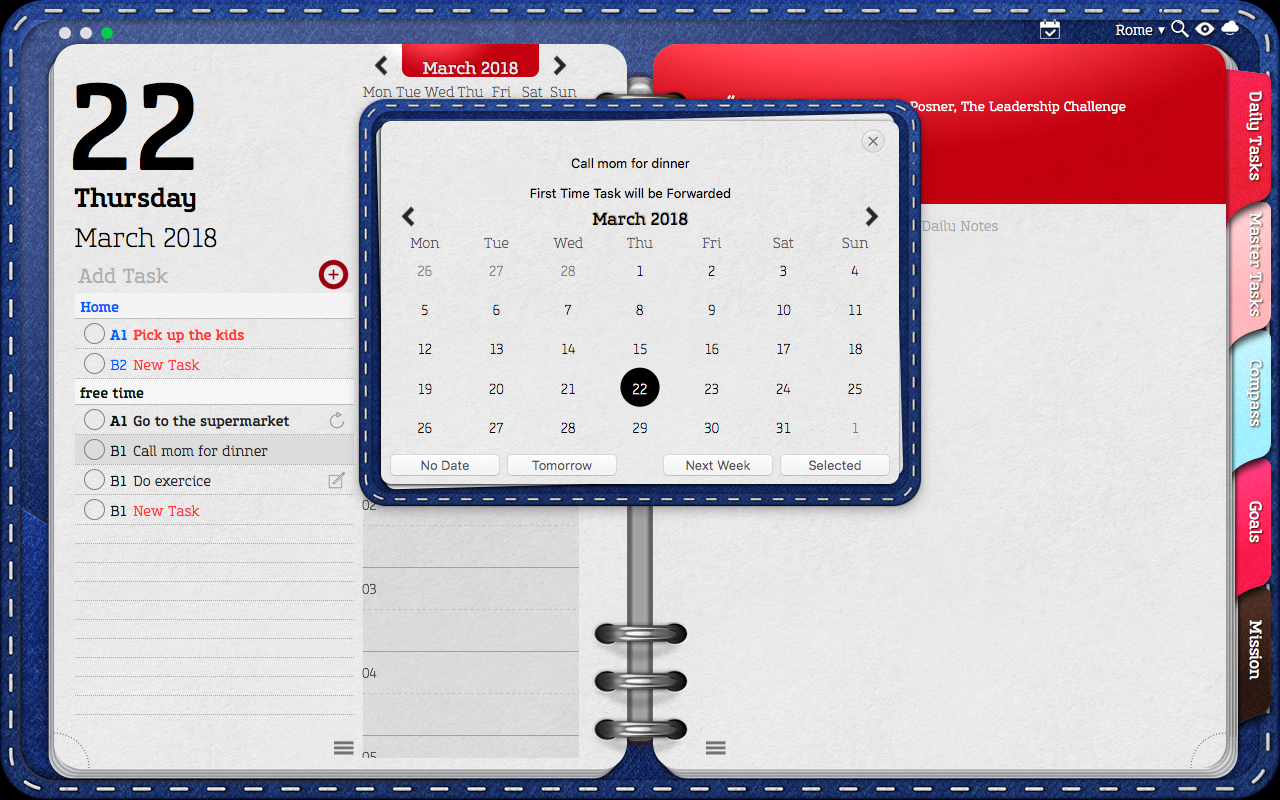
Forwarding a Daily Task
You can forward a tasks to a new due date in several ways.
1. Drag the task to a new date on the calendar located above the Daily
Schedule.
2. Give secondary click, open the Quick Option Menu, select Forward and
select the date to which you would like to send the task.
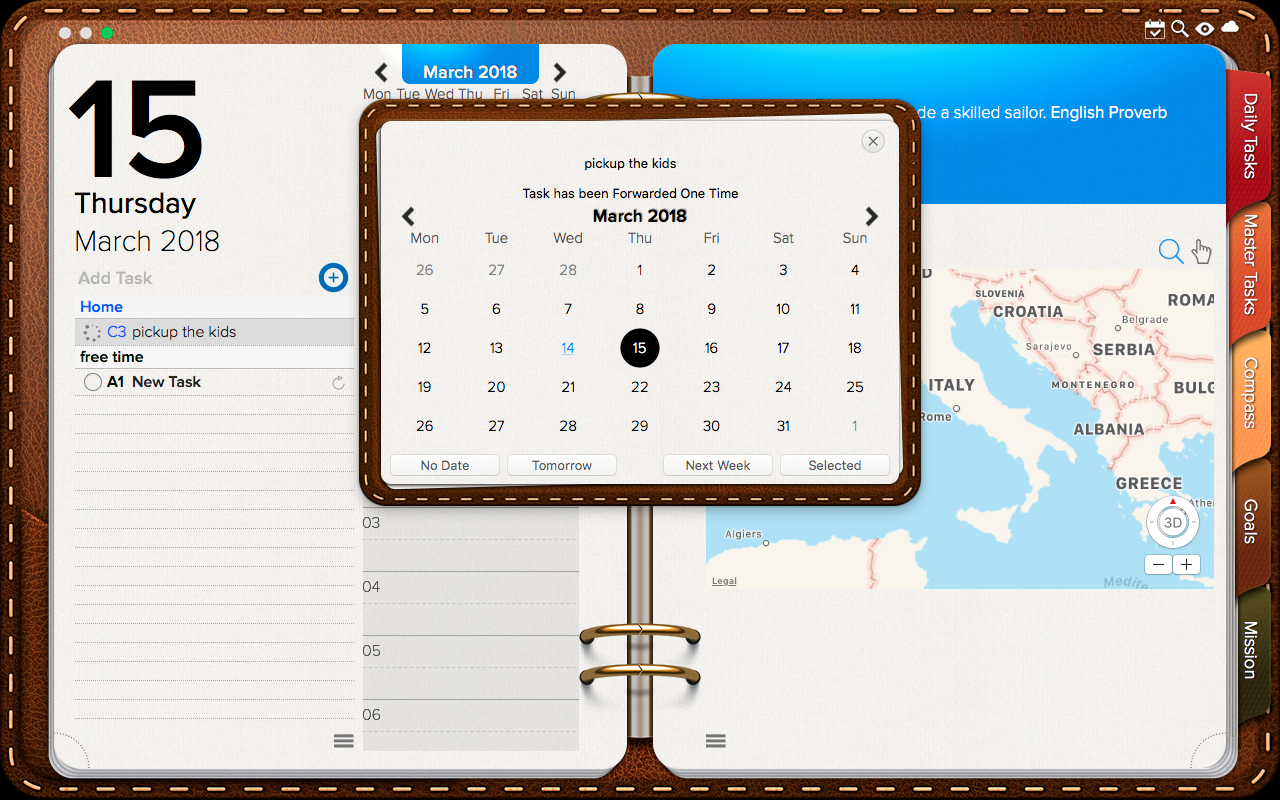
IMPORTANT: If you choose to use the Tomorrow & Next Week quick buttons.
Please consider that “Tomorrow” means the day after the current date not the date your looking at. For instance if today is January 1st and you are looking at the Daily Task List for January 3rd – when you click on “Tomorrow” the task will move to January 2nd not January 4th.
3. Access the task’s Information Card, by selecting Edit on the Quick Option Menu. And modify the task’s Due Date. If you choose to forward your task using method number 2, the task will remain on today’s Task List, as “Canceled” and it will also feature and arrow icon to show that this task was moved to a future date. The Forward feature will be disabled just for this task on this date (This means you cannot use the forward feature on a task that has a Forward Status).
In the event you remove or delete this task from the current Daily List it will remain on the date to which it was forwarded.
If you chose to use any of the other methods the task will be forwarded and will no longer appear on the Daily List. You will not be able to forward a task that has a Forward Status. To forward the forwarded task, you will need to go to the date to which the task was forwarded and re-forward it.
IMPORTANT: If you change the status of a task that has already been forwarded back to “Normal” – the task will appear both on today’s Daily Task List and on the list of the date to which the task was forwarded.
Cancelling and Deleting Tasks
Cancelling a task will keep the task on your list, at the end with a strikethrough.
Task’s information such as: Priority, Category, Time Zone and Notes will not be
affected.
Deleting a task will remove it from today’s list along with its information.
To cancel or delete several tasks at once:
1. Press the Command Key (⌘) and select the tasks.
2. Give a secondary click for the Quick Option Menu to appear.
3. Select “Cancel” or “Delete”.
For Mac:
For iOS: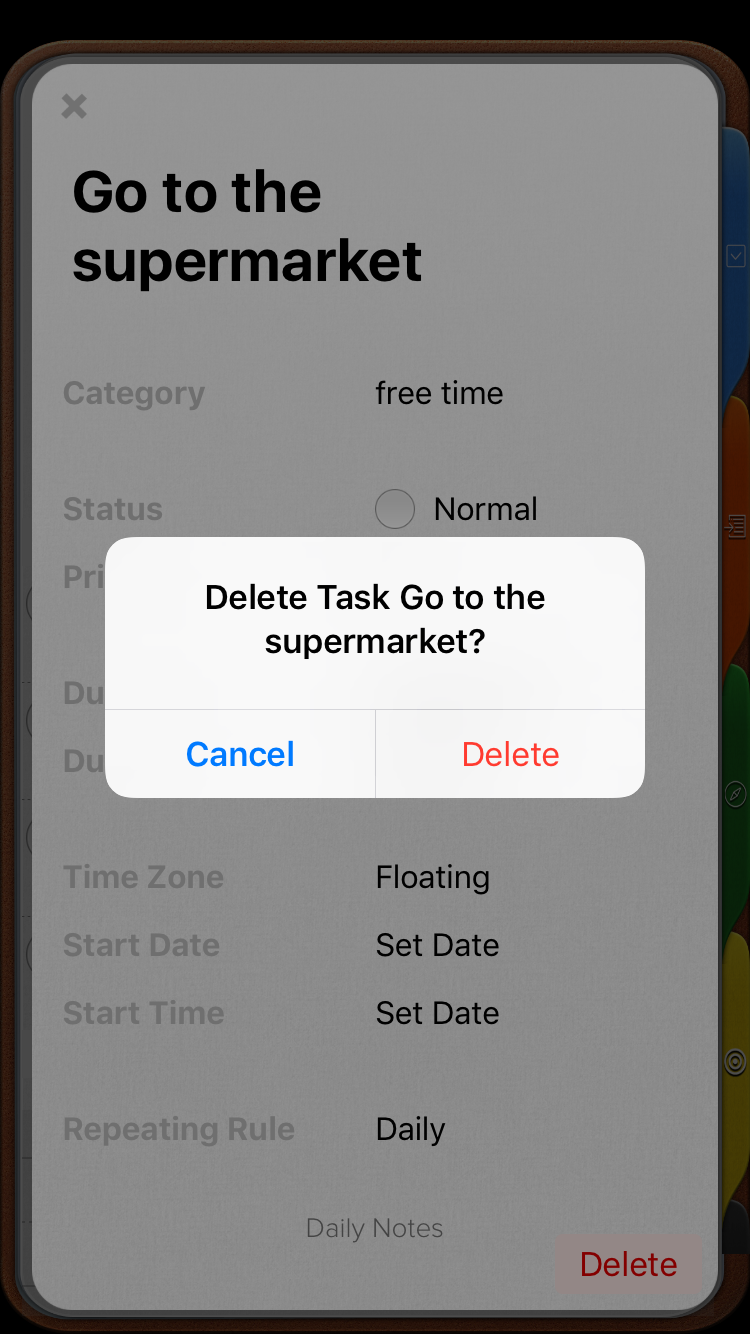
If you Cancel or Delete a task with a Forward Status, this task will only be
removed from the original date, but it will remain on the Task List of the date to
which it was forwarded.
Converting Daily Tasks to Master Tasks
Opus One has two separate lists one for today’s to dos (Daily Task List) and one
for tasks with unassigned due dates (Master Task List)
To send items from the Daily Task list to the Master Task list:
1. Select a task
• To select more than one task Press the Command Key (⌘) and select several
tasks.
2. Give a secondary click for the Quick Option Menu to appear.
3. Select “Send to Master Tasks”.

Another way to transform a Daily Task into a Master Tasks is by removing the due
date. You can do so by;
1. Giving a secondary click.
2. Select “Edit”.
3. Click “Due Date” and select “No Date”
Or
1. Select a task and give a secondary click.
2. Select “Forward”.
3. And select “No Date”
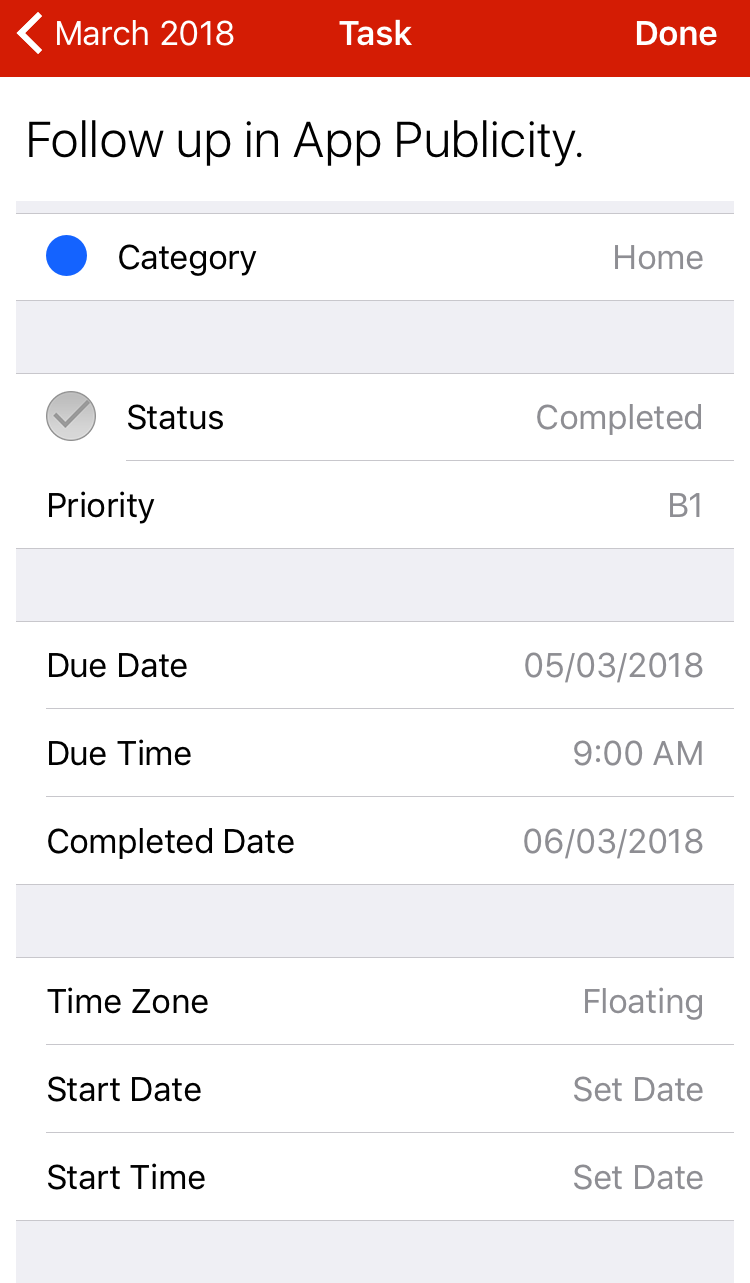
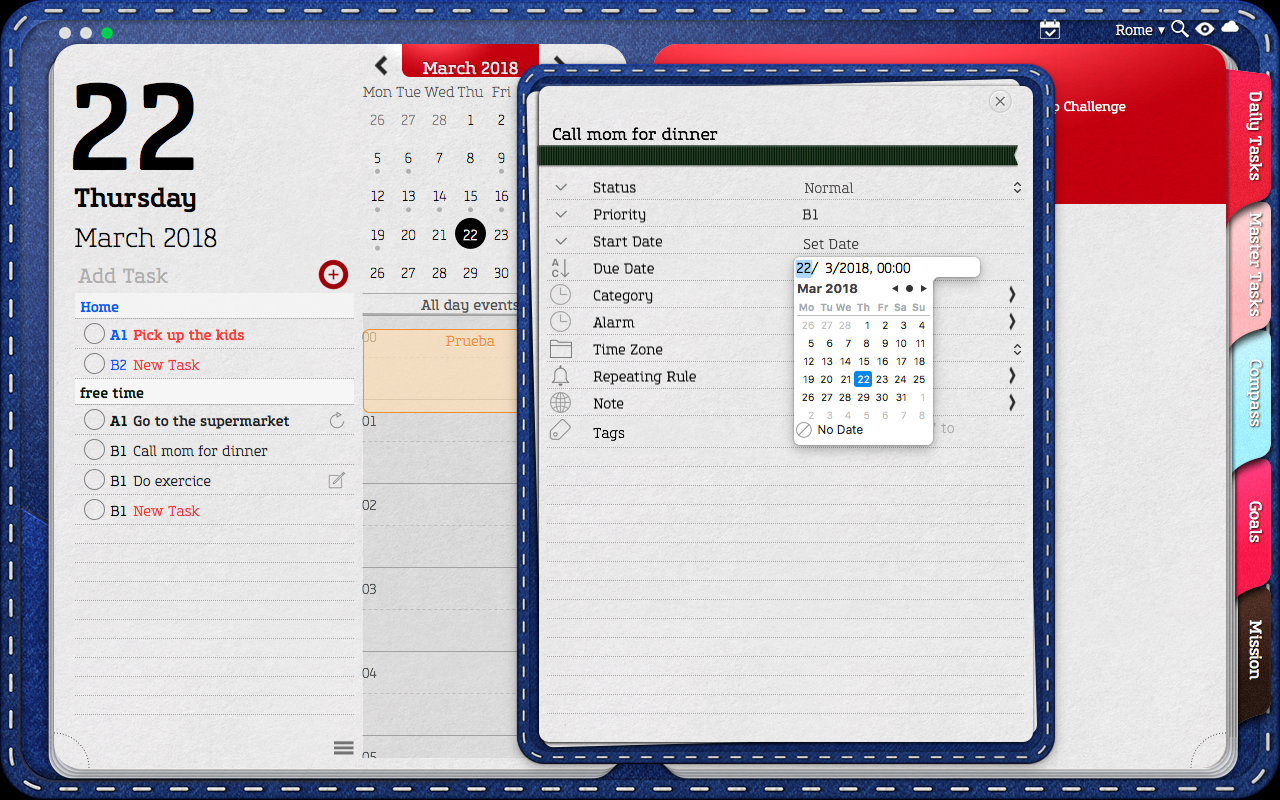
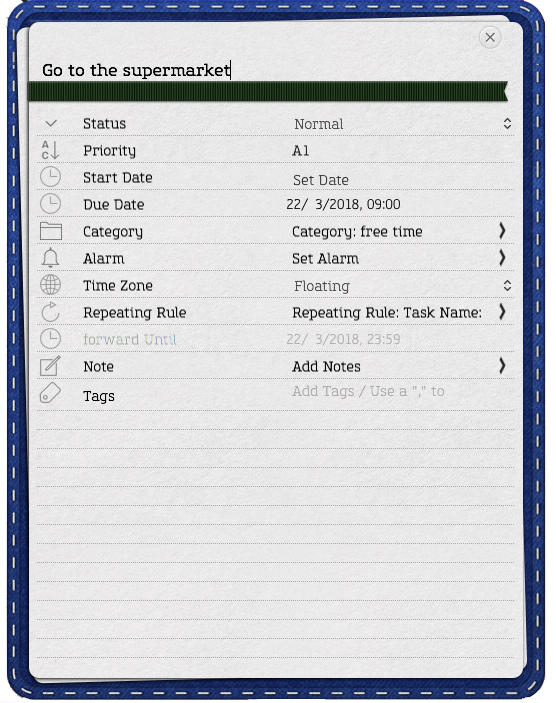
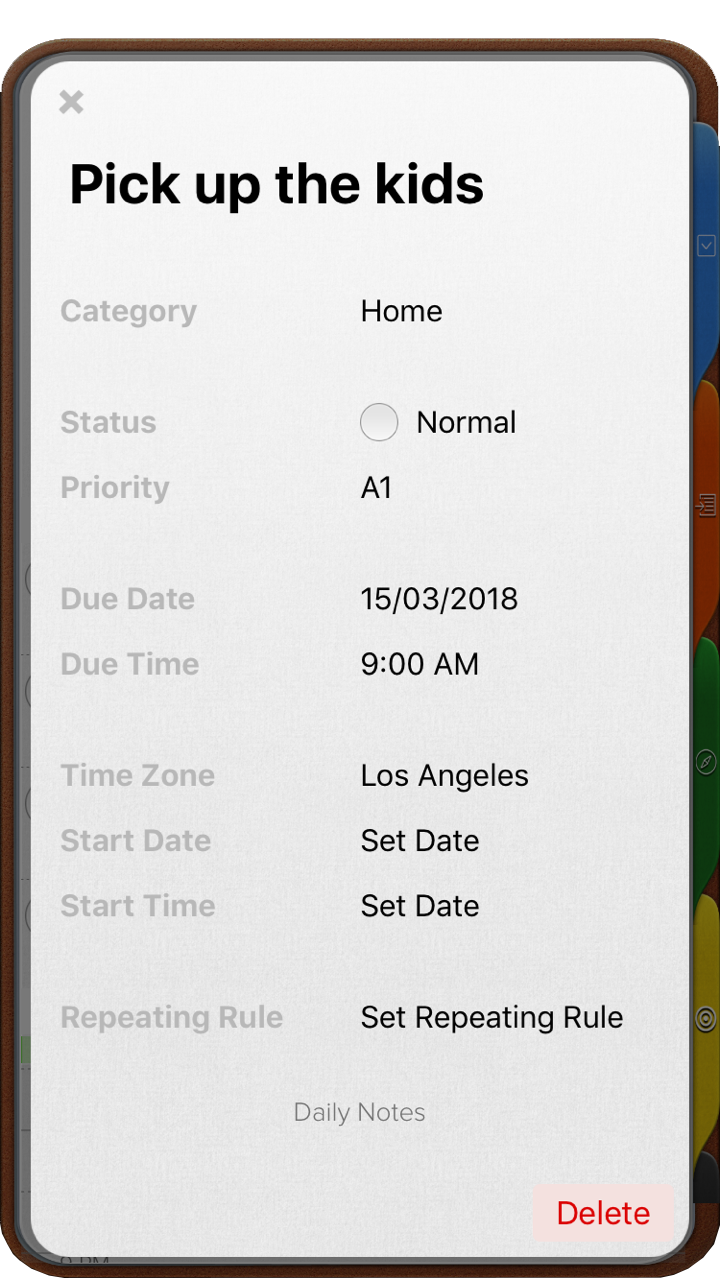
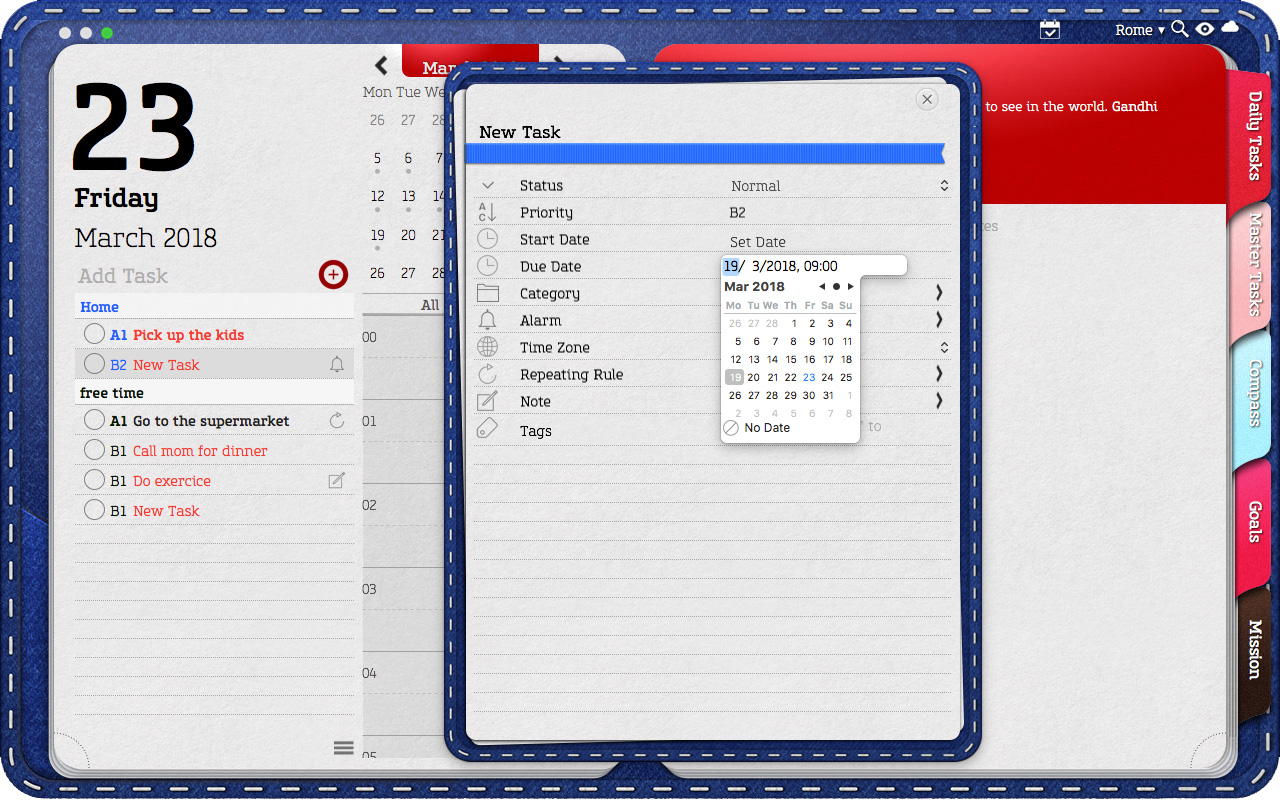
Task’s Information Card
To access a task’s Information Card give a secondary click to any task and select
Edit.
A new window will appear where you will be able to see and edit information
related to this task such as:
● Status
● Priority
● Start Date
● Due Date
● Completed Date
● Category
● Time Zone
● Repeating Rule
● Notes
● Tags
For information on how to add, edit and delete the Status, Priority and Category
please refer to the corresponding sections.
The rest of the items on the task’s Information Card will be described on the
following sections.
Adding a Start & End Date to a Daily Task. (Tasks shown several days)
You do not need to add a start & end date to each task, however if a task will take
more than a day to be completed or if you’d like to be reminded that a specific
task is due several days in advance you can do so using this feature.
To edit a task’s Start & End Date:
1. Open the task’s Information Card.
2. Click twice over the date. By default the current date will be assigned as the
start date.
3. To change this either select a new date from the calendar that appears (using
the arrows to move between months) or type it. To type a new date, select the
day, month or year field and when it is highlighted simply enter the data.
Additional notes:
- Multi-day tasks appear in your Daily Task List every day from the Start Date to
the selected End Date.
- As this is one task that lasts for several days (and not a repeating task)
- If you change the Priority or Category for this task on any of the dates
mentioned above, the change will be reflected in all dates. - Task will not appear as Overdue until after the selected “End Date”.
- When you mark this task as completed:
- “End Date” field will be automatically filled.
- The task and its information will be stored in that day’s Daily Task List.
- The task will disappear from all other dates.
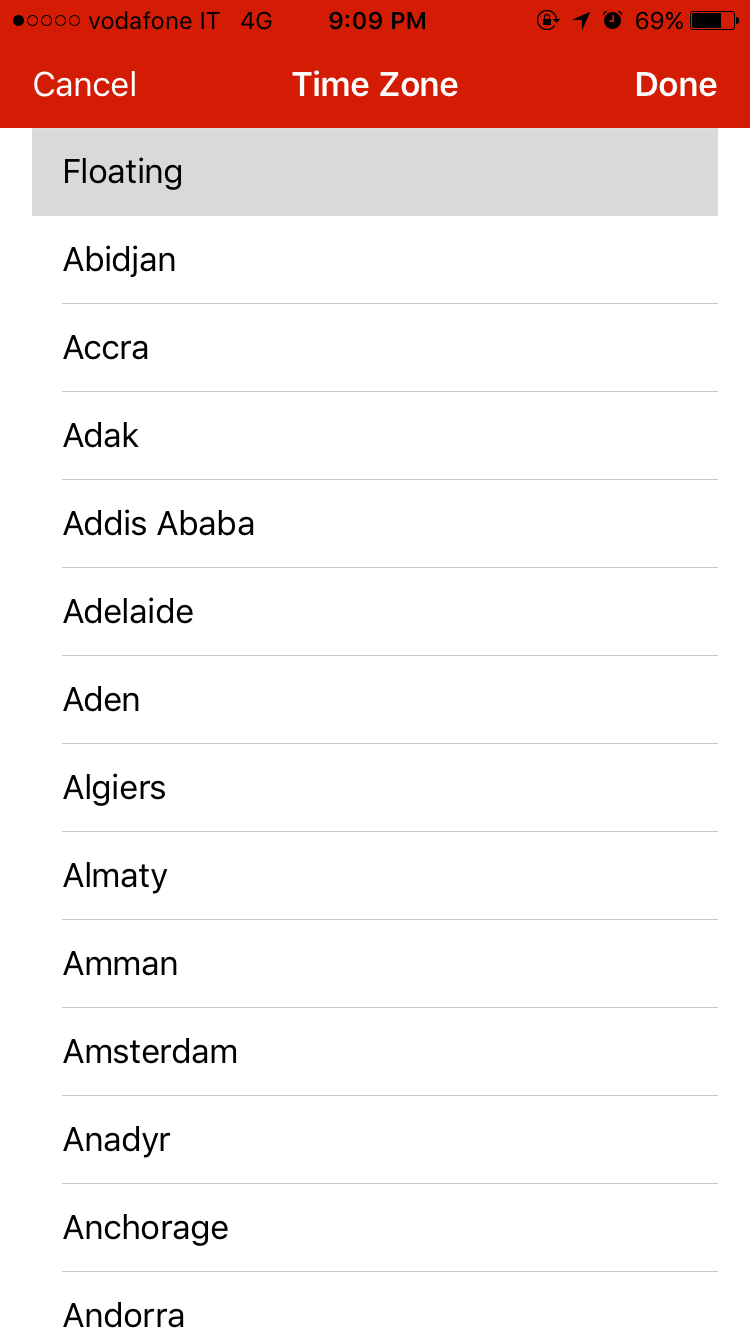
Setting Specific Time Zones for Tasks
Whenever you add a task it is assigned a Floating Time Zone, the task is not tied
to a specific time zone, therefore if you travel between time zones the task will
move along with you.
Basically this means tasks added at home might end a day forward or a day past
when travelling and tasks added while travelling may move a day before or after
once you get back home.
The following example illustrates this better:
If you are based in California will travel to Tokyo next Monday and you
need to run some errands there, you might want to add these tasks on
Monday and then set their Task’s Time Zone to Tokyo.
While you’re still in California these tasks will be appearing on Sunday’s
Task List – however once you arrive to your destination the tasks will show
on the right date.
This ensures that the tasks will show with a normal
status on the right date, instead of showing as overdue or a day after.
You can avoid this by setting a specific time zone for a task as follows:
1. Give a secondary click to the task.
2. Select Edit.
3. Open the task’s Information Card.
4. Go to “Time Zone” and select from the drop down menu.
For Mac: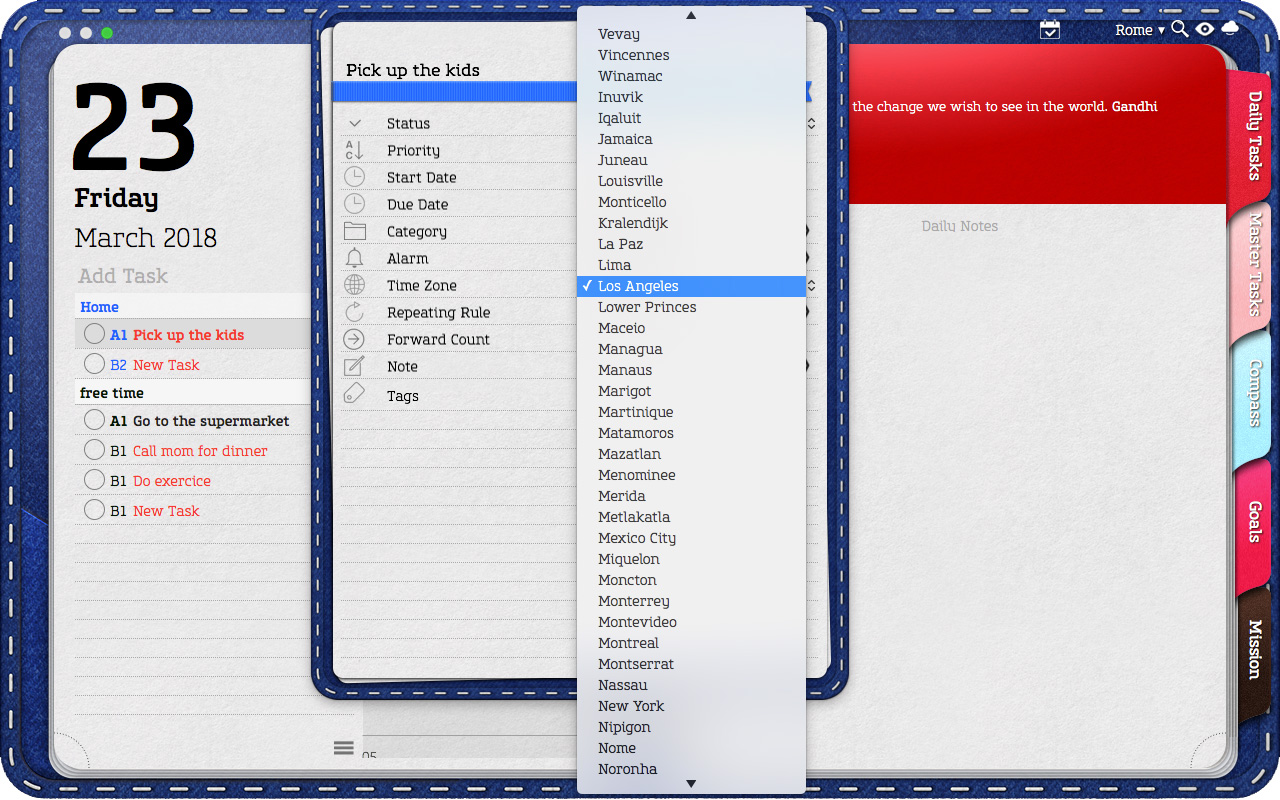
For iOs:
 |
 |
IMPORTANT: Repeating Tasks must have a Floating Time Zone. If tied a task to a specific time zone and then added a repeating rule, the task’s Time Zone will automatically be changed to Floating.
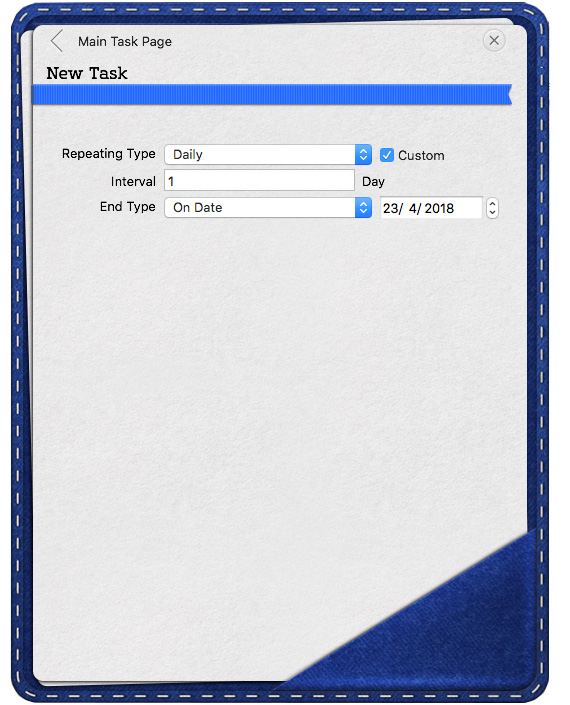
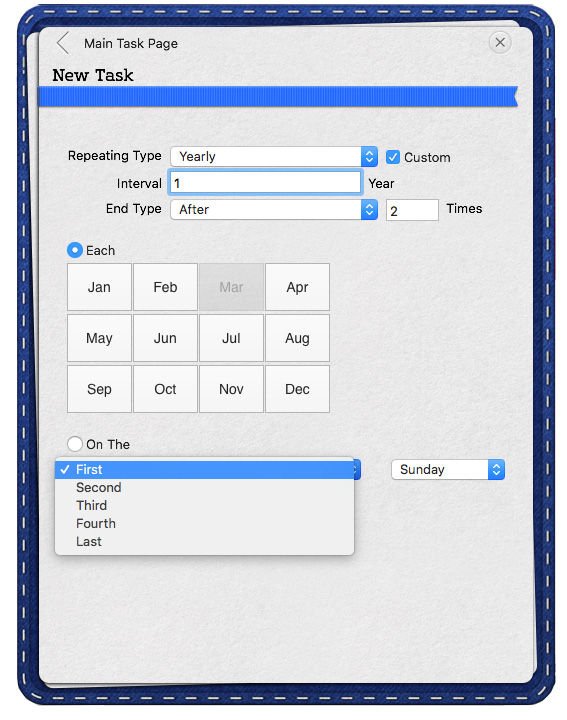
Repeating Tasks
To set a repeating rule:
1. Enter or select a task.
1. Give a secondary click to open the task’s Quick Option Menu.
2. Select “Edit” for the task’s Information Card to open.
3. Click “Set Repeating Rule”
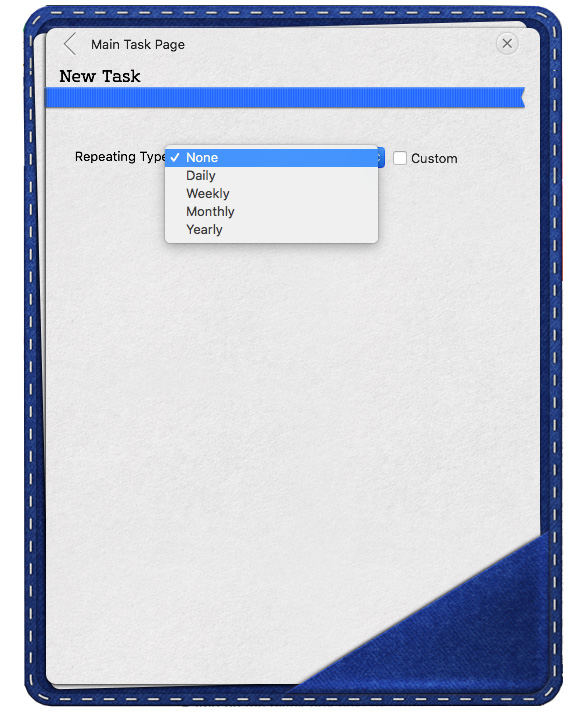
4. Choose the Frequency in which you’d like the task to be repeated, from the available options.
• Daily
• Weekly
• Monthly
• Yearly
• Custom
5. Set an End for the Repeating Rule. If you don’t set an end date, the task will repeat endlessly over time.
If you’d like for the repeats to end at a specific date:
● Go to the option box that says, “Ends” select On Date,
● Set an ending date by clicking on the calendar shown.
If you’d like the repeats to end after a number of instances:
● Go to the option box that says, “Ends” select “After”,
● And on the blank box next to “After”, type the number of repeats after
which the task should stop appearing on your lists.
Or if you’d like to end the repeats immediately:
● Switch the frequency to “None”.
IMPORTANT:
- Repeating tasks cannot be set to a specific Time Zone.
- The Forward status is disabled for Repeating Tasks.
- Overdue repeating tasks roll over but they will only appear in the Daily Task List
until:
• Marked Complete
• Or when the next repeat is due.
- If you add Repeating Rules to tasks that have a Start Date different than its
Due Date, only the Due Date will be repeated.
- Master Tasks (tasks without due dates) does not support repeating rules.
Editing Tasks with Repeating Rules
These tasks can be edited in the same way as other Daily Tasks.
It is important to remember that is One task that repeats overtime, and not several different tasks. Therefore changes to the repeated task’s:
● Alarm
● Category
● Notes or
● Tags
Will affect all the repeats. Past occurrences and future occurrences will be affected all the same.
Changes to the repeated task’s priority and status will only have effect in the Daily Task List of the day in which they were modified.
Editing Repeating Rules
There are two ways of doing this:
1. Using the task’s Information Card:
- Give a secondary click to a task and open its Quick Option Menu.
- Select “Edit” for the task’s Information Card to open.
- Click “Set Repeating Rule”
- Adjust the frequency and/or the end for the repeats.
2. Drag & Drop.
- Select a task with a repeating rule.
- Drag it to a new date in the small calendar above the Daily Schedule.
- When prompted if you’d like to change the rule for “Only This” instance or “All
Future” repeats:
• To create a separate instance no longer affected by the repeating rule – and keep the repeats as they are – select “Only This”.
• To affect the repeating rule, select “All Future”.
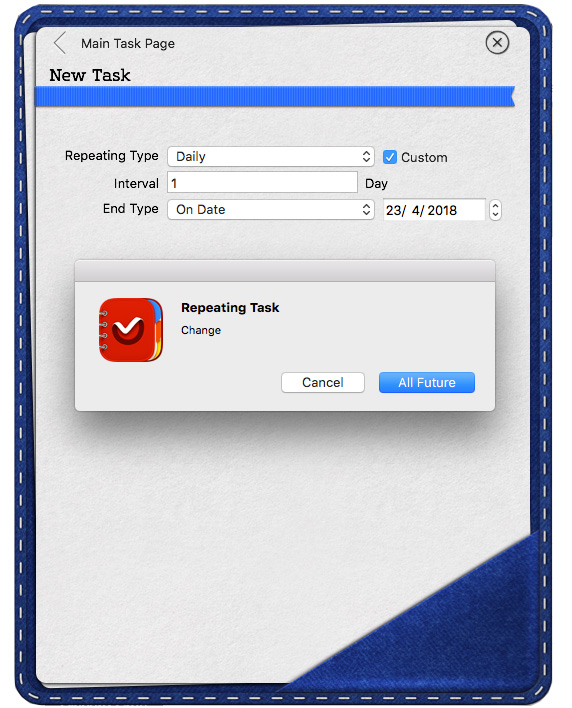
IMPORTANT: If the task was set to end on a specific date i.e. December 31st or after a number of repeats, dragging the task to a new date will not change this.
Preset and Custom Repeating Rules
Opus One allows you to see the following types of repeating rules:
• *None. *The default status for all tasks.
• Daily. Tasks will appear every day. For a task to be repeated every 2 or 3
days set a Custom Daily repeat instead.
• Weekly. Task will be repeated every week on the same weekday in which the task was added. For a task to repeat Tuesdays & Thursdays or every 2 weeks on Tuesdays set a Custom Weekly repeat instead.

• Monthly. Task will be repeated every month on the same calendar day in which the task was added.
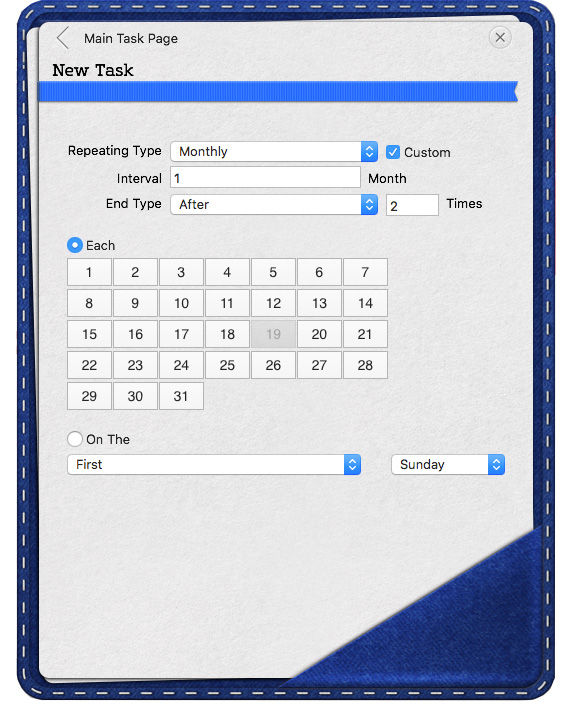
For a task to be repeated:
• Twice a month,
• On the fourth Thursday of every month, or
• The 1st Sunday of the month every two months
Set a Custom Weekly repeat instead.
• Yearly. Task will be repeated every year on the same date. For a task to be repeated the 4th Thursday of November every year set a Custom Yearly repeat instead.
Overdue tasks with Repeating Rules
If a task with a repeating rule is not completed by the time the next occurrence is due it will be automatically replaced by the most recent task.
Cancelling and Deleting Tasks with Repeating Rules
Cancelling a task with a repeating rule will keep the task on the day’s Daily List at the end with a strikethrough. It will not affect the task’s information or the repeating rule and it will have no effect on past or future repeats.
When Deleting a task with a repeating rule you will prompted whether to remove
“Only this” repeat or “All Future” repeats.
• Choosing “Only This” will delete only the chosen repeat.
• Choosing “All Future” will delete the current and all future repeats but it will have no effect on past repeats.
Forward Count
This feature keeps record of how many times you have changed the due date for a specific task.
The Forward Count is increased by one every time you change a task’s due date:
- Using the forward feature from the Quick Option Menu;
- By editing the task’s Information Card; or
- By dragging & dropping the task to a different date.
- Moving a task to a date before it’s original due date will also increase the forward by 1.
Task’s Notes
To add a note to any of your tasks proceed as follows:
1. Give a secondary click to open the task’s Quick Option Menu.
2. Select Edit for the task’s Information Card to open.
3. Click anywhere on the Notes line.
4. A new window will open. You can either start typing or scroll down to the
bottom for more options (Add pictures, checklists, etc).
You can add notes on any of the following formats:
● Text
● Pictures
● Checklists
● Drawings
● Audio Notes
For more information on each kind of notes, please refer to the Daily Notes section of this manual.
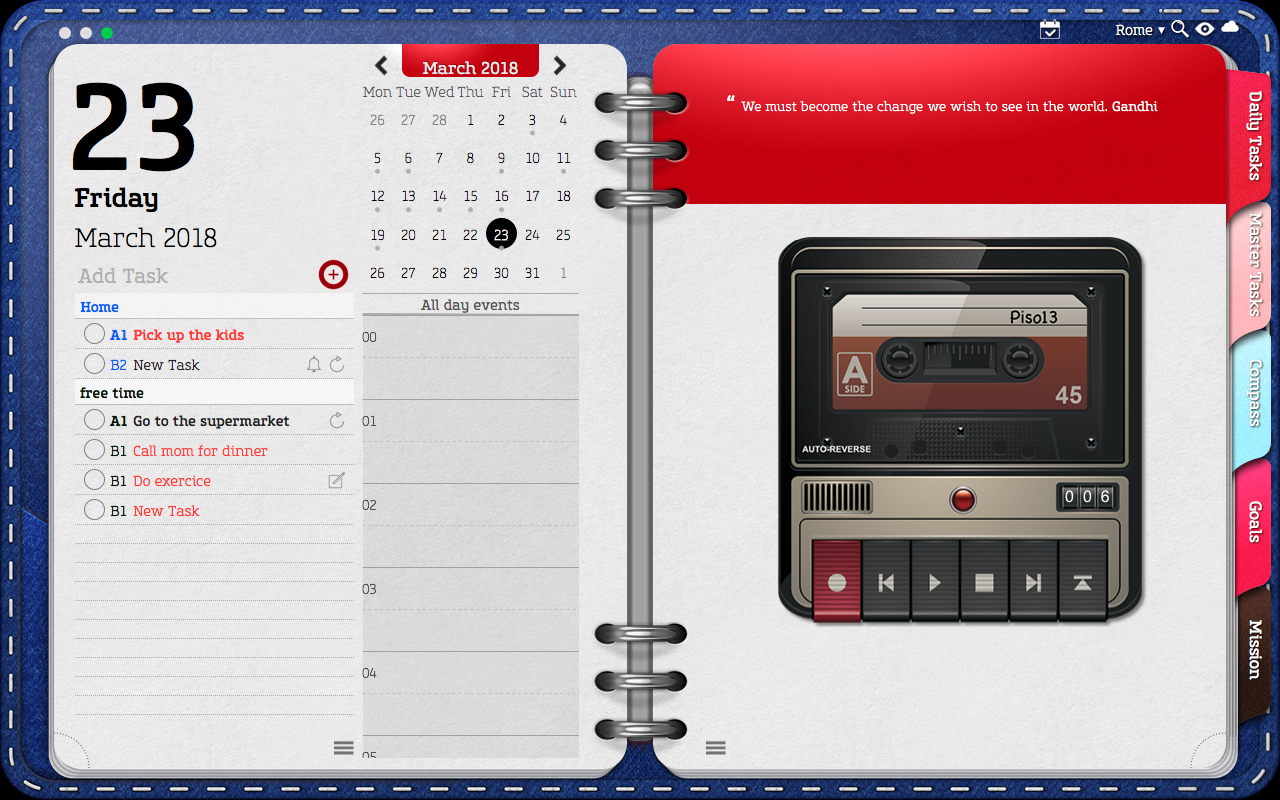
6. When finished simply close the window using the “x” button. When adding an audio note, press Stop (☐) before closing the window.
IMPORTANT: When adding notes to a Task with a Repeating Rule these will be shared by all of the repeats. This means anything you add to or delete from a single repeat will be added or deleted on all of them.
For more information on the different kind of notes you can add please refer to the Notes section of this manual.
Task’s Tags
Adding tags to tasks will allow you to search and find information faster. Tags may
contain alphanumeric characters, special characters and spaces.
You can add as many tags as you like. To add tags,
1. Create or select a task.
2. Give a secondary click to open the task’s Quick Option Menu.
3. Select “Edit” for the task’s Information Card to open.
4. Enter tags on the corresponding line. If adding 2 or more tasks separate them using commas.

Post your comment on this topic.