
An advanced method to have your entire model represented in white, while still using Skalp Pattern Textures in the Section itself. This can be used to create really professional plans and elevations.

This method uses special Skalp generated Pattern layers in combination with SketchUp’s ‘Hidden Line’ and ‘Color by Layer’ function.
Setting this up Step by step:
- Create a Skalp Section, and properly associate it with a Scene. Use ‘save Skalp settings to Scene’ if necessary. Check your scene.
- Organize your model and Skalp Style according to any of the previously explained methods using , Pattern ‘by Object’, ‘by Layer’, ‘by Texture’. You may use Override Rules, or configure the Skalp Style any way you like but make sure the end result maps all cutting results into Skalp Patterns. We are now going to take these Patterned section results, and have them placed on separate dedicated layers.
- Tweak your Skalp style so that it uses ‘Skalp Pattern Layer’ as the default section destination layer.

This is a special modus that actually does more than placing the section results on one special layer. Using this setting Skalp will auto create (on the fly) several new and dedicated layers as needed, one for each Skalp Pattern used in the section result. These layers will be named:
‘Skalp Pattern Layer – ‘
- Optionally, instead of relying on the automatic Pattern layer creation, you might want to pre-create all these layers at once in advance to simplify setting up your office standard. To do so: Create the special Skalp Pattern Layers from the menu: ‘Create Skalp Pattern Layers’
- Next: manually assign a Skalp Pattern texture to each layer in the the SketchUp layer dialog. One by one click on the ‘Color’ samples next to each layer. This will bring up the following:

Assign a desired Skalp Patterns to each such ‘Color’ field by picking a Skalp Pattern from the SketchUp ‘Colors’ dialog. (You can only pick those Skalp Patterns that you created before using the Skalp Pattern Designer). Repeat the process for each Skalp Pattern Layer.
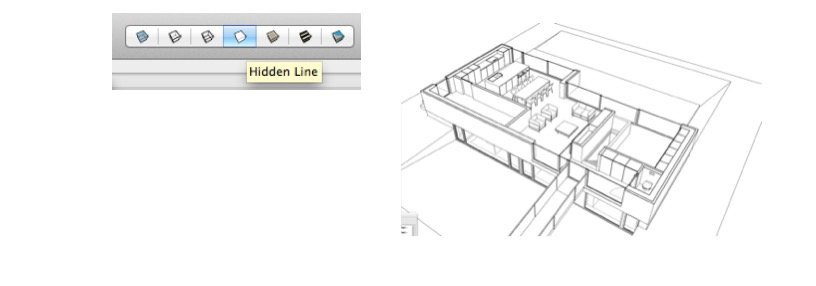
- Now set SketchUp to use ‘Hidden Line’. The entire model will now be shown in white.
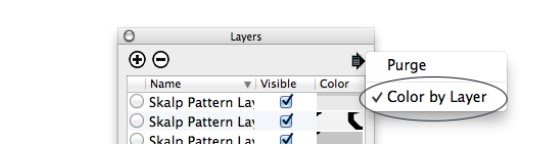
- Activate Sketchup’s ‘Color By Layer’ function from the layer dialog.
This is the heart of the trick: Hidden Line will show the entire model in white with one special exception: Textures assigned to layers will still be shown when using Color by Layer.
Notice that while pure Colors assigned to layers do get blanked out when setting ‘Hidden Line’, textures on the other hand ‘escape’ under the whitening radar. We consider this a rather unknown SketchUp ‘feature’. You might even consider this a strange exception, but in this case it provides exactly the functionality needed.
- Now you should see the Skalp Section including its Skalp Patterns in a white model context:

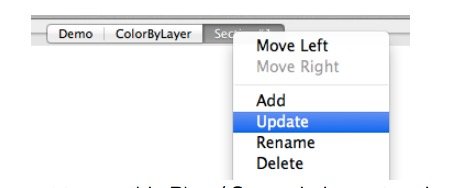
- Save or update your Sketchup style.
- Choose your projection mode (e.g. align viewport perpendicular to the section and use Parallel Projection)
Finally update your scene to use this style and view settings
- If you want to use this Plan / Scene in Layout make sure to always use ‘Update all Scenes (for Layout)’ from the menu before updating your referenced model in Layout.
Post your comment on this topic.