The Lightning Conductor App can be configured to rollup SharePoint Online content from either a single site collection or across multiple site collections within the tenant/farm. This page contains documentation on:
- Lightning Conductor App Parts
- Configuring an App Part
- Using the Configure Lightning Conductor App dialog
- Exporting data to CSV file
- Exporting and Importing an App Part configuration data
Lightning Conductor App Parts
The Lightning Conductor App provides four App Parts:
- Lightning Conductor App Part. Preconfigured to use the Object Model Rollup Engine Provider.
- Announcements Rollup App Part. This App Part is preconfigured to aggregate the Announcements list type throughout the site collection. It uses the Object Model Rollup Engine Provider, displays the columns: Title, Expires and Body (displayed as HTML), sorted in descending order by the Created column, 30 items per page, is enabled for multiple views and has two views:
- Announcements (default).
- Recent Announcements. Uses filters to display announcements where Expires is greater than [TODAY] and Created within the last 30 days.
- Announcements (default).
- Documents Rollup App Part. This App Part is preconfigured to aggregate the Documents list type throughout the site collection. It use the Object Model Rollup Engine Provider, displays the columns: Name, Created, Modified and Modified By, sorted in descending order by the Created column, show item type icon, 30 items per page, is enabled for multiple views and has three views:
- My Documents (default). Uses filters to not display folders, and to display only documents Created By the person who views the page [ME].
- All Documents. Grouped by folders with an initial state of expanded.
- My Checked Out Documents. Uses filters to display only documents checked out to the person who views the page [ME] and where the content type is not equal to folders.
- My Documents (default). Uses filters to not display folders, and to display only documents Created By the person who views the page [ME].
- Tasks Rollup App Part. This App Part is preconfigured to aggregate Tasks list type throughout the site collection. It use the Object Model Rollup Engine Provider, displays the columns: Assigned To, Task Status, Priority, Due Date and % Complete. It is also configured to show 30 items per page, is enabled for multiple views and has three views:
- My Tasks (default). Uses a filter to display only tasks Assigned To the person who views the page, whether it is assigned directly to them or that they are a member of the group it is assigned to.
- All Tasks.
- My Overdue Tasks. Uses filters to display only tasks Assigned To the person who views the page, and the Due Date is less than [TODAY]‘s date.
- My Tasks (default). Uses a filter to display only tasks Assigned To the person who views the page, whether it is assigned directly to them or that they are a member of the group it is assigned to.
Configuring an App Part
To configure an App Part:
- Add an App Part to the page, and then configure the Lightning Conductor app part, using either one of the following steps:
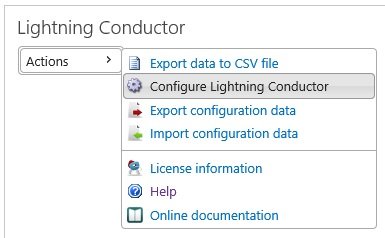
- When the app part is not configured for Multiple views, from the Actions menu click Configure Lightning Conductor.
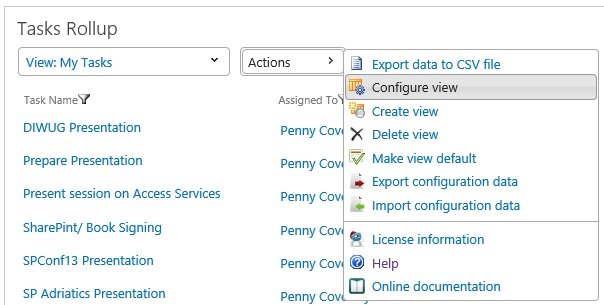
- Otherwise, from the View menu, select the view you wish to configure, and then from the Actions menu, click Configure View.
- When the app part is not configured for Multiple views, from the Actions menu click Configure Lightning Conductor.
- The Configure Lightning Conductor App dialog is displayed. Configure the necessary settings, starting with the App Part tab.
Using the Configure Lightning Conductor App dialog
The dialog consists of four tabs:
Once you have configured the app part, chosen the content to aggregate and how to display the content, at the bottom of the Configure Lightning Conductor App dialog, click Save.
The minimum configuration details you must provide are:
- On the Data Source tab:
- In the List/Item Types section, select a list type.
- In the List/Item Types section, select a list type.
- On the Columns tab, select at least one column.
Exporting data to CSV file
To export the data display from an App Part, from the Actions menu click Export data to CSV file. If the App Part is configured for multiple views, then you can only export data from one view at a time.
Exporting and Importing App Part configuration data
Importing and Exporting of configuration data allows you to export the settings and import them again between different environments. such as, from your staging environment to your production environment.
To export the configuration of an App Part:
- Add an App Part to the page, and then configure the Lightning Conductor app part.
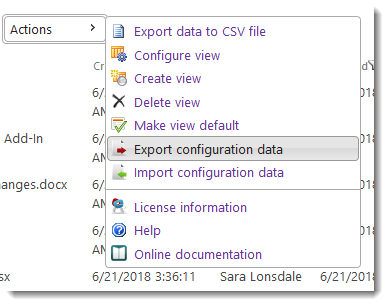
- From the Actions menu click Export configuration data.
- When the App Part is configured for multiple views, the Choose Export Type dialog is display. To save the configuration data for all views, clear the Export settings for current view check box.
Click OK. The browser may then ask you to allow pop-up.
- Save the Lightning Conductor Configuration data file, amending the name of the file to represent how you configured to App Part.
To import the configuration of an App Part:
- Add an App Part to the page.
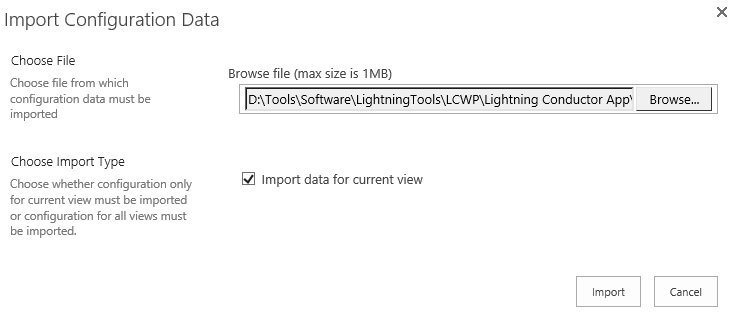
- From the Actions menu click Import configuration data to display the Import Configuration Data dialog.
- Click Browse to display the Choose File to Upload dialog box.
- Navigate to where you save the configuration data file, and then click Open.
- When the App Part is configured for multiple views, then a Choose Import Type section is displayed on the Import Configuration Data dialog. Clear the Import data for the current view check box if you want to import all the views.
- Click Import.


Post your comment on this topic.