| |
This is the Camera icon that represents the Primary Stream. |
| |
This is the Camera icon that represents the Secondary Stream (if applicable). |
| |
This is the Camera icon that represents a disabled camera stream. |
Streams
A camera stream is a profile with all of the basic settings used by Orchid Recorder to record video from the camera. Orchid Recorder and Orchid Fusion/Hybrid VMS support multiple active streams. Each of the available camera streams will be either a Primary stream, a Secondary stream, or a Disabled stream. You can identify them (and assign them) as described below.
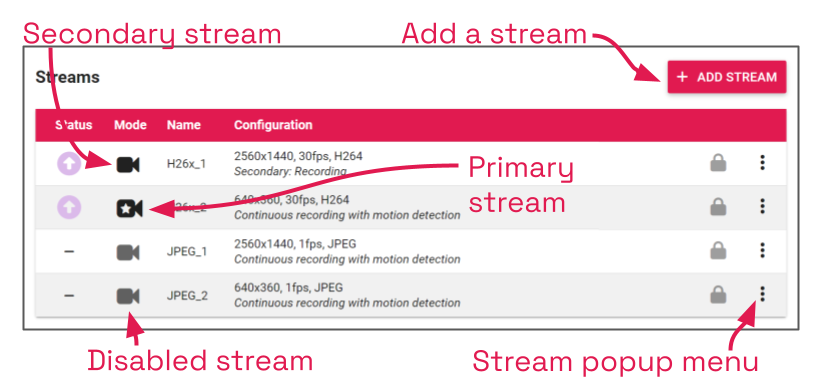
- To reassign a stream, click the Camera icon located in the Mode column to the left of the name of the stream you want to change. A pop-up menu will appear.
- Click on the Primary camera icon (
) to make this the Primary stream. (The original Primary stream will become disabled.)
- Click on the Secondary camera icon (
) to make this the Secondary stream. (You may have more than one Secondary stream. Keep in mind, however, that each stream that is set to record video will consume additional storage space.)
- Click on the Disabled camera icon (
) to make this an inactive stream.
- Click on the Primary camera icon (
Camera Stream Pop-Up Menu
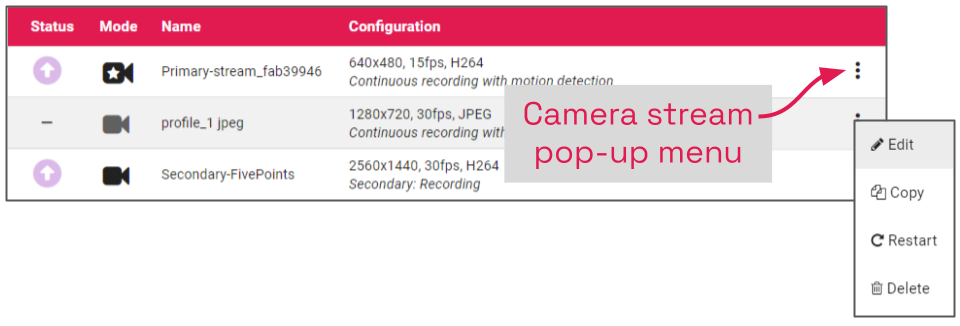
To the right of each camera stream, you’ll find a pop-up menu.
- Click on the menu to work with each camera stream. (The contents of the pop-up menu will vary based on the stream.)
| |
This is the Edit pencil icon. Click this icon to make changes to the stream settings. |
| |
This is the Copy Stream icon. Click this icon to copy these stream settings to other camera streams. |
| |
This is the Restart icon. Click this icon to refresh the connection to this camera stream. This option is not available on inactive streams. |
| |
This is the Delete icon. Click this icon to delete the camera stream. This option is not available on locked streams. |
- To edit a stream, click the stream’s pop-up menu and then click the Edit pencil icon. After clicking the Edit icon, a screen will appear with all of the stream settings available for editing.
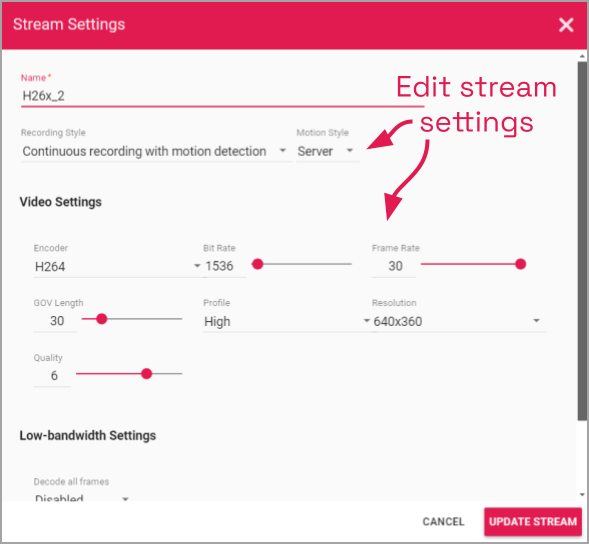
- Review or change the stream name so users can easily identify the camera stream. (This is especially helpful on Primary and Secondary streams.)
- Review or change the Recording Style for the camera stream. (Review the information below before making a selection.)
Recording Style
Orchid Recorder offers five different recording styles to choose from. These recording styles will impact video availability (as shown in the descriptions and table below). (Secondary streams are limited to the following recording styles: Continuous Recording without Motion Detection, and Proxy Only.)
- Continuous Recording with Motion Detection: Orchid Recorder will continuously record video from the camera and perform motion detection. This is the default and recommended setting. (This recording style is not available on Secondary streams.)
- Continuous Recording without Motion Detection: Orchid Recorder will continuously record video from the camera, but will not perform motion detection. This option offers a modest reduction in CPU load on the Orchid Recorder.
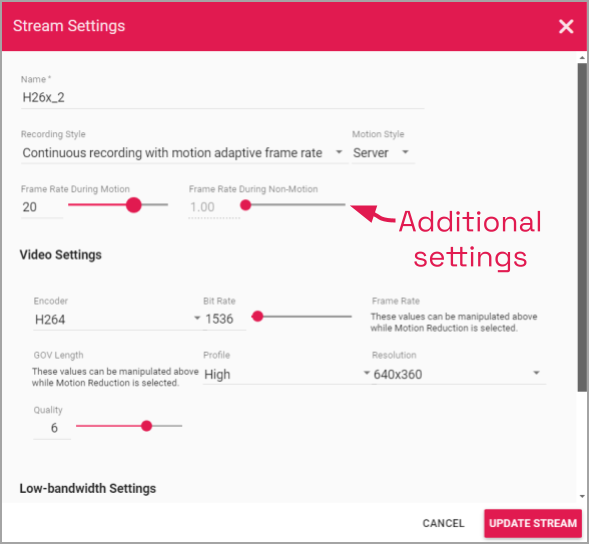
- Continuous Recording with Motion Adaptive Frame Rate: Orchid Recorder will record at a higher frame rate while motion is detected, and a different (slower) frame rate while no motion is detected. These frame rates are user-selectable (as shown in the screenshot following the table). Due to the way H264 compresses video, this recording style typically shows significant savings in disk usage only for inexpensive cameras with noisy sensors, or cameras in low-light environments. (This recording style is not available on Secondary streams.)
- Proxy Only: Orchid Recorder will provide live video from the camera but will not record video.
- Recording Only When Motion Detected: Orchid Recorder will only record video from the camera when motion is detected. This may result in a reduction in disk usage on the Orchid Recorder, however, motion detection accuracy may vary and result in video loss. (This recording style is not available on Secondary streams.)
| Continuous recording with motion detection – Default | Continuous recording without motion detection | Continuous recording with motion adaptive frame rate | Proxy only, no video will be recorded | Recording only when motion is detected | |
|---|---|---|---|---|---|
| Recording and playback are available | Yes | Yes | Yes | No | Yes – When motion is detected |
| Live view is available in low-bandwidth mode | Yes | No | Yes | No | Yes |
| Thumbnail previews are available | Yes | Yes | Yes | No | Yes |
Motion Style
If you choose a Recording Style with motion detection, Orchid Recorder will allow you to select either camera-based or server-based motion detection for each camera stream. (For more details on these Motion Styles, please refer to the Orchid Recorder Administrator Guide.)
- Use the Recording Style drop-down list to select a new recording style.
- If you select a Recording Style that includes motion detection, you may need to make additional selections.
- Use the Motion Style drop-down list to select a motion style. Options include Camera and Server (the default).
- If you select the Camera motion style, use the Camera Event drop-down list to select the criteria the camera will use to detect motion. Available selections will vary based on the camera and may require some experimentation. (For more details on Camera Events, please refer to the Orchid Recorder Administrator Guide.)
- Use the Motion Style drop-down list to select a motion style. Options include Camera and Server (the default).
- If you select the Continuous recording with motion adaptive frame rate recording style, you will need to set both the Frame Rate During Motion and the Frame Rate During Non-Motion. (The Frame Rate During Motion will dictate the available settings for the Frame Rate During Non-Motion. Allowable settings for the Frame Rate During Non-Motion range from 1 up to a setting that is less than or equal to the Frame Rate During Motion.)
- If you are editing a Secondary stream, you will notice that the Recording Style drop-down list will only offer two options: Recording and Proxy. The Recording setting will provide continuous recording without motion detection, and the Proxy setting will provide live video only.
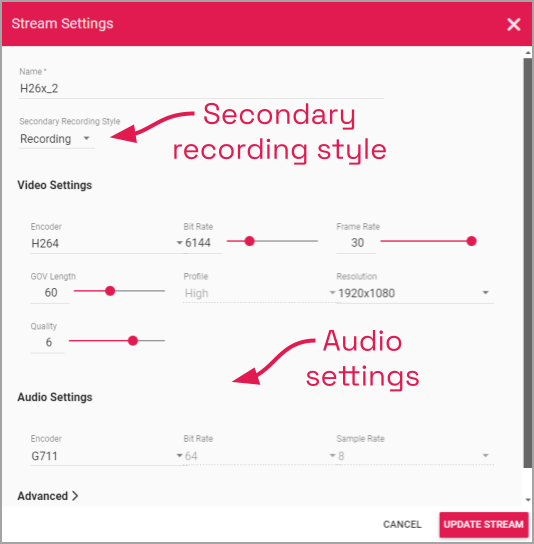
- Continue to review and change camera stream settings for video, audio and bandwidth as needed. Refer to the definitions below for help in selecting settings.
Video Settings
Each camera type reports its own default values provided by the camera manufacturer. Use those default values unless otherwise noted.
- Encoder: The type of compression used for the camera’s video. In WebRTC mode, Orchid Recorder only supports H264 video. In Low-bandwidth mode, Orchid Recorder supports JPEG, MPEG4, and H264 (recommended). (Available selections depend on the camera.)
- Bit Rate: The target data size (in kilobits per second) of the compressed video. Increasing this value will typically improve image quality at the expense of increased disk usage and reduced retention. In WebRTC mode, bit rates of 2000 kbps or less tend to work best. The default value is recommended.
- Frame Rate: The number of frames per second transmitted within the video stream. Most Orchid Recorder users are best served by values between 7 and 12. Higher frame rates provide more video detail at the expense of reduced video retention and increased bandwidth usage.
- GOV Length: When using H264 compression, this value specifies how often the camera sends a full image frame (instead of a “change frame” which only describes differences between frames). For example, if this is set to 15, Orchid Recorder will send a full image frame once every 15 frames. Be aware of how this setting may impact video quality. As the GOV length decreases, the system will need to send more keyframes of video (within the set bit rate). This may result in a loss of quality for those keyframes. The default value is recommended.
- Profile: When using H264 compression, this specifies an H264 Profile of either Baseline, Main, or High. Higher profiles offer better compression (which means increased retention and lower bandwidth usage) at the expense of increased CPU utilization when decoding video. The highest available profile is recommended.
- Resolution: The resolution of video transmitted by the camera. Higher values increase video detail at the expense of reduced video retention and increased bandwidth usage. Most Orchid Recorder users are best served by resolutions between 1280×720 and 1920×1080.
- Quality: This value affects how much the video is compressed. Higher values increase video quality at the expense of increased storage requirements (and thus reduced video retention). The default value is recommended.
Audio Settings (if supported)
If Orchid Recorder and Orchid Fusion/Hybrid VMS are running version 23.6 or higher, audio control is supported at the Player/Stage level in WebRTC mode. If selected, the Orchid Recorder will record audio for those cameras that support it. This audio will be available on the Stage (in WebRTC only), and in exported video files.
These audio settings will appear on the screen only if the camera supports audio, and determine how the Orchid Recorder will record the audio. Each camera type reports its own default settings. Use those default values unless otherwise noted.
- Encoder: The type of compression used by the camera’s audio. Orchid Recorder supports “None” (audio is disabled), G711 (recommended), and AAC.
- Bit Rate: The target data size (in kilobits per second) of the compressed audio. The default value is recommended.
- Sample Rate: Affects the quality of recorded sound. The default value is recommended.
Low-bandwidth Settings
- Decode all frames: This setting applies to viewing Live video in Low-bandwidth mode. When Decode all frames is disabled, Orchid Recorder will display only full frames (per the configured GOV length) when viewing live video in Low-bandwidth mode. When Decode all frames is enabled, Orchid Recorder will display every available frame from the camera (regardless of GOV length) when viewing live video in Low-bandwidth mode, assuming sufficient bandwidth exists. Decode all frames is disabled by default because enabling this setting will increase CPU use on your Orchid Recorder. (For more details on Low-bandwidth mode, please refer to the Advanced Topics section.)
Advanced
The last section on the screen provides additional information about the camera stream. This includes the Camera ID, the Stream ID, and the URLs, all of which may be helpful for troubleshooting the camera stream.
- Click the Expand icon (
) to view the Advanced stream information.
- Click the Condense icon (
) to close the Advanced stream information.
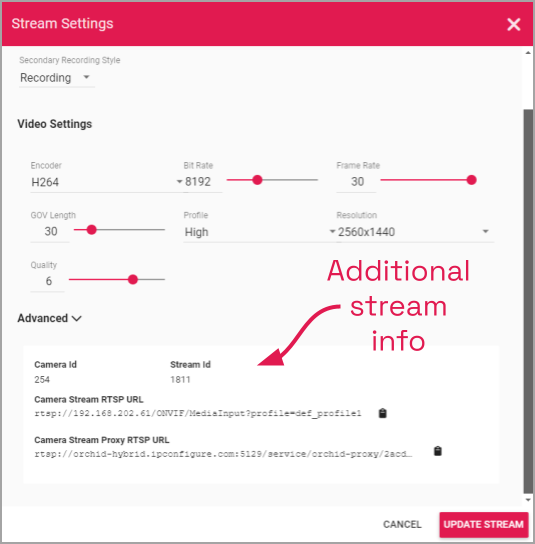
- Once the stream settings have been updated, click the Update Stream button to save the new stream settings. It may take a few seconds for the settings to change based on the camera being updated.
- You may review the impact that the stream settings have on video playback for each camera. Simply click on the corresponding thumbnail to watch a current live video feed.


Post your comment on this topic.