
| |
This is the Add icon. |
| |
This is the Filter icon. |
| |
This is the Card View icon. |
| |
This is the Table View icon. |
| |
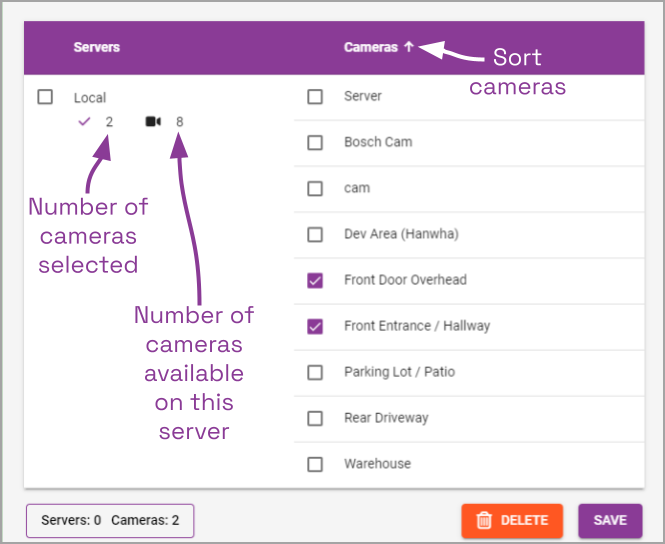
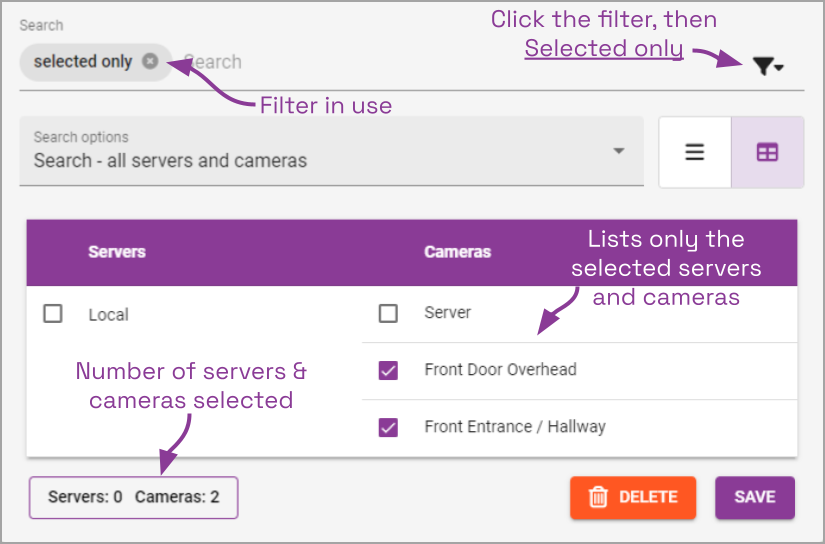
This indicates how many of the server’s cameras have been selected for the group. |
| |
This indicates how many cameras are available on the server. |
- Click the Add Permission Group button in the top-right corner of the Permission Groups list. A New Permission Group screen will open.

This screen has been redesigned with some additional tools to help you find what you need. These changes are beneficial on large systems and may eliminate the need to scroll through pages of servers and cameras. (The most significant changes appear when you unmark the All servers and cameras option.)
- Enter a name and a description for the new Permission Group in the Group Name and Group Description fields.
- Select a member for the new Permission Group by clicking in the Members field to open a drop-down list of Orchid Fusion/Hybrid VMS users. Find and click on a member. As soon as you select a member, another list will appear so you can make another selection (if needed).
- Press Esc if you don’t need to make another selection.
- To remove a member, click the X to the right of the member name.
- To grant Library access to non-administrator users in this group, click the Library Access switch to turn it on. (Members of this group will be able to view and delete Library items. They will also be able to create Library items involving cameras for which they have export permissions.)
Beginning in version 23.6, no abilities will be granted to new Permission Groups, but they will have access to All servers and cameras.
- To assign specific, limited permissions for this Permission Group, use the Permissions Granted and Permissions Revoked features.
- After all of the permissions are set, press the Save Group button.
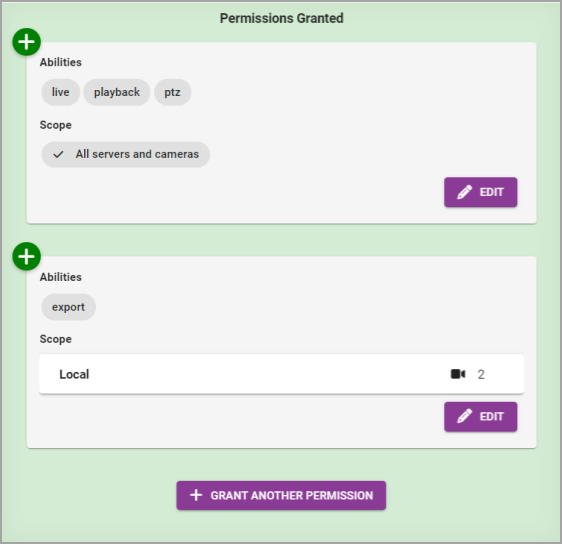
Permissions Granted
The Permissions Granted feature provides a way to grant custom combinations of abilities to selected servers and cameras. In the example below, the Permission Group is given the ability to view live and recorded video and control PTZ cameras, on all servers and cameras. With the addition of another permission set, this same Permission Group will be able to export video from two cameras.
- Go to the Permissions Granted box.
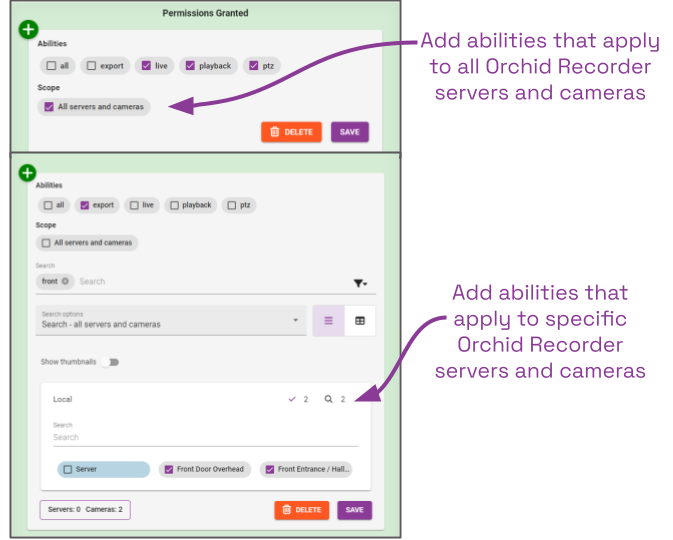
- Select an ability for the new Permission Group by clicking on any of the listed abilities. Available selections include the following: All, Export, Live, Playback, and PTZ.
- To remove an ability, click it again to unmark it.
- Mark the All servers and cameras checkbox if you want this permission set to apply to all of the registered Orchid Recorders and associated cameras. You may also select this option if you want this permission set to apply to most of the servers and cameras; you may use a Revoke permission set in conjunction with this one to eliminate the unwanted servers and cameras. Keep in mind how this will impact cameras and servers that are added to the system later. (If marked, proceed to step number 14. If left unmarked, proceed to step 4.)
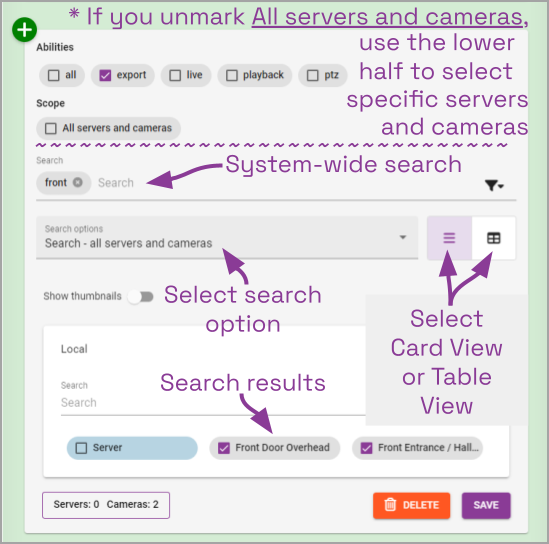
- Select specific servers and cameras for this permission set by unmarking the All servers and cameras checkbox. Here’s where you will see some new camera search tools.
- If you can easily find the cameras you need, simply scroll down to find the servers and cameras and select the ones you want. (You may need to expand the server line items to view the cameras.)
- If you have a large number of servers and cameras, you may want to use the search feature. The main elements of the search feature are:
- Search field
- Search options
- View selection
- Click in the Search field and enter one or more search terms. Press Enter after each one.
- To remove a search term, click the X to the right of the search term.
- By default, the search will show you all of the matching servers and cameras. There are actually three Search options that determine what the system will search for.
- Select Search-all servers and cameras if you want the search results to show any matching servers and cameras.
- Select Search-servers only if you want the search results to be limited to matching servers.
- Select Search-cameras only if you want the search results to be limited to matching cameras.
- Now select your viewing option by clicking on the Card view or Table view button.
| Button | Description |
|---|---|
| |
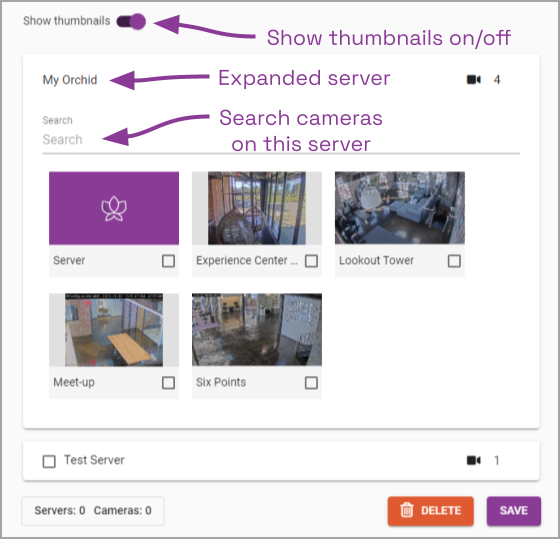
The Card View provides the most options. |
| Each server (with all of its cameras) is contained in a separate line item. Each line item may be expanded (to show all of the associated cameras), or condensed to hide them. | |
| Card View allows you to perform an additional camera search on each server. | |
| You have the ability to view camera thumbnails (when the line item is expanded). | |
 |
|
| |
The Table View offers a well-organized view of the available servers and cameras. |
| One by one, the servers are listed in the left column, with the associated cameras listed in the right column. | |
| Servers are displayed in rows of alternating color for easy identification. | |
| With Table View, you have the ability to sort the servers and the cameras alphabetically, in ascending or descending order. Just click the arrow to the right of the Servers or the Cameras heading to change the sort order. | |
 |
- Now that you can see all of the servers and cameras (or at least the ones you have asked to see), it’s time to select the servers and cameras you want to include in this permission set.
- You have the option to select all of the cameras on a server. There are several ways to do this.
- If you are using Card View:
- If the server is condensed, click the checkbox next to the server name.
- If the server is expanded, click the Server checkbox.
- If you are using Table View:
- Click the checkbox next to the server name, or the Server checkbox.
- If you are using Card View:
- Use the page navigation tools at the bottom of the screen to view additional servers and cameras, as needed.
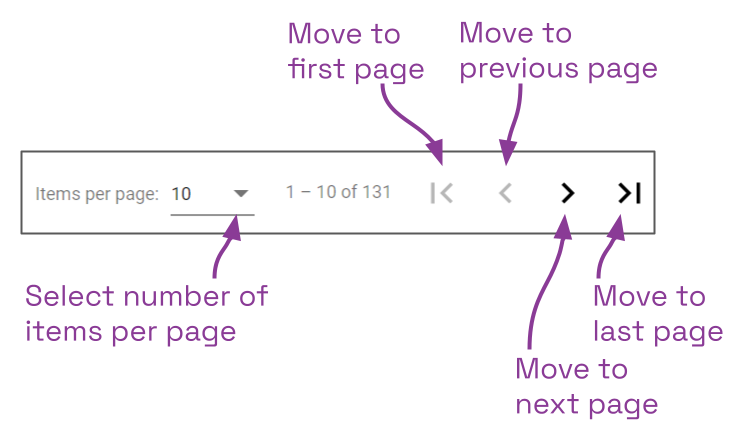
- Use the Items per page drop-down list to set the number of rows you want to view per screen. One row is equal to one server, expanded or condensed (in Card View), or one row (in Table View). Available selections include 10, 20, 30, and 50.
- Refer to the count to determine which rows are listed on the current screen, and how many total rows are available. (Remember: The number of available rows will change as you use different search terms to narrow the list of servers and cameras.)
- Use the navigational arrows to move to a different screen. From left to right you can: go to the first page, go to the previous page, go to the next page, and go to the last page.
- To de-select a server/camera, unmark the checkbox that represents the server or camera.
- If you want to do a final review of the servers/cameras you have selected for the permission set, click on the Filter icon, then click Selected only. This view will display only those cameras and servers that have been selected for the group.
- When the permission set is complete, press the Save button.
- If you need to add another permission set for this Permission Group, click the Grant Another Permission button, then repeat the previous series of steps.
- To edit a permission set, click the Edit button that corresponds to the set you want to change.
- To delete a permission set, click the Delete button. (The set will be removed immediately.) If you don’t see the Delete button, enter edit mode first by clicking the Edit button.
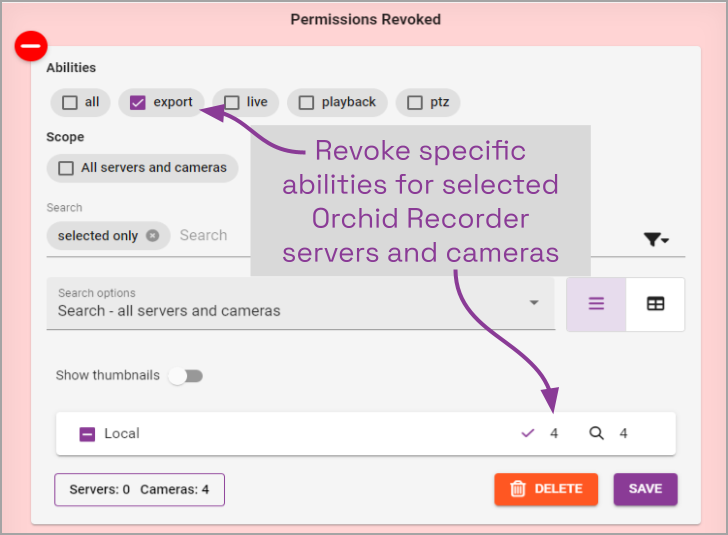
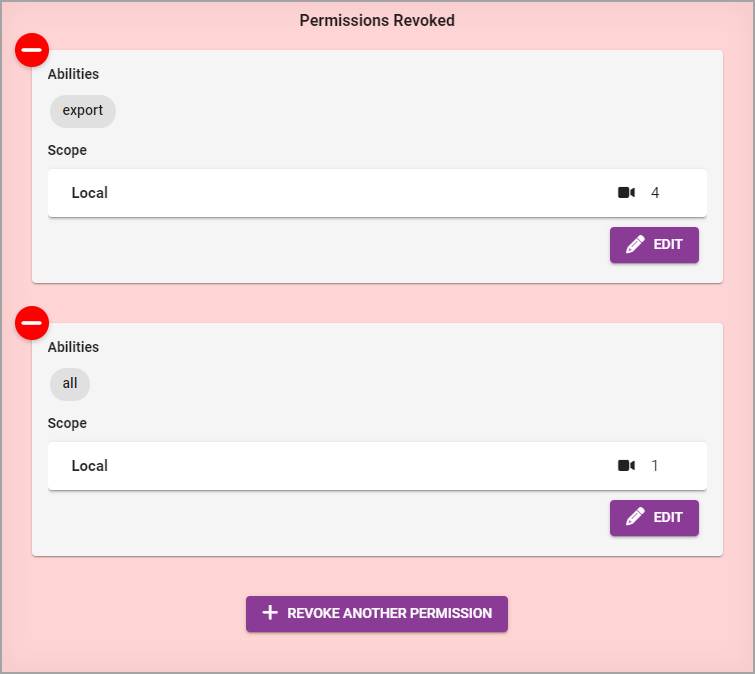
Permissions Revoked
The Permissions Revoked feature provides a way to eliminate the Permission Group’s ability to do certain things for selected servers and cameras. This can be a great shortcut especially when, for example, there is only one camera out of many that requires some restricted access. In the sample below, the Permission Group’s ability to export video has been revoked on four cameras. By adding another permission set, this Permission Group will lose all abilities for another camera.
- Go to the Permissions Revoked box.
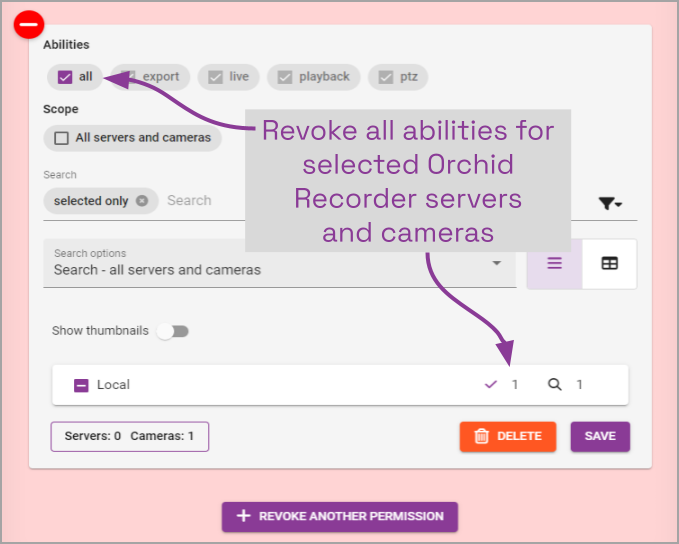
- Select the ability you want to take away from the Permission Group by marking the appropriate checkbox. Available selections include the following: All, Export, Live, Playback, and PTZ.
- To remove an ability from the revoked list, simply unmark the checkbox.
- Mark the All servers and cameras checkbox if you want this permission set to apply to all of the registered Orchid Recorders and associated cameras. (If marked, proceed to step 7. If left unmarked, proceed to step 4.)
- Select specific servers and cameras for this permission set by unmarking the All servers and cameras checkbox.
- If you can easily find the cameras you need, simply scroll down to find the servers and cameras and select the ones you want. (You may need to expand the server line items to view the cameras.)
- If you have a large number of servers and cameras, use the search and sort tools, along with different viewing options to simplify the search.
- To remove a server/camera from the revoked list, simply unmark the checkbox.
- When the permission set is complete, press the Save button.
- If you need to add another revoked permission set for this Permission Group, click the Revoke Another Permission button, then repeat steps 1 through 7.
- To edit a permission set, click the Edit button that corresponds to the set you want to change.
- To delete a permission set, click the Delete button. (The set will be removed immediately.) If you don’t see the Delete button, enter edit mode first by clicking the Edit button.
Post your comment on this topic.