This topic goes into how the features and functions of the RVI PC Viewer work in conjunction with the IBMi host system. If you are using the RVI One Look browser interface, reference the One Look (IBM i/Cloud) manual.
Availability of the imaging system functions will come from the result of an application interface or interactively from a stand-alone system. In either situation, once the user enters the imaging system, all the functions are exactly alike.
With the use of a function key, the user can enter the imaging system and begin to complete the necessary work activities. When completed, the user can return to their business application by pressing F3.
With both procedures, the goal is to reach the Real Vision Imaging System index screen for a specific account. This index listing of all images on file for this specific account enables the user to accomplish all available options, based on security.
From a Business Application – Index List Function
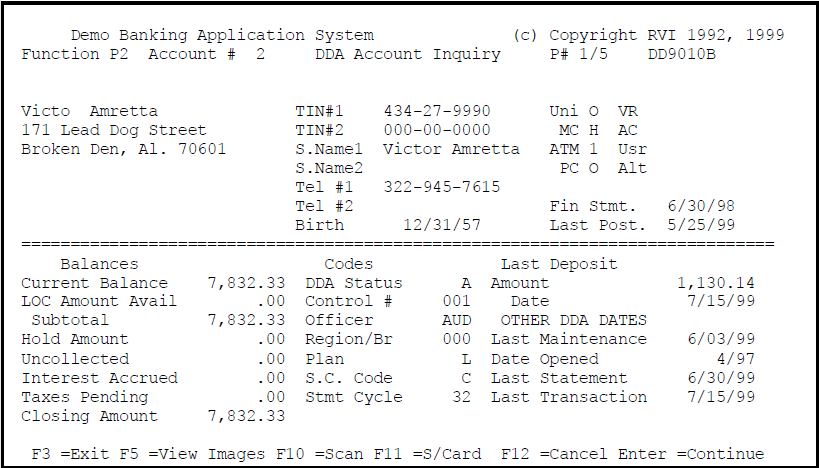
Sample Application Screen
Notes In The Real Vision Imaging System PC Viewer
Notes Exist: On the RVI PC Viewer the “Notes Exist” button will display in yellow if notes are attached to the image being viewed, gray when no note exists. This can also be used to add notes to an image being displayed or the user can add notes on the IBM i Host System screen as shown above.
Add New Notes Using The RVI PC Viewer:
• Click on the Notes Button to open the Notepad – Quick View Screen.
• Type in the desired note on the line provided the yellow notes display area.
• Click on the Add button.
The note is now in the RVI Imaging System and viewable on the IBM i Host System Notepad Screen or the RVI PC
Viewer.
For demonstration purposes, this IBM i Host System application has several function keys added to the bottom of the screen to provide the imaging functions.
• F5 =View Images
• F10 =Scan
• F11 =S / Card, (Signature Card), using Document Tab
With the use of the F5 function key, the user can go to the RVI Index List Screen.
In this example, the imaging system, System 1, was previously set up with the search criteria for this system that was defined as being the Account Number and Date.
Note: Document Tab is a feature that is used for additional database security or convenience and offers the ability to group similar documents for viewing. Setup is normally accomplished by the IS Department.
On the sample application screen above, there is an F11 =S/Card function key for Document Tab. In this example, Document Tab would enable the user to request just the signature card for viewing instead of using F5 to view all the images on file and placing a V beside the signature card for viewing.
From a Stand Alone Application – Index List Function
Real Vision Main Menu

Select Option 1: Image Inquiry.
Press Enter to continue.
Image Inquiry Request Screen
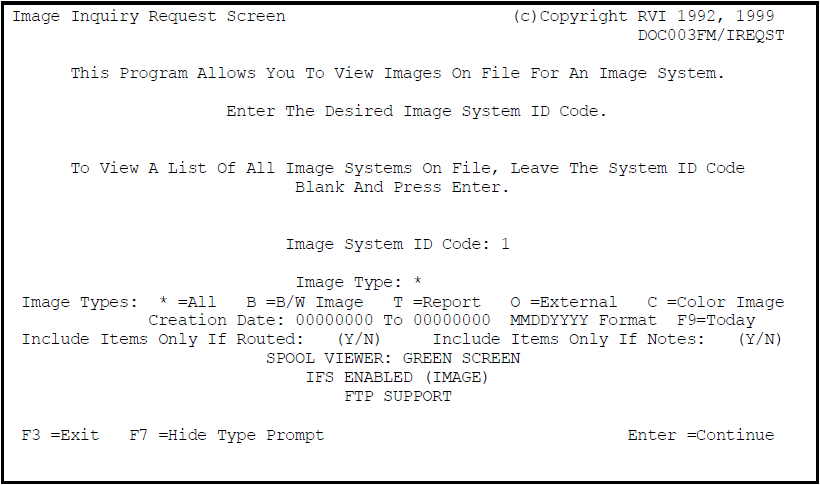
This screen will prompt the user for an Image System ID Code.
Enter the desired Image System ID Code for the imaging system being set up. Imaging System ID Codes can be from 0 to 9 or A to Z, upper and lower
case, and $, #, or @.
Input the desired code, (1 for this example), and press Enter to continue, or to view a listing of all imaging systems on file, leave the code blank and press Enter.
Image Inquiry Search Screen
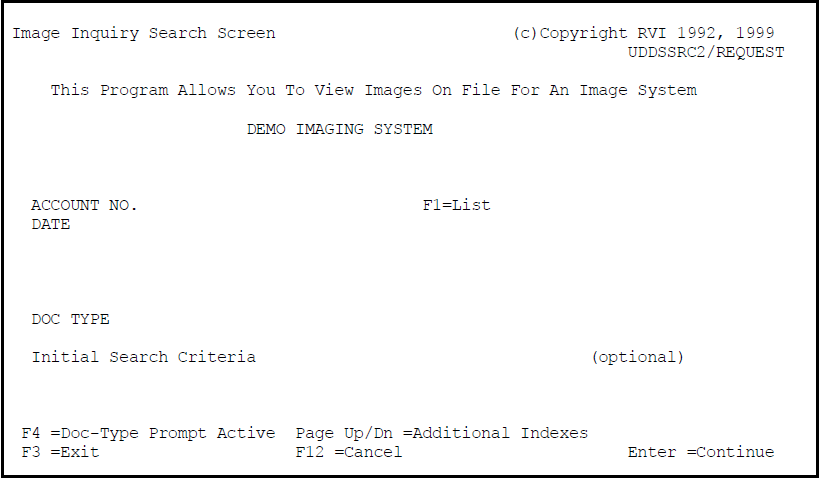
This screen will prompt the user for the required indexing information.
Each Imaging System has 7 Key Field Indexes available for database searches. Only the defined fields will appear on the Image Inquiry Search Screen.
(Upper and lower case is available if the Control File Parameter is set up.)
To advance, enter the required indexing information and press Enter.
Wild Card Searches: Wild card searches can be accomplished using two methods.
Method 1: An asterisk ( * ) can be used to search on all occurrences beyond a certain point. For example, assume the account number was 10 characters long, 1234567890. By entering 1234* the user would retrieve all the account numbers beyond the 4 that matched the first 4 bytes.
Method 2: The at sign ( @ ) can be used to search excluding some information. For example, assume a date of 06-29-99. If it was entered as 06-@@-99, the search would list all matching indexes for the month of 6-99, not just for one day, 06- 29-99.
From a Stand Alone Application – Index List Function
Image Inquiry Search Screen From To Option Activated
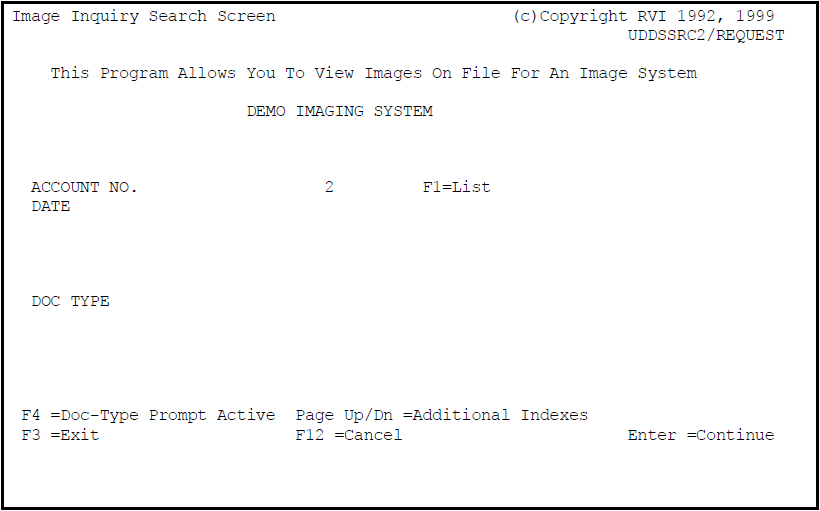
This alternative Image Inquiry Screen will only be active when the user enables the Search From / To Option.
To enable this option:
• GO IMAGE
• Select option 8, RVI Maintenance Menu
• Select option 1, Maintain Image System Descriptions and Key Fields
• From the Maintain Image System Description Selection Screen and enter the specific Image System ID code.
• Place a Y in the Range column for the index field or fields requiring the Search From / To function.
Initial Search Criteria: Used only when searching a spool file report. This can be used in conjunction with the Search From / To Option and will only list those reports in an index list for viewing that meet the Initial Search Criteria and the Search From / To Option. The Initial Search Criteria field is only available if the GBLSRCH1 Control File Parameter is set up.
Each imaging system has 7 Key Field Indexes available for database searches. Only the defined fields will appear on the Image Inquiry Search Screen. Upper and lower case entry is available only if the SLOWERCX Control File Parameter is set up.
These System Control File Parameters can be set up through:
• GO IMAGE
• Select option 8, RVI Maintenance Menu
• Select option 6, Enter/Update System Control File Parameters
To advance, enter the required indexing information and press Enter.
The RVI Index List Screen
From the sample application, the index list is accessed in one step after pressing the F5 function key. From the stand-alone application, it requires three steps to reach the same index list screen.
Image Inquiry Selection Screen
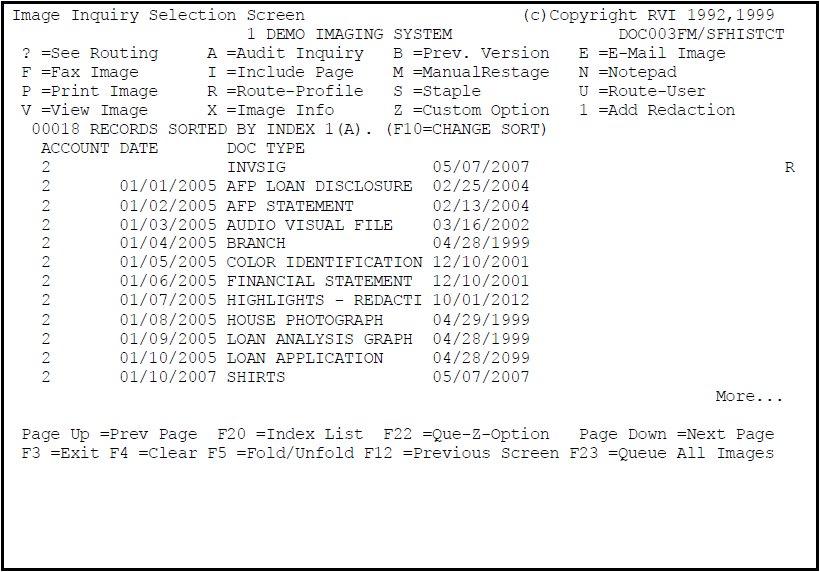
Enter the function letter next to the image record. Each function is based on security.
| Index List Functions: | |
|---|---|
| ? | View existing Routing Profiles |
| A | Audit of faxed, printed, or viewed images (Control File Parameter INQAUDIT |
| B | Previous Version |
| E | E-mail the image |
| F | Fax the image |
| I | Include Page |
| M | Manual Restage |
| N | Attach a note to the image |
| P | Print the image |
| R | Route the image to a Routing Profile |
| S | Staple |
| U | Route the image to one user |
| V | View the image |
| X | See additional image information |
| Z | Custom Option(s) |
| 1 | Add Redaction |
CMD – 10 CHANGE SORT OPTION:
Permits the user to re-sort the subfile listing based on different search settings. Renumber the indexes and creation date into the desired sort order (1-8). Specify D
for descending sequence. Specify A or leave blank for ascending sequence.
Index List Function: ? = See Routing
Image Inquiry Selection Screen
From the index list, the user can determine which Routing Profile the image was routed to and the users assigned to that Routing Profile.
Place a ? beside the image, and press Enter to continue.
Routing Screen
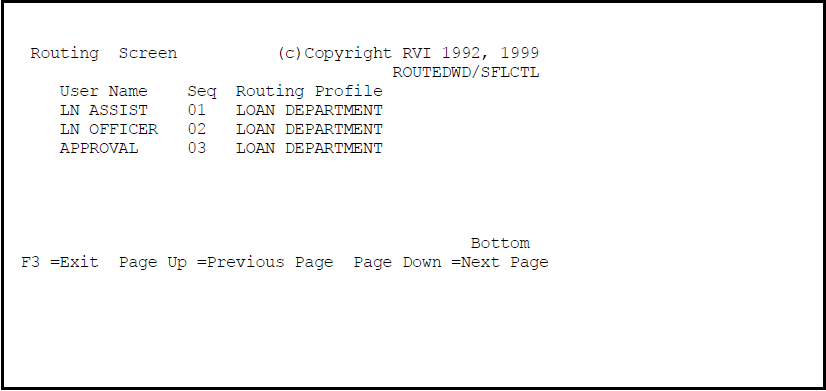
This screen lists the people assigned to the profile and their work sequence in the profile.
Index List Function: A = Audit Inquiry
Image Inquiry Selection Screen
From the index list, the user can view a list of all the users who previously viewed, faxed or printed a specific image.
Place an A beside the image, and press Enter to continue.
Audit Inquiry Screen
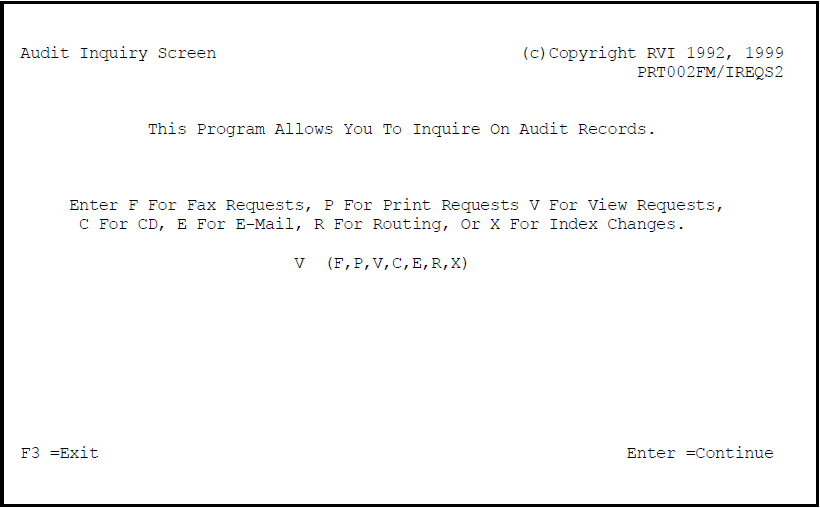
EMAUDIT Control File Parameter needs to be setup to enable this function. Refer to the RVI Maintenance Menu.
Press Enter to continue.
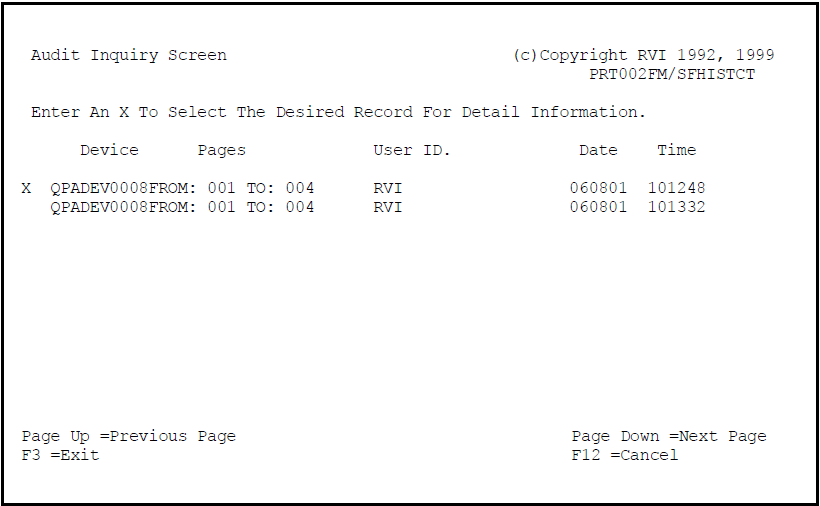
From the index list, the user can view a list of all the users who previously viewed, faxed or printed a specific image.
Place an X beside the image and press Enter to view the audit for this specific image.
From the index list, the user can view a list of all the users who previously viewed, faxed or printed a specific image.
Place an X beside the image and press Enter to view the audit for this specific image.
Press Enter to continue.
Index List Function: B = Prev Version
Image Inquiry Selection Screen
Versioning is only available for black & white scanned documents or scanned color images.
If the user has authority to view versions, they also have the ability to view the original document.
The B = Prev Version option will only appear if the user has authority to view previous versions.
Use F5 = Fold/Unfold to expand the index listing to determine if the document has multiple versions. This must be done to determine if a document has versions associated with it.
Place a B beside the image and press Enter to view a listing of the previous versions of this document.
Image Versioning Screen
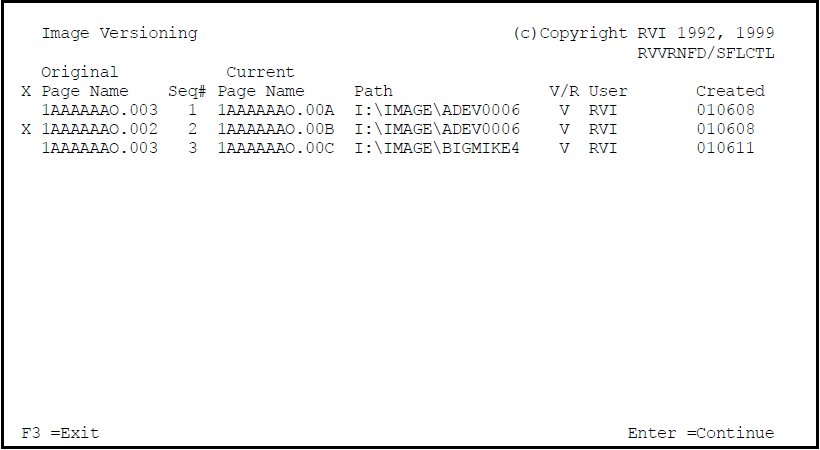
From this index list, the user can select the specific versioned page for additional information and viewing options.
Place an X beside the versioned page and press Enter to advance to the next screen.
Press Enter to continue.
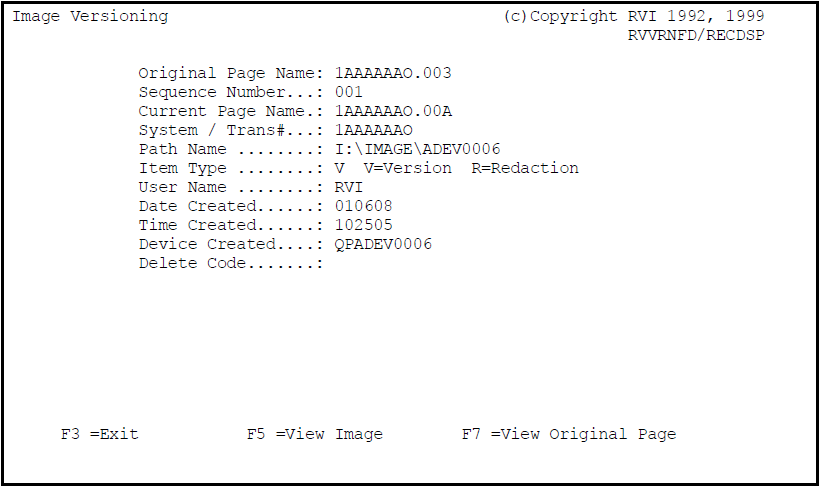
From this screen, the user can view the version of the document selected or they can view the original document.
With Versioning, RVI does not keep multiple copies of the versioned document, only the original document and each versioned page that is created.
Press Enter to continue.
Versioning requires that the user be setup and authorized to this function. If a user is not authorized to versioning, the B = Prev. Version will not appear as an available option and the only document that will be listed in the index list will be the last version.
Index List Function: E = E-Mail Image
Image Inquiry Selection Screen
From the index list, the user can Email through the IBM i Host System if the IBM i Host System is connected to the internet or the user can e-mail from the RVI PC viewer.
Place an E beside the image, and press Enter to continue.
RVI Send E-Mail Screen
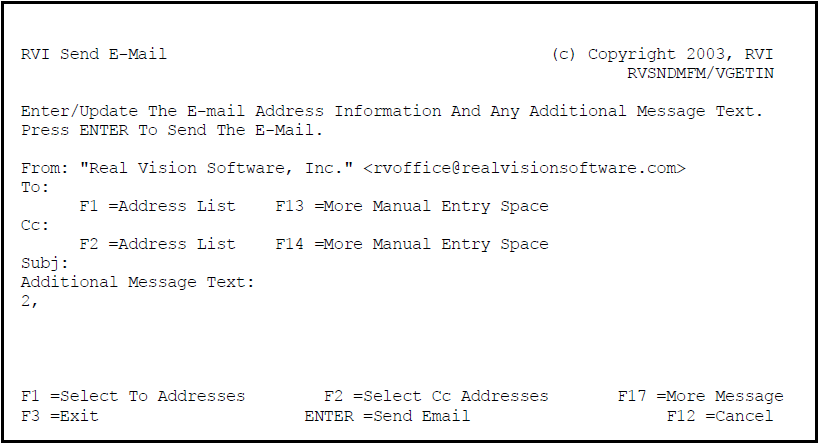
F1 =Select To Addresses: Prompt to see addresses previously entered in the RVI E-mail address list.
F13 =More Manual Entry Space: To add additional names manually to the e-mail address list information.
F2 =Select Cc Addresses: Prompt to see addresses previously entered in the RVI Email address book to be used to Cc the Email.
F14 =More Manual Entry Space: To add additional names manually to the e-mail address list information.
PDF or HTML: (P=PDF, H=HTML) This option will only appear if the image being selected is a spool file. The default answer is controlled by the System Control File Parameter EMAILFMT.
Press Enter to continue.
Index List Function: F = Fax Image
Image Inquiry Selection Screen
From the index list, the user can request a fax through the IBM i Host System.
Place an F beside the image, and press Enter to continue.
Outbound Fax Selection Screen
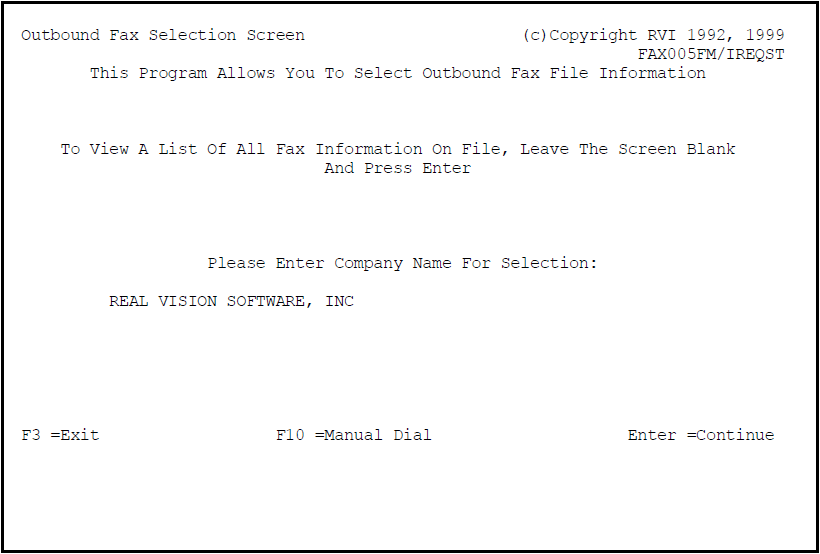
The screen will prompt the user for the company name.
Enter the company name to receive the fax and press Enter to continue.
To view a list of all companies on file leave the Company Name blank and press Enter.
F10 =Manual Dial: Use for manual faxing if the company or individual is not on file.
Press Enter to continue.
Fax Confirmation Screen
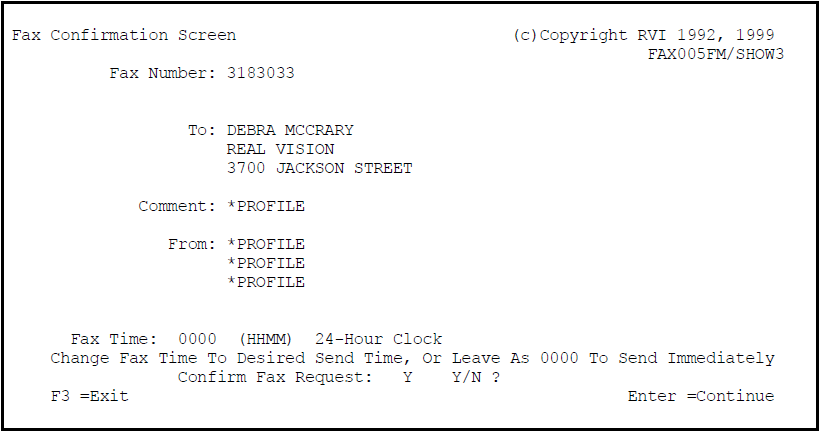
To: Passed from the Fax Phone Book.
Comment: Can set as a Control File Parameter *FXINTCM using * Profile or manually entered.
From: Can set as a Control File Parameter *FXINTFI1, *FXINTFI2, or *FXINTFI3 using * Profile or manually entered.
Fax Time: The time selected to send the fax or leave blank and press Enter to send immediately.
Confirm Fax Request: Y for Yes to have the fax confirmed or N for No.
Press Enter to continue.
Index List Function: I = Include Page
Image Inquiry Selection Screen
This permits the user to include or add an additional index list item to the requested image presently being viewed.
For example, assume the Survey Plat was being viewed and now the user needs to see the Signature Card. The user could return to the RVI index list, place an I beside that Signature Card and press Enter. This would add the Signature card to the original request, and both documents would now be displayed in the viewer.
Place an I beside the image and press Enter to continue.
Index List Function: M = Manual Restage
Image Inquiry Selection Screen
From the index list, the user can select one or multiple images to move to DASD for a specified period of time for faster retrieval.
Place a M beside the image and press Enter to continue.
Image Restaging Request Screen
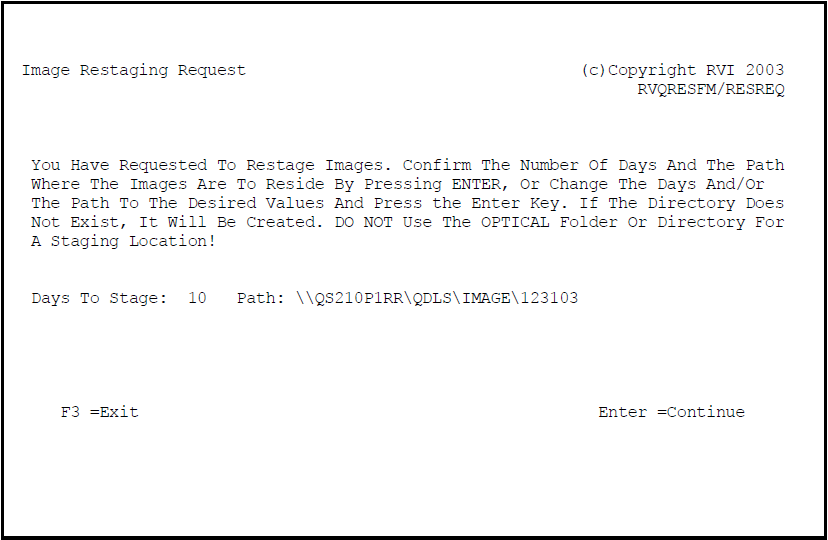
Days To Stage: The days to temporarily keep images on DASD.
Path: The path where the images are to reside.
If the directory does not exist, it will be created. Do not use the optical folder or directory for a staging location!
Press Enter to continue.
Index List Function: N = Notepad
Notes can be entered on the IBM i Host System Notepad Screen or the RVI PC Viewer.
Image Inquiry Selection Screen
From the index list, the user can add notes to any image.
Place an N beside the image and press Enter to continue. The User ID and Entry Date are automatically passed to the next screen.
Image Notepad System Screen
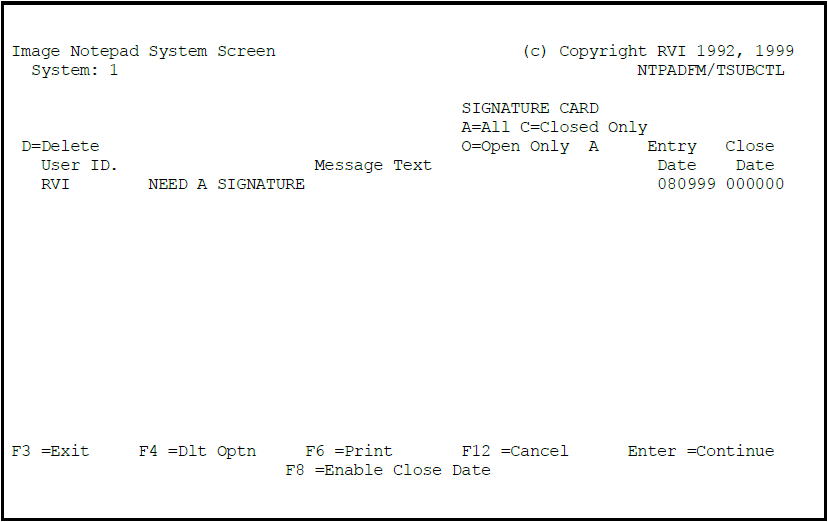
The user is permitted up to 999 lines per image.
If the Close Date is left open, it will serve as a reminder that there is an open note attached to this image.
An image with a note attached will show a red N at the right side of the index list listing.
Press Enter to continue.
Notes In The Real Vision Imaging System PC Viewer

Add New Notes Using The RVI PC Viewer:
- Click on the Notes Button to open the Notepad – Quick View Screen.
- Type in the desired note on the line provided the yellow notes display area.
- Click on the Add button.
The note is now in the RVI Imaging System and viewable on the IBM i Host System Notepad Screen or the RVI PC Viewer.
Index List Function: P = Print Image
Image Inquiry Selection Screen
From the index list, the user can place a P beside the image and press Enter to print from the IBM i Host System session.
Print Request Screen
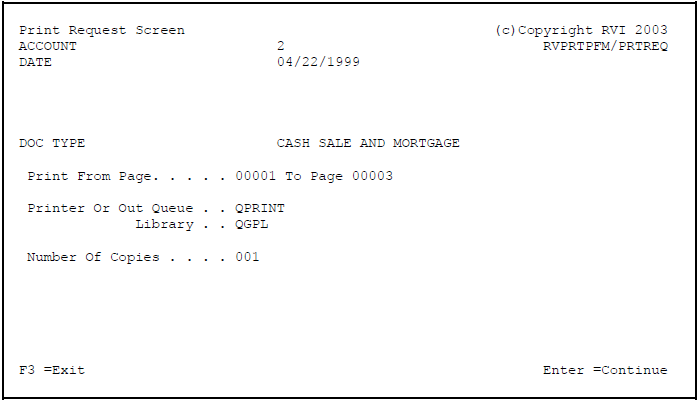
This screen will appear and prompt the user for From Page and To Page and defaults to the Attached or Assigned Printer.
If a Network Printer is used, not the attached printer, place a ? in the printer space and press Enter to see a list of all assigned network printers.
Printer Or Out Queue: Select a specific printer or out queue. (Mandatory) printer or out queue is not in the library list. (Optional)
Press Enter to initiate the print.
Index List Function: R = Route Profile
Image Inquiry Selection Screen
From the index list, the user can route an image to an existing Routing Profile.
Place an R beside the image, and press Enter to continue.
Image Management Selection Screen
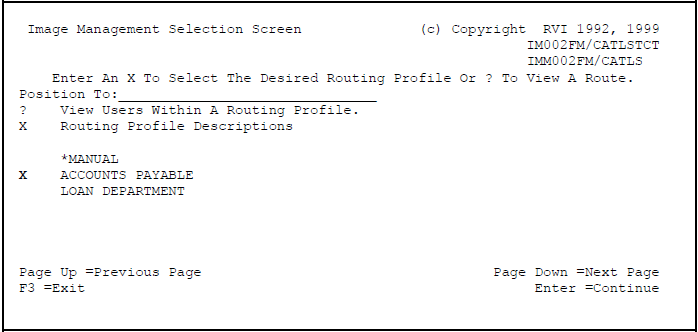
To select a profile, place an X beside the desired Routing Profile.
Place a *? *beside the desired profile to view the users in a specific Routing Profile.
Press Enter to continue.
Index List Function: U = Route – User
From the index list, the user can route an image to a specific user.
Place a *U *beside the image, and press Enter to continue.
Route To User Screen
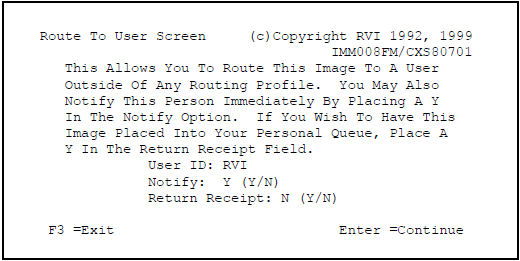
User ID: The User ID to route the image to.
Notify: Y for Yes, N for No. Notify the recipient of the image.
Return Receipt: Y for Yes, N for No. If Y is selected, a copy will be placed in the sender’s work queue for reference and follow up activities. In the sender’s work queue, a red U will appear on the right side of the screen to indicate a return receipt was requested for the image routed to a specific user.
Press Enter to continue.
Index List Function: V = View Image
From the index list, the user can view an image.
Place a V beside the image, and press Enter to continue.
The Menu Bar options are available to the user after the selected image appears in the RVI viewer.
Index List Function: X = Image Info
From the index list, the user can view additional image information.
Place an X beside the image, and press Enter to continue.
Image Information Inquiry Detail Screen
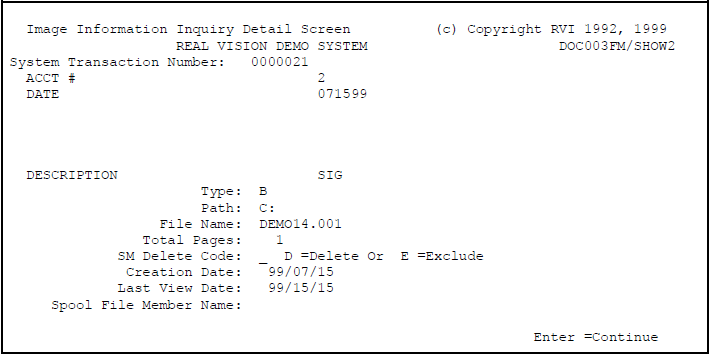
Information can only be viewed, not updated or changed. To update or change, refer to the RVI Maintenance Menu, option 2.
System Transaction Number: A unique number per document.
Key Field Indexes: Each Imaging System has 7 Key Field Indexes available. Only the Key Field Indexes defined for the Imaging System will appear on the screen.
Type: Type of image, C =Color, B =Black and White, T =Text (Spool Files), O =Other.
Path: The location of the image.
File Name: The actual image file name.
Total Pages: The total number of pages associated with the image.
D =Delete Or E =Exclude: Only one of three entries are permitted, D if to be deleted, E to not have it appear in the index list for viewing, or Blank for active. E = Exclude requires a System Control File Parameter PCINDEXX.
Creation Date: YYMMDD, automatically assigned.
Last View Date: The date the image was viewed last.
Spool File Member Name: The original physical file member that contained the captured data.
Press Enter to continue.
Index List Function: Z = Custom Option
Custom Options
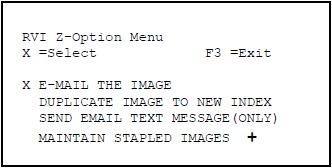
Custom Options are available for those users who want to accomplish specific tasks through their own custom programming.
Index List Function: 1 = Add Redaction
Add Redaction
Redaction is only available for black & white scanned documents.
This function offers the user the ability to permanently cover or “black out” areas of an original document.
The 1 =Add Redaction option will only appear if the user has authority to add redactions to the original document or previously redacted pages.
Use F5 =Fold/Unfold to expand the index listing to determine if the document has multiple versions.
Place a **1 beside the image and press Enter to continue. The user will view the original document with all redactions on it. The user can add new redactions, remove older redactions and save the process. This now becomes the latest redacted version available for viewing.
Viewing Redactions
There are only two viewing options, both based on security. Redaction viewing security is setup by Image System and User.
- View with redactions only.
- View original document.
Security to Authorize Creation or Update of Redactions
Redaction security to authorize a user to make or update redaction is setup by Image System and User. With this security active, the RVI PC Viewer Redaction button will be enabled, otherwise it will be disabled.
When new redaction work is completed, the user will see a screen that prompts them to accept the new redactions.
When accepted, that will then become the latest redacted version available for viewing.
Image Inquiry Selection Screen Symbols
Image Inquiry Selection Screen
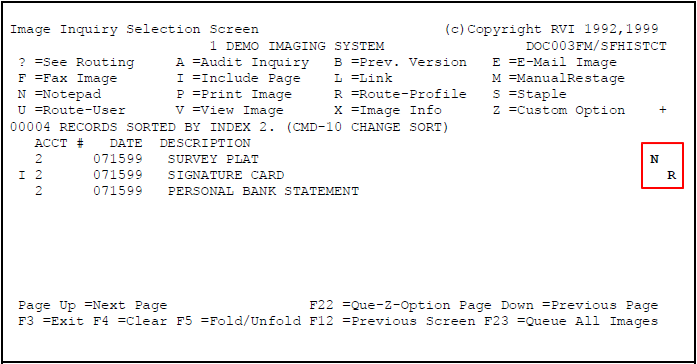
For an RVI user accessing the Image Inquiry Selection Screen, there could be symbols at the right side of the index list to inform the user of a special condition for individual images:
N: A note has been attached to an image.
R: An image has been routed to an existing Routing Profile.
Image Management Selection Screen Symbols
Image Management Selection Screen
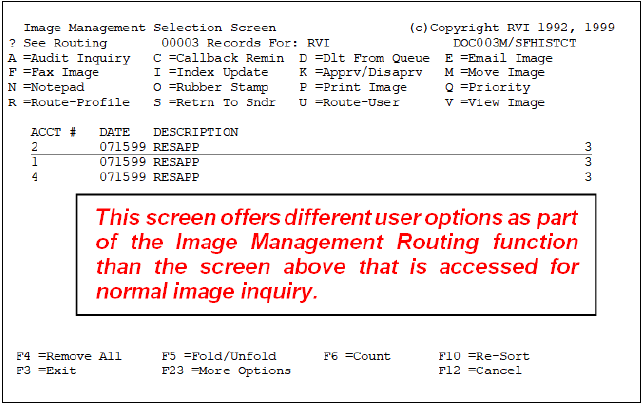
For an RVI user accessing the Image Management Selection Screen when working their work queue, there could be symbols at the right side of the index list to inform the user of a special condition for individual images.
To view all symbols, press F5 to Fold/Unfold:
*: The image was routed outside the normal Routing Profile.
N: A note has been attached to an image.
P: Packages are setup. If listing has reversed color, one or more items are missing from the package.
U: Image was routed from another user.
Number 0-9: Indicates priority routing.
Underlined Listing: Call Back Notice has been entered.
Underlined Listing In Red: Call Back Notice overdue.


Post your comment on this topic.