RVI Spool File Viewer Functions

Goto Page: Permits the user to position to a specific page, T for top of report, B for bottom of report.
Columns: The starting and ending columns of the report being viewed.
Starting Column: Permits the user to position to a specific column within a report. If column 20 was selected, column 20 would become the left most column in the viewer.
Advance Lines: Permits the user to advance down the report a specific number of lines each time the enter key is pressed. If 10 is selected each time the user pressed Enter, the view would advance by 10 lines.
Page: The page number being viewed and the total pages in the report.
RVI Spool File Viewer Function Keys
F2 =Branching
Branching is generally used with a complete report when the user wants to go directly to the associated information instead of returning to the RVI index list.
For example, when looking at an Aged Trial Balance with the Hot Spot being setup for the account number, the cursor is placed on a specific account number and F2 is pressed, it will automatically advance to the specific invoice that contains that information.
After a predefined Hot Spot is established for a report, the user can place the cursor on the desired field and press F2 to Branch to associated indexed information, which could be a spool file or image.
Hot Spot columns will be highlighted for easy identification. For example, if Hot Spots were defined for the Account Number Field, that column would be highlighted and available for the Branching function.
Branching is only available on the RVI IBM i Host System Spool File Viewer, not the PC GUI Spool File Viewer.
F4 = History
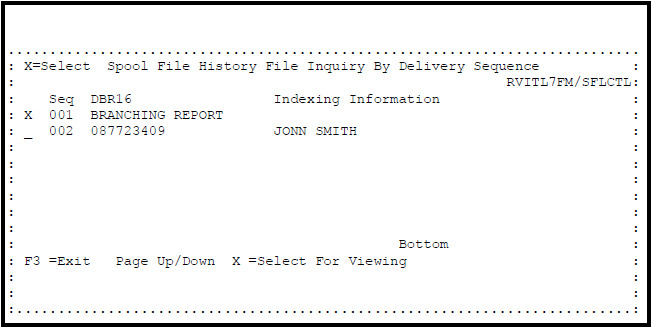
Spool File History File Inquiry By Delivery Sequence Screen

When the Branch function is used as described above, each time the user selects using F2, a History File index is created.
If the user pressed F4 =History on the previous screen, this screen would appear enabling the user to again select any previously viewed report without returning to the original RVI Imaging System index list.
Using the RVI PC viewer History button 
In the History File, the primary report will appear with each indexed item Branched to being highlighted for easy identification.
Place an X beside the index item to be reviewed and press Enter to continue.
F5 = Save
Save Current View Screen

When using the F11 Change View function, the settings selected for viewing can be saved for future viewing requests of that specific report.
Select Options:
- My User Profile: Permits the user to save the view settings selected for a specific report to their current user profile.
- All Users of this Report: Permits the user to save the view settings selected for a specific report for any user who does not have their own custom view settings defined.
If a setting presently exists for this report, the user will be prompted with a screen that permits them to overwrite the setting or delete the setting.
F6 = Print
Used to print the spool file being viewed.
F7 = Boolean Search
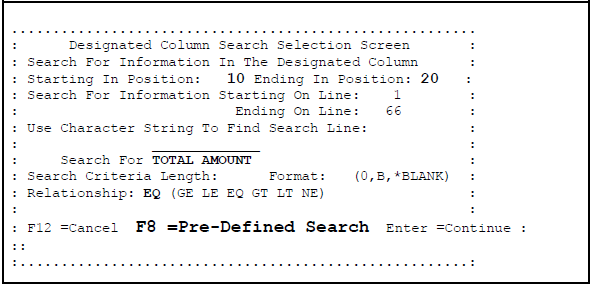
Designated Column Search Selection Screen

The default is for the entire report. If the user wants to isolate the search area, enter the appropriate search criteria for the column positions and line position.
Search For Information In The Designated Columns / Starting and Ending Positions: The starting and ending position of the specific column to search.
Starting and Ending Line: The starting and ending lines within a report to search.
Use Character String To Find Search Line: If the user can not specify the line to be searched, a text string can be used to find the information. For example, “Total Amount” will narrow the lines to search within a report.
Search For: Specific search criteria.
Search Criteria: Used only when the data must be formatted for the search. (Optional)
- Length: The desired length of the field.
- Format*: Used to format the Search Criteria Field. 0 = zero fill, B = blank fill right adjusts, *BLANK = blank fill no adjustment.
Relationship: User can select relational values when searching the report. (Optional) GT =Greater Than, LE = Less Than or Equal To, EQ = Equal To, GE = Greater Than or Equal To, LT = Less Than, NE = Not Equal To.
F8 = Pre-Defined Search

The user can advance to the Saved Search Selection Screen to select any pre-defined report searches listed for this report. Place an X beside the desired selection and press Enter to select and bring in the pre-defined fields.
In addition to searching for specific information, the user can save the specific search criteria for future searches.
Enter the required search information.
Press Enter to advance to the next screen.
Search Selection Confirmation Screen

This screen permits the user to review the search criteria before proceeding. If the user wants to search and not save these settings, press Enter to continue.
To save settings for future searches, press F5. This will advance the user to the next screen.
Press Enter to continue.
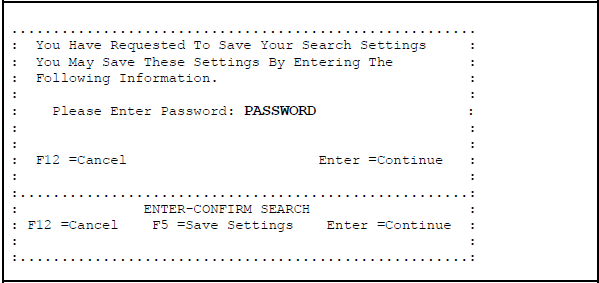
Save Search Settings

To confirm that the user wants to save the settings selected, the user must enter the password. The password is PASSWORD.
Press Enter to advance to the next screen.

This screen will prompt the user for two descriptions.
Prompt Description: This will replace the search for prompt. AMOUNT would indicate a numeric value as the search item.
Save Setting Description: This will be the reference item to identify the settings saved for future searches.
Press Enter to continue.
Save Search Selection Window

This screen permits the user to select searches using the predefined search criteria.
Place an X beside the desired entry.
F8 = PC View
Permits the user to view the current spool file in the PC GUI Spool File Viewer instead of the Host Spool File Viewer.
Press Enter to continue.
F9 = Standard Search Option
Designated Column Search Selection Screen

Selection: User can specify up to 5 search criteria items for each searching function. These 5 fields allow for upper and lower case information. Each search is joined by an OR condition. If any of the search items are found, the system will treat this line as a matching condition.
Exclusive Search: If Yes, the search will only display the information in the viewer that matches the search criteria. If No, each matching entry will be displayed on the top line of the viewer as the user advances through the report.
Designated Column: User can specify the beginning position and ending position of the columns to search.
Note: Search Criteria can be alpha numeric and is case sensitive.
Searching Priority
- If the Designated Columns as shown above have beginning and ending positions, RVI will search those columns only. This is true even if the Change View option was used to designate up to 5 specific columns for viewing.
- If the Designated Column option was not used and the Change View option was, RVI would search only those columns specified under Change View.
- If the Designated Column and Change View options were not used, RVI would search the entire report.
Note: The Exclusive Search option can be used with any of these searches if the user only needs to see those lines that meet the search criteria.
F24 = More
Access to additional function key options.
F10 = PDF: Convert and display the report in PDF format in the RVI Viewer.
F11 = ChgView: Used to select up to 5 columns from within a report for selective viewing and searching.
F13 = Line#s: Show line numbers on left of display screen.
F14 = Email: E-Mail the report from the IBM i host System.
F15 = Blnks: Remove blank line from report for viewing.
F16 = Repeat: Repeat search.
F17 = Top: Go to top of the report.
F18 = Notes: Add or review notes attached to this report.
F19 = Left: Scroll left.
F20 = Right: Scroll right out to 378 columns.
F21 = 80/132: Toggle between 80 and 132 columns.
F22 = Custom Menu
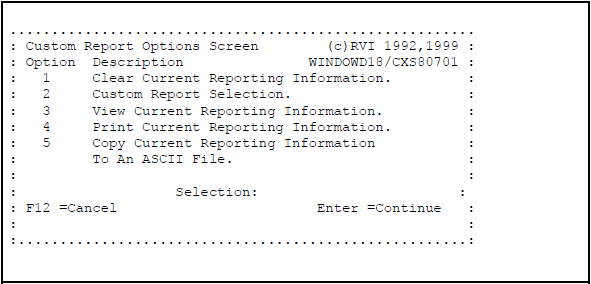
Custom Report Options Screen

User can select information from a spool file report or multiple reports to build a custom report. Collect the required information while viewing the report and enter the appropriate information on this screen.
Option 1: Clear Current Reporting Information.
This should be accomplished before new report information is sent to the private work area.
Option 2: Custom Report Selection Screen.
![Custom Report Selection Screen]()
User can select information from a spool file report or multiple reports to build a custom report. Collect the required information while viewing the report and enter the appropriate information on this screen.
Columns:
- Send only Columns selected for viewing (Y/N), Y for Yes to send the columns selected for viewing under the Change View Option above.
Page Range:
- Select either Complete Report or a Page Range
Exclude or Include From Line:
- Exclude From Line To Line and Include From Line To Line permit the exclusion or inclusion of specific lines within the page range specified. This is helpful when copying and the column headings are not needed for the custom report.
Omit Blank Lines:
- Blank Lines, Y to omit, N to keep. Using Y to omit provides raw data only with no blank lines.
The private work area is assigned by the specific device description and will not be cleared until the user elects to.
Now that the information collected is held in the private work area, the user has several options available.
Option 3: View Current Reporting Information
Option 4: Print Current Reporting Information
Option 5: Copy Current Reporting Information to an ASCII File.
This procedure will download your custom erport data into an ASCII file on the host system by placing it in a host system IFS directory.
Custom to ASCII File Transfer Screen

File Name: The name the user assigns to the file, example MARY.TXT
Folder Name: Could be the IMAGE folder or another folder name the user sets up.


Post your comment on this topic.