(Alt + / + P)
Documents being displayed in the viewer may be printed or e-mailed using the desired settings. Print and E-Mail now supports Highlights and Annotations for output.
Print Menu / Print Documents
(Alt + P + P) or (Ctrl + P)
Permits the user to print documents. The Print Documents Dialog allows the user to select the printer, the documents, and associated settings for output to the printer. The Printer Settings button allows the user to select the printer options specific to the printer selected. The Scale Settings button allows the user to select the default scale settings when printing images. The Page
Settings button is used to select multiple printed images per page. The Annotation button supports image annotation for the printed output.

Range
- All Documents: Check this box to print all pages of all the documents selected for viewing.
- Current Document: Check this box to print the total document or selected pages of the document being viewed.
If the user selected a specific zone for printing, choosing the Selected Area option will print only that area. - Selected Documents: Check this box to print all pages of the selected documents.
- Print Highlights and Markup: Check this box to add the current highlights and annotations to the printed output.
Print Menu / Print Documents / Scale Settings
The scale settings dialog allows the user to select the default scale settings when printing image documents. It may be desirable to have different scale settings for both color and black & white documents. The choices are the same for each option.
Be aware that most printers have an unprintable area around the border of the printed page. Even though the paper size may reflect the selected paper size for the printer, it does not represent the actual area an image may be printed to. The importance of this becomes obvious when printing a scanned image. For example, if the user selects Actual and the original document scanned was 8.50 × 11.00 inches, the output image will be printed beginning at the upper left corner of the printable area and allowed to run off the right and lower sides of the printed paper.
In order to compensate for this aberration, use either the “Fit” option or “Force Scale Inside Printable Area” option. This will cause the image to be scaled to fit within the printable area.
This requirement is by design and is limited by hardware requirements imposed by the printer.
Scale Options / Black & White Image Settings – Color Image Settings
- Actual: Choose this option to print at the actual size regardless of the specified print area.
- Fit: Choose this option to scale the image to fit the specified print area.
- Scale: Choose this option to specify a scale value.
Ratio
- Maintain Aspect Ratio: When scaling an image to print a specific area the image may be scaled either top to bottom or left to right to accommodate the area. Maintaining aspect ratio
forces the scale to be applied both horizontally and vertically to ensure the document appears as desired.
- Force Scale Inside Printable Area: If the settings for Actual or Scale causes the image to overrun the printable area, the output will be scaled down to ensure the whole document is visible.
- Center Images Inside Printable Area: The output will be centered with equal margins on the printed page.
Print Menu / Print Documents / Page Settings
The page settings dialog allows the user to choose how many images will be printed to a single page.

Rows: Select the number of rows to print, maximum of 5.
Columns: Select the number of columns to print, maximum of 5.
Total Windows: Total windows selected.
Quick Buttons: Select 1 of 3 settings, single screen (1), split screen (2) or quad view (4).
Print Multiple Images Per Page: When checked, this becomes the print default for all printing from this specific station.
Print Menu / Print Documents / Annotation
The Annotation dialog allows the user to annotate or print information along with the output image to the printer. Annotation does not permanently affect the image and is present only at print time.

Enable Image Annotation: Check to enable.
Transparent Annotation: Check this block to prevent blocking out information under the stamp.
Token Selections
- Date Stamp: Check this block to date stamp the document scanned.
- Time Stamp: Check this block to time stamp the document scanned.
- Print Page Count: Check this block to print a page number on every page.
- Print Index Information: Check this block to print the indexes associated with this image on every page.
Text Annotation: Add descriptive text to the document printed. Example: COPY OF ORIGINAL.
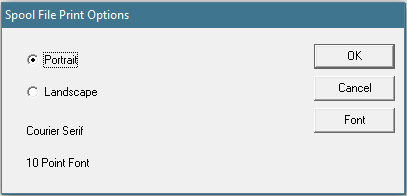
Print Menu / Print Documents / Spool File Print Settings
Choose the orientation and font used to print spool files from the Spool File Viewer.
Print Menu / Mail Documents
(Alt + P + M or Ctrl + E)
E-mail Documents / Range
All Documents: Choose this option to e-mail all pages of all the documents selected for viewing.
Current Document: Choose this option to e-mail the total document or selected pages of the document being viewed.
Selected Documents: Choose this option to e-mail all pages of the selected documents.
Print Highlights/Markup: Enable this option to print the image with corresponding highlights and markups.


Post your comment on this topic.