
In the New CAPA form, users can create and customize the CAPA to align with their specific needs and preferences.

- CAPA Name: This is a text field that allows users to input a name for the CAPA. It is a mandatory field.
- Created By: This field is automatically populated with the full name of the user currently creating the CAPA. Users cannot modify the field.
- Creation Date: This field is automatically populated with the creation date of the CAPA. Users cannot modify the field.
- CAPA ID: This field is automatically populated with a unique identifier when a CAPA is created. Users cannot modify the field.
- When an event type is selected, the CAPA ID will dynamically update to incorporate the appropriate infix.
- For example, if Variance is selected as an event type, the CAPA ID undergoes the following modification:
![]()
- For example, if Variance is selected as an event type, the CAPA ID undergoes the following modification:
- When an event type is selected, the CAPA ID will dynamically update to incorporate the appropriate infix.
- Event Type: This is a single-select dropdown field that displays the list of event types. It is a mandatory field. It allows users to categorize the nature of the CAPA.
- Event Types: Audit Finding (External/Internal), Complaint, Deviation, Incident, Inspection Finding, Non-Conformity, Out-of-Spec, Quality Event, Serious Breach, Variance.
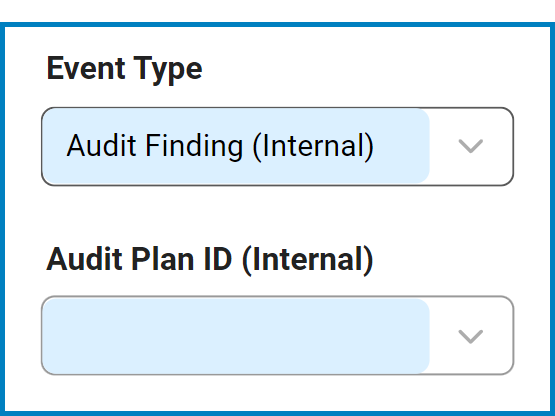
- If Audit Finding (Internal) is selected, the following field becomes visible:
![]()
- Audit Plan ID (Internal): This is a single-select dropdown field that retrieves the list of internal audit plan IDs. It is a mandatory field. It allows users to associate the CAPA with a specific internal audit plan.
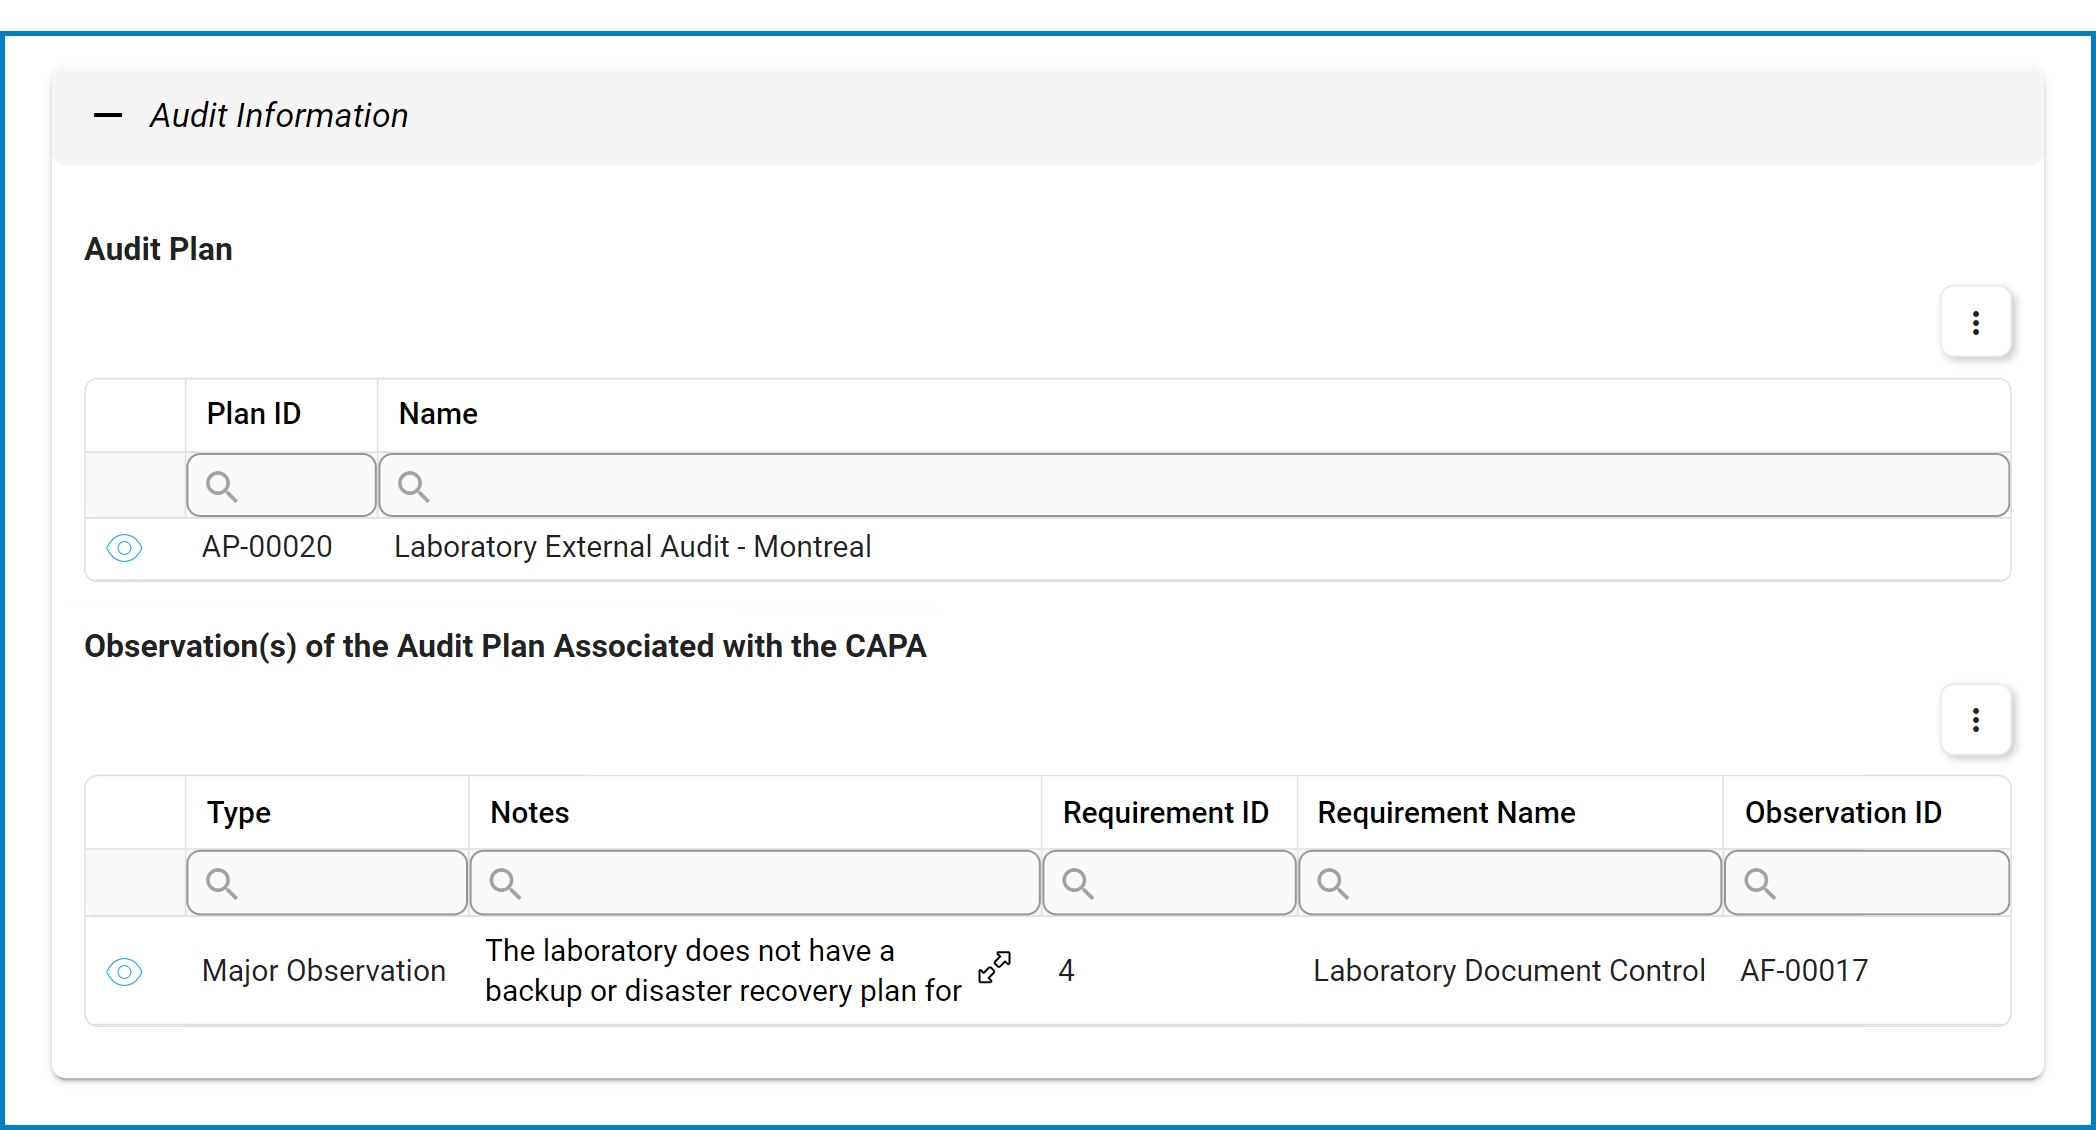
- Internal audit plans are retrieved from the Completed Audit Plans module of the Audit application.
- When an audit plan is linked to the CAPA, a new accordion labeled Audit Information will appear in the form, containing the relevant details.
![]()
- Internal audit plans are retrieved from the Completed Audit Plans module of the Audit application.
- Audit Plan ID (Internal): This is a single-select dropdown field that retrieves the list of internal audit plan IDs. It is a mandatory field. It allows users to associate the CAPA with a specific internal audit plan.
- If Audit Finding (External) is selected, the following field becomes visible:
![]()
- Audit Plan ID (External): This is a text field that allows users to input the unique identifier of the external audit plan. It is a mandatory field. It allows users to associate the quality event with a specific external audit plan.
- If Inspection Finding is selected, the following field becomes visible:
![]()
- Inspection ID (External): This is a text field that allows users to input the unique identifier of the inspection. It is a mandatory field. It allows users to associate the quality event with a specific external inspection.
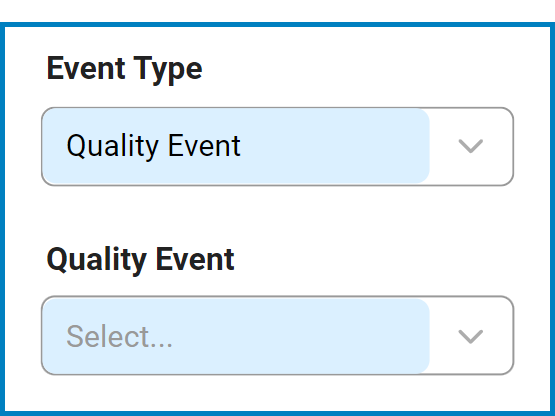
- If Quality Event is selected, the following field becomes visible:
![]()
- Quality Event: This is a single-select dropdown field that retrieves the list of quality event IDs. It is a mandatory field. It allows users to associate the CAPA with a specific quality event.
- Quality events are retrieved from the Quality Event List module of the Quality Event application.
- When a quality event is linked to the CAPA, a new accordion labeled Quality Event Information will appear in the form, containing the relevant details.
![]()
- Quality events are retrieved from the Quality Event List module of the Quality Event application.
- Quality Event: This is a single-select dropdown field that retrieves the list of quality event IDs. It is a mandatory field. It allows users to associate the CAPA with a specific quality event.
- If Audit Finding (Internal) is selected, the following field becomes visible:
- Event Types: Audit Finding (External/Internal), Complaint, Deviation, Incident, Inspection Finding, Non-Conformity, Out-of-Spec, Quality Event, Serious Breach, Variance.
- CAPA Reviewer: This is a single-select dropdown field that retrieves the list of users, roles, and groups in the system. It is a mandatory field. It allows for the selection of the user, role, or group responsible for reviewing the CAPA.
- RCA Owner: This is a single-select dropdown field that retrieves the list of users assigned to the RCA Owner group. It is a mandatory field. It allows for the selection of the user responsible for executing the root cause analysis.
- RCA = Root Cause Analysis
- RCA = Root Cause Analysis
- Effectiveness Check Responsible: This is a single-select dropdown field that retrieves the list of users in the system. It allows for the selection of the user responsible for checking the effectiveness and approving the CAPA.
- Accordions: The form includes several collapsible sections, known as accordions, which each serve a specific purpose.
- Comment: This field allows users to add comments related to the CAPA.
- Submit Form: This button allows users to submit the completed form.
- To maintain the integrity of the CAPA ID system, we have implemented a validation mechanism. When users select this button and are ejected from the New CAPA module, a pop-up window may appear with the following message:
![]()
- Once the New CAPA form has been submitted, the assigned reviewer will be tasked with reviewing the CAPA.
- To maintain the integrity of the CAPA ID system, we have implemented a validation mechanism. When users select this button and are ejected from the New CAPA module, a pop-up window may appear with the following message:
- Save Form: This button allows users to save the form.
- If saved, this form can be found in the Drafts folder (shown in the image below).
- A saved form can be found in the Drafts folder if it is the first step in a given workflow. If it is a task assigned in the middle of a workflow, the saved form will remain in the Pending Tasks folder.
- A saved form can be found in the Drafts folder if it is the first step in a given workflow. If it is a task assigned in the middle of a workflow, the saved form will remain in the Pending Tasks folder.
- If saved, this form can be found in the Drafts folder (shown in the image below).


*To access additional options or perform actions related to the form, please utilize the kebab menu ( ![]() ) located in the upper rightmost corner.
) located in the upper rightmost corner.
Post your comment on this topic.