
One of the core capabilities of SmartView is the event management, which includes defining events, identifying, handling and reporting on event excursions. An event is the occurrence of a pre-defined situation.
SmartView enables users to define business rules for such situations. An Event Excursion represents an alert situation which indicates the breach of one of the business rules that are defining the event. With continuous sensor measurements, SmartView can identify the breach of a rule and thereby can report on an excursion.
To support the event management, SmartView enables users to define event profiles that include: Event Rules, Recipients and personalised message.
The user needs to define appropriate Event Profiles in the system first. For monitoring a shipment or a facility, he needs to select one of the predefined Event Profiles that is applicable for it. Selecting an Event Profile for a shipment or sector means that the business rules, as defined in the Event Profile, are now applicable to the specific shipment or sector.
To access the Event Profiles, you need to go to the ‘Configuration’ tab in the Menu bar and click on Event Profiles.

Create
To create a new Event Profile, go to the Event Profile menu item and click on the button.
Provide a Name for the Event Profile and click OK.
Optionally you can select an existing Event Profile as a template in the Use Event Profile selection box. If you select an existing Event Profile as a template, then the new Event Profile will get the information that was already defined in the existing profile. This is useful in a situation when an Event Profile similar to an existing one needs to be created.
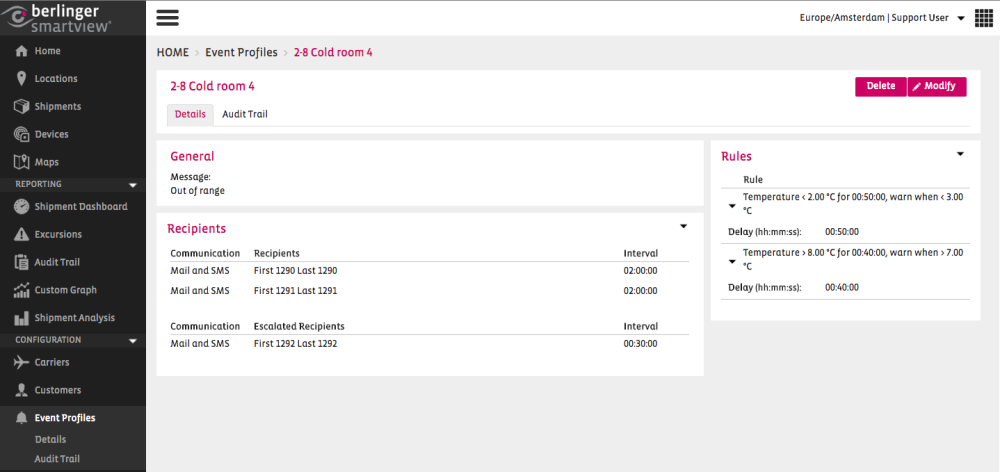
The Event Profile screen contains different sections for defining relevant information:
Message: Define the Message that needs to be sent in the notification email or SMS in case of an event excursion.
Main Recipients: The main recipients section defines the first recipients of the notification in case of an event excursion.
Recipients: Start typing the name of the user who needs to get the notification message. A list of user names matching your typed keys will be visible. Select the name from the list. To define multiple recipients just type again and select the name from shown list.
Notification Type: Select the type of notification that the user will get in case of event excursion – Email, SMS, Email & SMS
Repetition Interval: Define the repetition interval of sending notifications in case an excursion situation persists.
Escalate Recipients: You can optionally define the escalated recipients who will be notified in case an event excursion persists for an Escalation Delay Period and none of the main recipients has acknowledged the excursion.
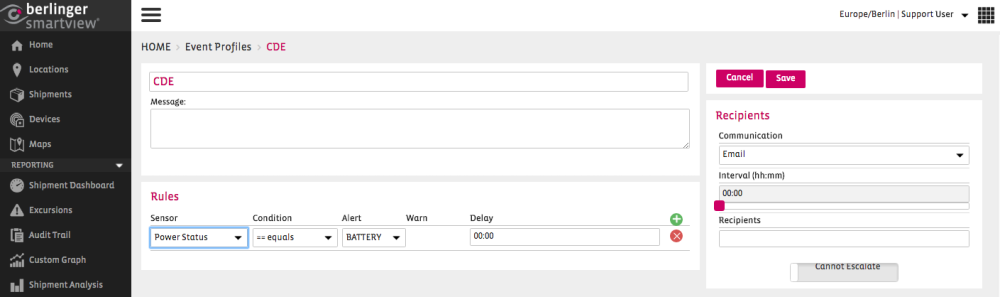
Event Rules: In this section the user defines the business rules for a situation that should be monitored. The breach of any of the rules defined by the user will trigger an excursion and a notification message will be sent to the recipients. Click on the icon and define the following fields as shown in the image below.
Sensor. : Select the sensor that needs to be monitored by the rule such as Temperature, Humidity, Contact and Power Status.
Condition: Select the appropriate mode for the rule, such as “< less than” or “> greater than” for the sensor. For Contact and Power Status sensors the only available Condition is “== equals”.
Value: Define the alert value for the rule.
Delay: Optionally define a delay period for the rule, in case you want to get notified if the alert situation is found to be persisting for the delay period. For example, if you want to get notified in case the temperature crosses the limit for 20 minutes, then define 20 minutes in the delay period.
Warning: Optionally check this box if you want to define a Warning Value.
Warning Value: After checking the Warning option, define the warning value for which you want to get notified. For example, if you want to get a warning notification before the temperature crosses the limit of 8 °C, then you can define the warning value 7. In this case, if the temperature is found to be above 7°C but below 8°C, then you will get a warning notification about the temperature approaching the excursion situation.
After creating an Event Profile, this can be applied to a Sector or a Shipment and can be reused as many times as required.
You can choose to Edit or Delete the Event Profile from the Event Profile overview, by clicking on the  button and by choosing your action. The Modify page can be reached also from the Event Profile itself, by choosing the
  button.
Note: Editing or deleting an Event Profile does not affect the Shipments or Sectors to which the event profile is added. Editing an Event Profile will only affect the Shipments or Sectors to which the Event Profile will be added.
Modify
![]()

Every setting can be modified which you had to fill out or define when creating an Event Profile.
Delete
You cannot delete an Event Profile if it is in use.
Special Type Sensors
Besides the standard sensors that measure and report temperature and humidity continuously, there are following special type of sensors that report on events like Open/Close of contact, Shock.
Open/close Contact: This type of sensor can report on the state of its contact sensor – either OPEN or CLOSE. This type of sensor can be used to monitor the state of a door. You can use such a sensor to get an alert in case the ‘Door is OPEN for 20 minutes’.
Power Monitoring: This type of sensors are actually network infrastructure devices installed in a location, like Gateway or MicroRouter. Although the main responsibility of such a device is to make sure that the data is forwarded to the right node(s), they can be configured to report on their power status. If a Power Monitoring device is running on its backup battery, it will report its status as BATTERY, otherwise it will report the status as MAINS POWER. Thus you can associate such a device to a sector to get an alert in case ‘Power Status in on BATTERY for 5 minutes’.
Battery Voltage: This sensor serves the same purpose of the sensor Power Monitoring but for ILC2000 device only. You can use this sensor for power monitoring of an ILC2000 device.
Light: This especial sensor originally reports on light event i.e. presence of light. This is only available with an ILC2000 device. This sensor should be confused with Light intensity (Lux) sensor of the device.
Shock: This is a measurement that indicates Shock/ Fall experienced by an ILC2000 device. Unlike the other sensor, this is not a separate sensor of ILC2000 device. If an ILC2000 device falls from 1-2 feet above from the ground or experiences a similar shock, it will report a shock event.
Note: Light and Shock reporting of an ILC2000 device is turned off by default. If you want to use these report please make sure have configured the device by turning these sensors ON in SmartView.
To define an Event Profile for any of these special type of sensors, create a new profile and define required rules following the steps described below.
Event rule for open/close contact sensor

To define an Event Profile for open/close contact sensor, create a new Event Profile and follow the following steps
Go to the Edit Event Profile screen for the profile that you have just created and click on the  icon to add a rule. By default, the Temperature sensor is selected for the rule. Change the sensor by selecting Contact from the sensor list. The Condition field will be changed to ‘== equals’ which is unchangeable.
In the Value field select the alert value for which you want to get the alert notification. For example if you want to monitor the state of a door and want to get notified if the door is open, select OPEN for Alarm.
If you want to get the alert if the door is OPEN for a certain period, then define the period by dragging the time (hh:mm) bar. While dragging the bar you can see the period in the Delay field.
Event rule for power monitoring
To define an Event Profile for power monitoring (by using devices like a ConnectGate or MicroRouter), create a new Event Profile and follow the following steps
Go to the Edit Event Profile screen for the profile that you have just created.
Click on the icon to add a rule. By default, the Temperature sensor is selected for the rule. Change the sensor by selecting Power Status from the sensor list. The condition field will be changed to ‘== equals’ which is unchangeable.
To get alert notification when the power status is on backup battery, select BATTERY in the Value field.
If you want to get the alert if the power status is on backup battery for a certain period, then define the period by dragging the time (hh:mm) bar. While dragging the bar you can see the period in the Delay field.
Event rule for Light event
To define an Event Profile for Light event (reported by ILC2000 devices only), create a new Event Profile and follow the following steps
Go to the Edit Event Profile screen for the profile that you have just created.
Click on the icon to add a rule. By default, the Temperature sensor is selected for the rule. Change the sensor by selecting Light from the sensor list. The Condition field will be changed to ‘== equals’ and the Value field will be changed to ‘ON’. Both of these fields are unchangeable.
You will Delay, Warning and Warning Value fields are disabled as these are not required for monitoring light event.
Click on the Save button to save your changes.
Event rule for Shock event
To define an Event Profile for Shock event (reported by ILC2000 device only), create a new Event Profile and follow the following steps
Go to the Edit Event Profile screen for the profile that you have just created.
Click on the icon to add a rule. By default, the Temperature sensor is selected for the rule. Change the sensor by selecting Shock from the sensor list. The Condition field will be changed to ‘== equals’ and the Value field will be changed to ‘ON’. Both of these fields are unchangeable.
You will Delay, Warning and Warning Value fields are disabled as these are not required for monitoring light event.
Click on the Save button to save your changes.
Event rule for Battery Voltage
To define an Event Profile for monitoring the battery voltage of an ILC2000, create a new Event Profile and follow the following steps
Go to the Edit Event Profile screen for the profile that you have just created.
Click on the icon to add a rule. By default, the Temperature sensor is selected for the rule. Change the sensor by selecting Battery Voltage from the sensor list.
Select ‘< less than’ from the condition field and in the Value field put the battery voltage value below which you want to get noticed.
Click on the Save button to save your changes.