Display data from Salesforce® on a Microsoft® SharePoint® page, can be difficult and / or time consuming. Using BCS Meta Man for Windows from Lightning Tools with Microsoft® SharePoint® 2013/2016 or Microsoft® SharePoint® 2010, you can connect to Sales Cloud® CRM Enterprise, Unlimited or Performance editions and generate a BDC model – External Content Type – without having to write any code. The External Content Type(s) are then used with Business Connectivity Services.
To build a connection to Salesforce you need to:
- Verify the custom connector has been installed
- Build a Connected App in Salesforce and take note of the Consumer Key and Consumer Secret that are created.
- Create two Secure Store Application IDs to save the
- Salesforce username and password
- Consumer Key and Consumer Secret.
Create the BCS Model.
Build the Connected App in Salesforce
Any application that communicates with Salesforce will need to be trusted and authorised to connect to the Salesforce data; therefore, you will need to create a Connected App. Connected Apps use the standard OAuth 2.0 protocol to authenticate, provide single sign-on, and acquire access tokens for use with Salesforce APIs. To create a connected app, using the following steps:
- Login to Salesforce.com with your username and password.
- Click Setup in the top right hand corner.
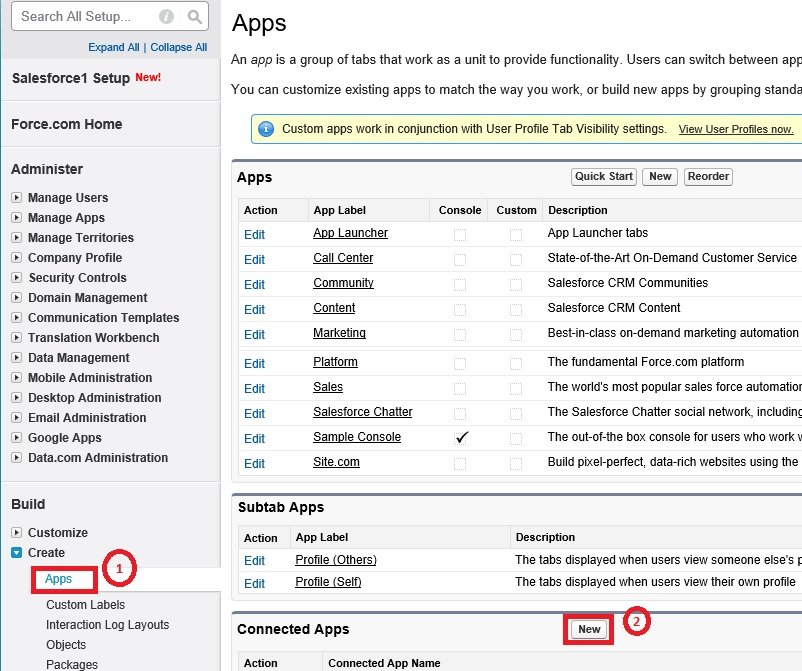
- On the Quick Launch, under Build, expand Create and click Apps.
- In the Connected Apps section, click New to display the New Connected App page.
- In the Basic Information section:
- In the Connected App Name, text box, type a connected app name, for example, Meta Man.
- In the API Name text box, type an API name, for example, Meta Man. This name is used when referring to your Salesforce app from BCS. Only letters, numbers, and underscores are allowed.
- In the Contact Email text box, type a contact Email address that Salesforce should use for contacting you or your support team.
 Under Available OAuth Scopes:
- Select Access and manage your data (api)
- Click Add. The scope appears under Selected OAuth Scopes.
 Click Save,either at the top or bottom of the page.
A page is displayed with the message Allow from 2-10 minutes for your changes to take effect on the server before using the connected app. Click Continue to display the details of the new connected app. In the API (Enable OAuth Settings) section: To the right of Consumer Secret click Click to reveal.
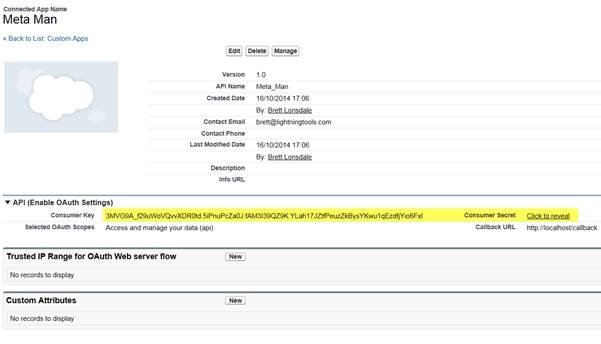 Take note of the Consumer Key and Consumer Secret. These are needed to connect to Salesforce when create Secure Store Application ID and when using BCS Meta Man.
Use Secure Store to create two Secure Store Application IDs
You need to create two Secure Store Target Applications that your BDC Model/External Content Type will use for the BCS Salesforce connector that contain the two credentials were created for your Salesforce Connected App in the previous section:
- Salesforce user credentials
- Salesforce consumer credentials
Use the following steps to create the two Target Applications:
- Navigate to SharePoint 2013 Central Administration web site and click Manage Service Applications under Application Management.
- Click Secure Store Service service application.
- On the Edit Ribbon tab, click New in the Manage Target Applications group.
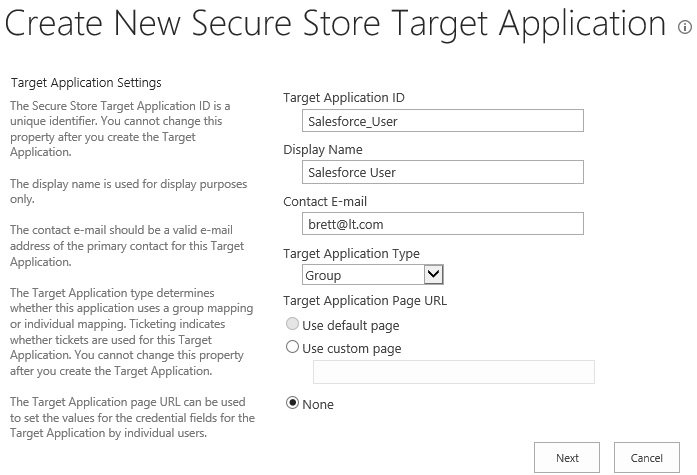
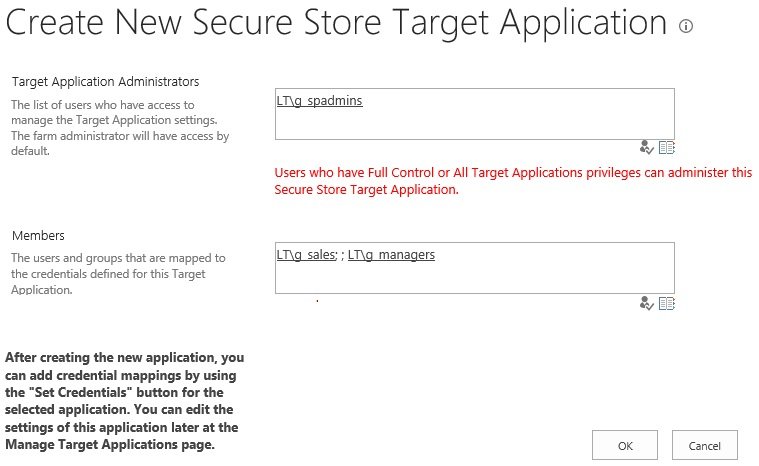
- On the Create New Secure Store Target Application page:
- In the Target Application ID text box, type an application id, for example, Salesforce_User.
- In the Display Name text box, type a display name, for example, Salesforce User
- In the Contact E-mail text box, type an email address.
- In the Target Application Type, select Group.
- Click Next.
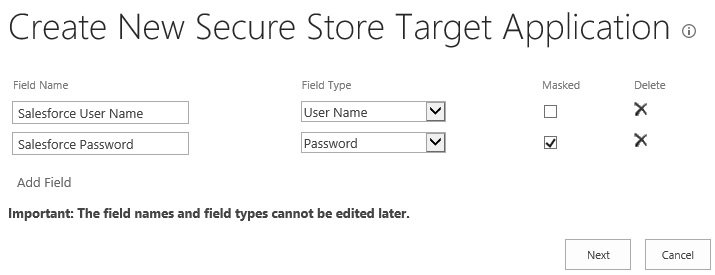
- On the second Create New Secure Store Target Application page:
- In the first text box under Field Name, type Salesforce User Name and from the Field Type drop down list, select, User Name.
- In the second text box under Field Name, type Salesforce Password and from the Field Type drop down list, select, Password
- Click Next.
- On the third Create New Secure Store Target Application page:
- In the Target Application Administrators text box, type or use the people picker to enter the users who will mange the Secure Store Target Application settings.
- In the Members text box, type or use the people picker to enter users who are allowed to connect to Salesforce using the Salesforce User credentials.
- Click OK.
- Create a second Target Application by clicking New on the Edit Ribbon tab, using the same steps above, however, type:
- Target Application ID as Salesforce_Connected_App.
- Display name as Salesforce Connected App.
- Field Name: Salesforce consumer key, Field Type: User Name.
- Field Name: Salesforce consumer secret, Field Type: Password.
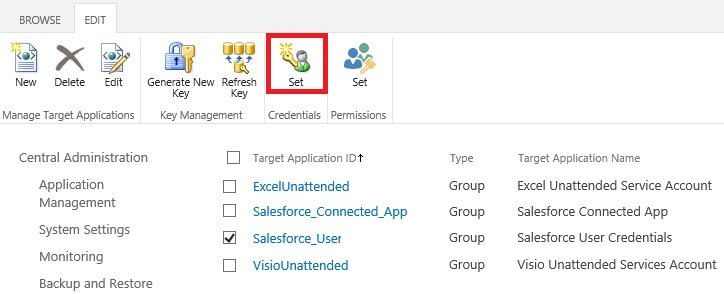
- Select the check box to the left of Salesforce_User and then on the Edit Ribbon tab, click Set in the Credentials group.
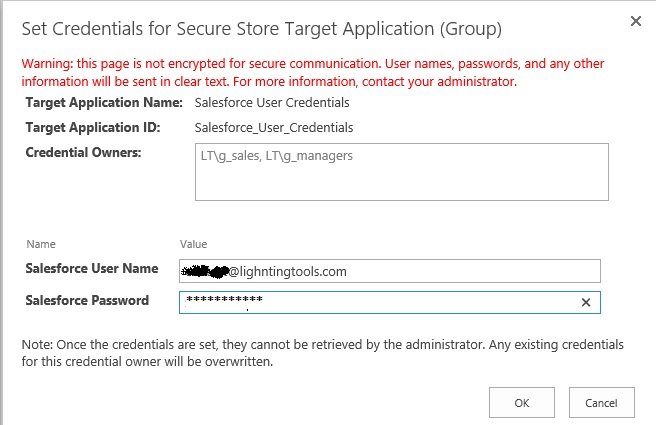
The Set Credentials for Secure Store Target Application (Group) dialog is displayed. - Type the Salesforce user name and password into the relevant text boxes.
- Click OK.
- Repeat the above steps to set the credentials for the Salesforce_Connected_App Target Application and type the Salesforce consumer key and consumer secret into the relevant text boxes.
← Go to top of section
Create a BCS Model
Use the following steps to create a BDC Model:
- Start BCS Meta Man.
- Under Data Source, click Salesforce.
- In the Credentials to be used by meta man to retrieve Salesforce metadata section enter the information that will be used whilst you create/modify the BDC Model:
- In the Salesforce user name text box, type the your Salesforce user name.
- In the Salesforce password text box, type your password.
- In the Consumer key from the remote access application definition text box, type your consumer key.
- In the Consumer secret from the remote access application definition text box, type the consumer secret.
 Click the blue arrow
  to move to the next step – build one or more external content types
← Go to top of section
← Connecting to Oracle
Connecting to Microsoft SQL Server database →




Post your comment on this topic.