By selecting the BPMS SMS Service checkbox/module in the Features installer, the “SMS Service Configuration” form will then be displayed. This form is used to update or install the SMS Service.
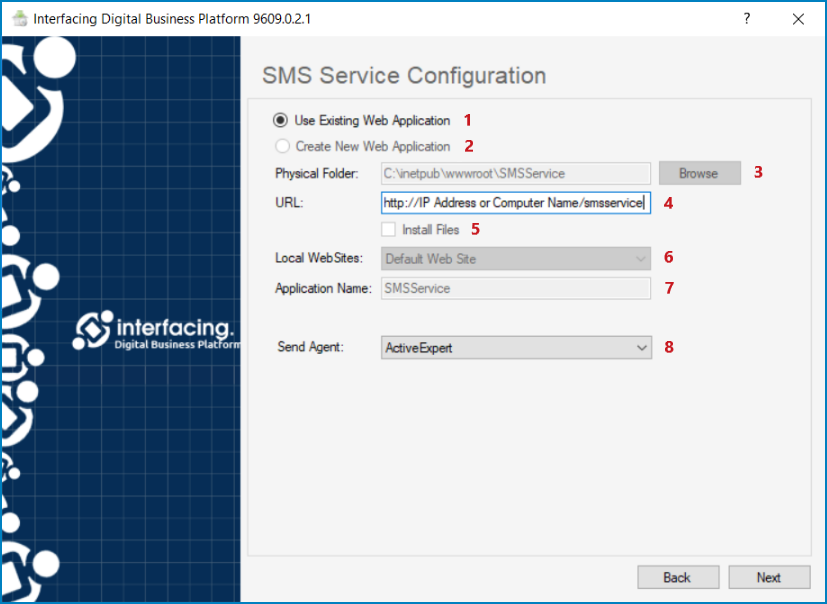
- Use Existing Web Application: This option allows users to perform the installation on the existing SMS Service available in the system.
![]()
- If this option selected, certain fields in this form will be disabled, as they will contain previously defined information. Where applicable, however, users will be able to either make modifications to the displayed information or input new information.
- Create New Web Application: This option allows users to create a new SMS Service.
![]()
- If this option is selected and the corresponding profile is then defined, the SMS Service will be created under the chosen name. All fields will be enabled, allowing users to define new information.
- Physical Folder: This field allows users to select the physical path/folder of the SMS service.
- To select or change the folder, select the Browse button.
![]()
- To select or change the folder, select the Browse button.
- URL: This is a text field that allows users to input the URL (or web service access path) of the SMS service.
![]()
- Install Files: This is a checkbox which, if selected, allows users to install the files and place them into the IIS physical path/folder.
![]()
- Local Website: This is a single-select dropdown field that displays the list of local websites. It allows users to select the website that will host the SMS Service.
![]()
- Application Name: This is a text field that allows users to input the name of the web application.
![]()
- Send Agent: This is a single-select dropdown field that displays the list of send agents. It allows users to select the server that will be used as the SMS provider.
![]()