
Selecting the Settings button will display the Settings form. This form is composed of nine main tabs: (1) General, (2) System, (3) Workbench, (4) Security, (5) E-Mail/SMS, (6) File Storage, (7) Integration, (8) Scheduler, and (9) Logs.
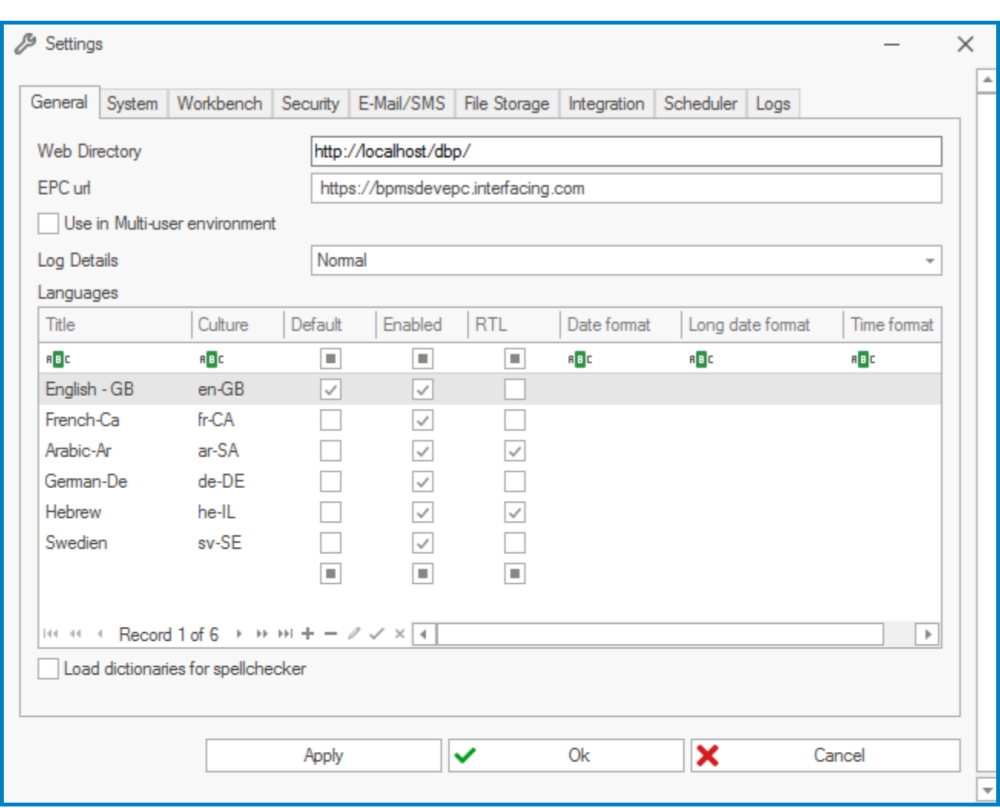
- General Tab: In this tab, users can access the list of supported languages. They can set a language as the default and/or enable languages as available options.
![]()
- Web Directory: This is a text field that allows users to specify the web address of the BPM application.
- To view the web application, the web directory must be entered correctly.
- EPC URL: This is a text field that allows users to specify the URL of the EPC server that will be linked to the application.
- Use in Multi-User Environment: This is a checkbox which, if selected, allows users to enable use in a multi-user environment.
- Selecting this checkbox will display the Multi-User Settings section.
![]()
- BPM Applications Directory: This field allows users to specify the physical path/folder of the BPM applications.
- Rebuild an Application For the First Use: This is a checkbox which, if selected, allows users to automatically rebuild an application for the first use.
- Selecting this checkbox will display the Multi-User Settings section.
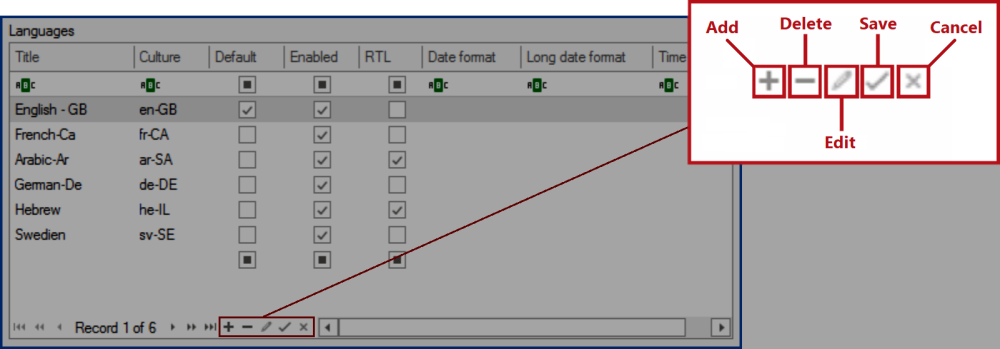
- Languages: Here, users can configure the language settings.
![]()
- Title: This is a text field that allows users to input the title of the language.
- Culture: This is a text field that allows users to input the cultural variant of the language.
- Default: This option allows users to set a language as the default. (Only one language can be set as the default at a time.)
- Enabled: This is a checkbox which, if selected, allows users to enable a language for use in the Web. (Multiple languages can be enabled at a time.)
- RTL: This is a checkbox which, if selected, allows users to mark out the languages that use right-to-left script.
- Date Format: This is a text field that allows users to specify the date format for the language.
- Long Date Format: This is a text field that allows users to specify the long date format for the language.
- Time Format: This is a text field that allows users to specify the time format for the language.
- Log Details: This is a single-select dropdown field that displays the list of log details. It allows users to select the method by which details are logged in the system.
- Log Details: Critical Only, Normal, or Verbose.
- Load Dictionaries for Spellchecker: This is a checkbox which, if selected, allows users to load dictionaries for the spellchecker function.
- Web Directory: This is a text field that allows users to specify the web address of the BPM application.

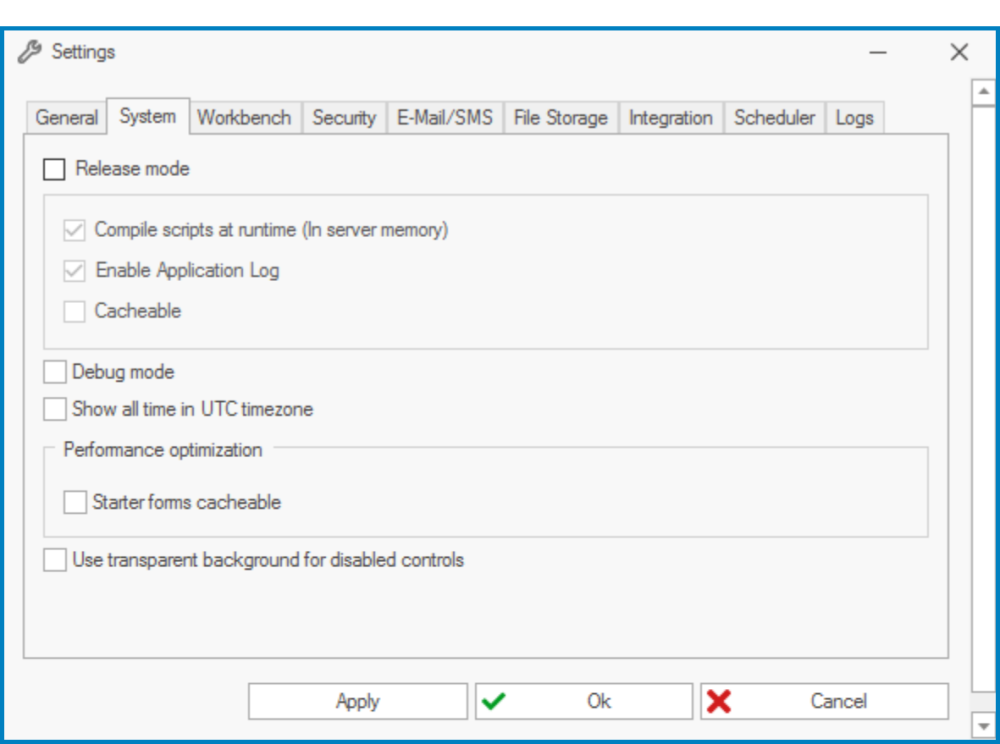
- Systems Tab: In this tab, users can configure details relating to the running of the system.
![]()
- Release Mode: This is a checkbox which, if selected, allows for the program to run in release mode. In this mode, there is no need to deploy the application every time modifications are made.
- Compile Scripts at Runtime: This is a checkbox which, if selected, allows users to compile scripts at runtime. This means that changing the script and saving it does not require for the application to be deployed.
- Enable Application Log: This is a checkbox which, if selected, allows for relevant activities performed in the system to be recorded in the Application Log.
- Cacheable: This is a checkbox which, if selected, activates data retrieval from the server memory.
- Debug Mode: This is a checkbox which, if selected, allows for the program to run in debug mode.
- Show All Time in UTC Time Zone: This is a checkbox which, if selected, converts all time to the UTC time zone.
- Starter Forms Cacheable: This is a checkbox which, if selected, activates data retrieval for starter forms.
- Use Transparent Background For Disabled Controls: This is a checkbox which, if selected, allows for disabled controls to have a transparent background in applications—as opposed to a darker background color.
- Release Mode: This is a checkbox which, if selected, allows for the program to run in release mode. In this mode, there is no need to deploy the application every time modifications are made.
- Workbench Tab: In this tab, users can set up both their logo and web application title.
![]()
- Logo: This field allows users to add their logo.
- To add a customer logo, first click on the
![]() button and then select the desired image. The image can be removed by selecting the Delete button.
button and then select the desired image. The image can be removed by selecting the Delete button.
- To add a customer logo, first click on the
- Set Title: Here, users can set the web application title. Users can also customize the title according to each language.
- Logo: This field allows users to add their logo.
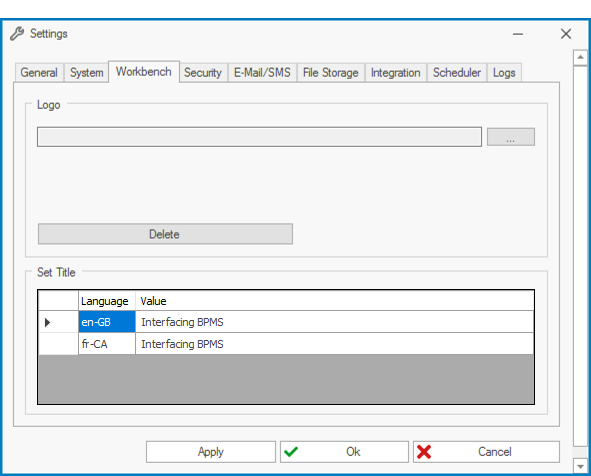
 button and then select the desired image. The image can be removed by selecting the Delete button.
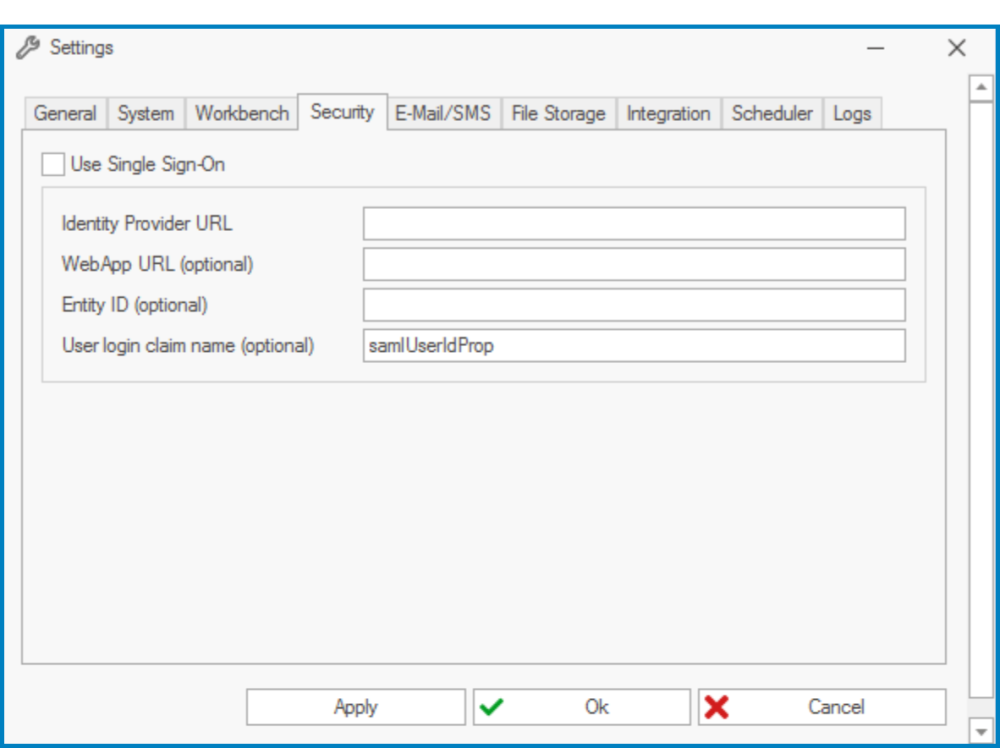
- Security Tab: In this tab, users can configure the security settings.
![]()
- Use Single Sign-On: This is a checkbox which, if selected, allows users to enable the use of single sign-on (SSO).
- SSO allows users to authenticate with multiple applications using a single set of credentials.
- Identity Provider URL: This is a text field that allows users to input the URL of the identity provider.
- WebApp URL: This is a text field that allows users to input the URL of the web application. This is an optional field.
- Entity ID: This is a text field that allows users to input the entity ID. This is an optional field.
- User Login Claim Name: This is a text field that allows users to input the user login claim name. This is an optional field.
- Use Single Sign-On: This is a checkbox which, if selected, allows users to enable the use of single sign-on (SSO).
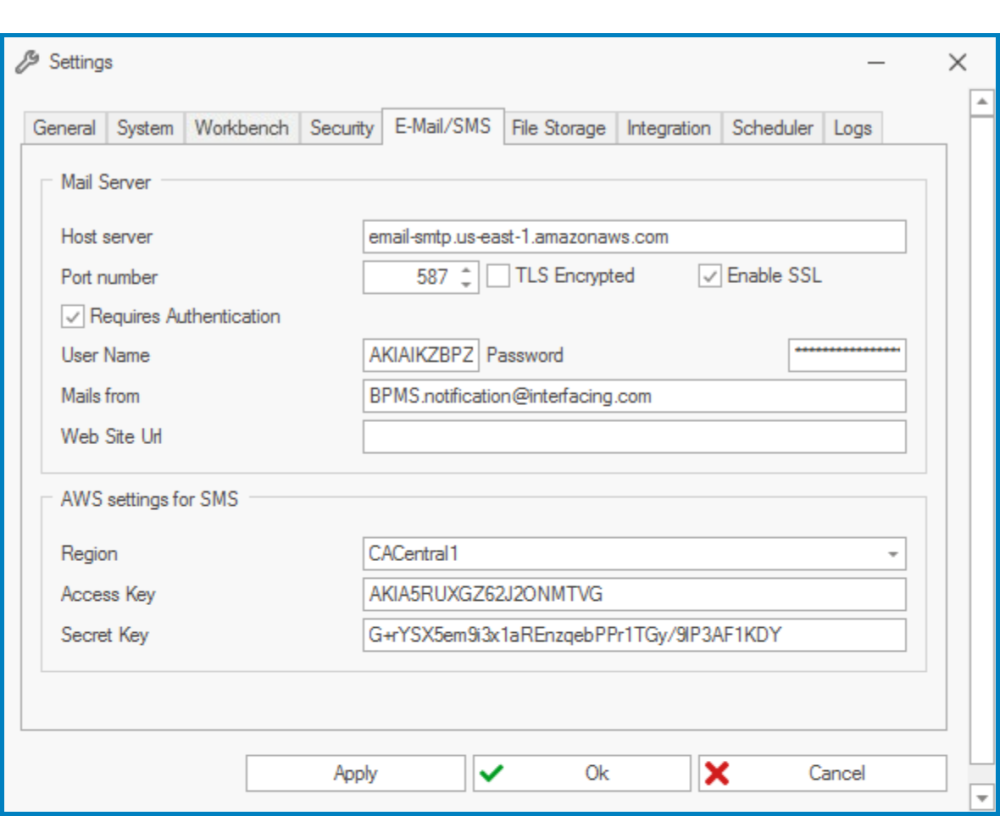
- E-Mail/SMS Tab: In this tab, users can configure the email and SMS settings.
![]()
- Mail Server: Here, users can set up the mail server.
- Host Server: This is a text field that allows users to input the address of the host server.
- Port Number: This is a numeric updown field that allows users to input the port number. Users can enter this number either manually or by clicking the increment/decrement arrows.
- TLS Encrypted: This is a checkbox which, if selected, allows users to enable TLS encryption.
- Enable SSL: This is a checkbox which, if selected, allows users to enable SSL.
- Requires Authentication: This is a checkbox which, if selected, allows users to mark out authentication as a requirement.
- User Name: This is a text field that allows to input the username.
- Password: This is a text field that allows users to input the password.
- Mails From: This is a text field that allows users to input the address from which the emails will be sent.
- Website URL: This is a text field that allows users to input the URL of the website.
- AWS Settings for SMS: Here, users can configure the AWS settings for SMS.
- Region: This is a text field that allows users to input the AWS region.
- Access Key: This is a text field that allows users to input the access key.
- Secret Key: This is a text field that allows users to input the secret key.
- Mail Server: Here, users can set up the mail server.
- File Storage Tab: In this tab, users can
![]()
- File Storage Type: This is a single-select dropdown field that displays the list of file storage types. Depending on the type selected from this dropdown, different fields will be enabled/disabled in this tab.
- File Storage Types: DB, Local Folder, Remote Folder, or AWS S3.
- Local Folder: Here, users can input the local folder.
- Remote Folder: Here, users can input the remote folder.
- AWS Settings: Here, users can configure the AWS settings.
- Region: This is a text field that allows users to input the AWS region.
- Access Key: This is a text field that allows users to input the access key.
- Secret Key: This is a text field that allows users to input the secret key.
- Bucket Name: This is a text field that allows users to input the bucket name.
- Folder in the Bucket: This is a text field that allows users to specify the folder in the bucket.
- Custom File Storage: Here, users can
- File Storage Type: This is a single-select dropdown field that displays the list of file storage types. Depending on the type selected from this dropdown, different fields will be enabled/disabled in this tab.
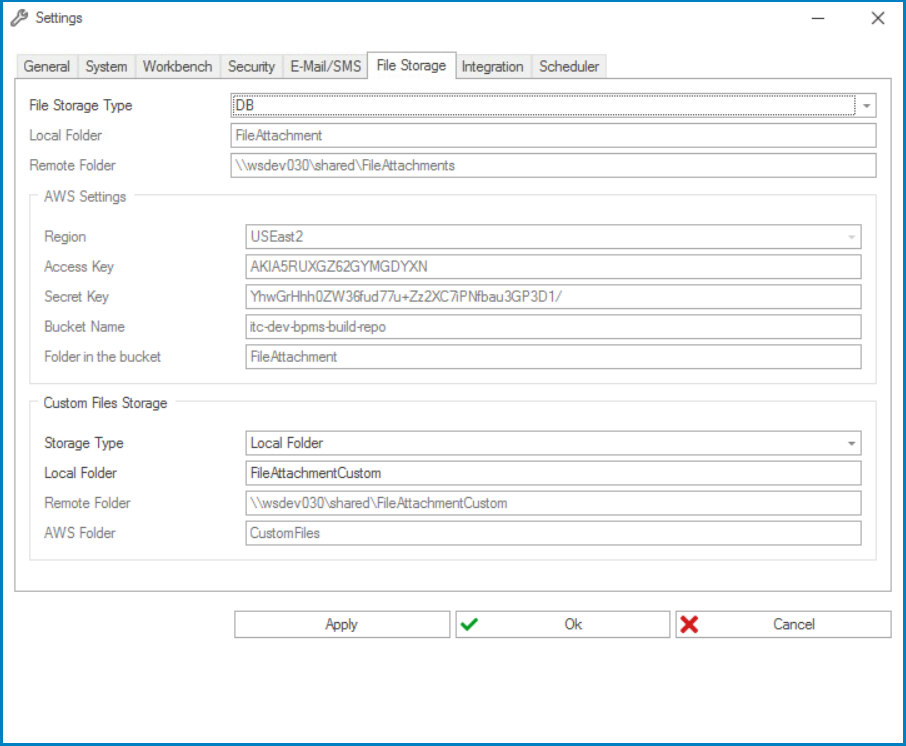
- Storage Type: Here, users can select from the dropdown the storage type. Depending on the type selected from this dropdown, different fields will be enabled/disabled in this tab.
- Local Folder: Here, users can input the local folder.
- Remote Folder: Here, users can input the remote folder.
- AWS Folder: Here, users can input the AWS folder.
- Integration Tab
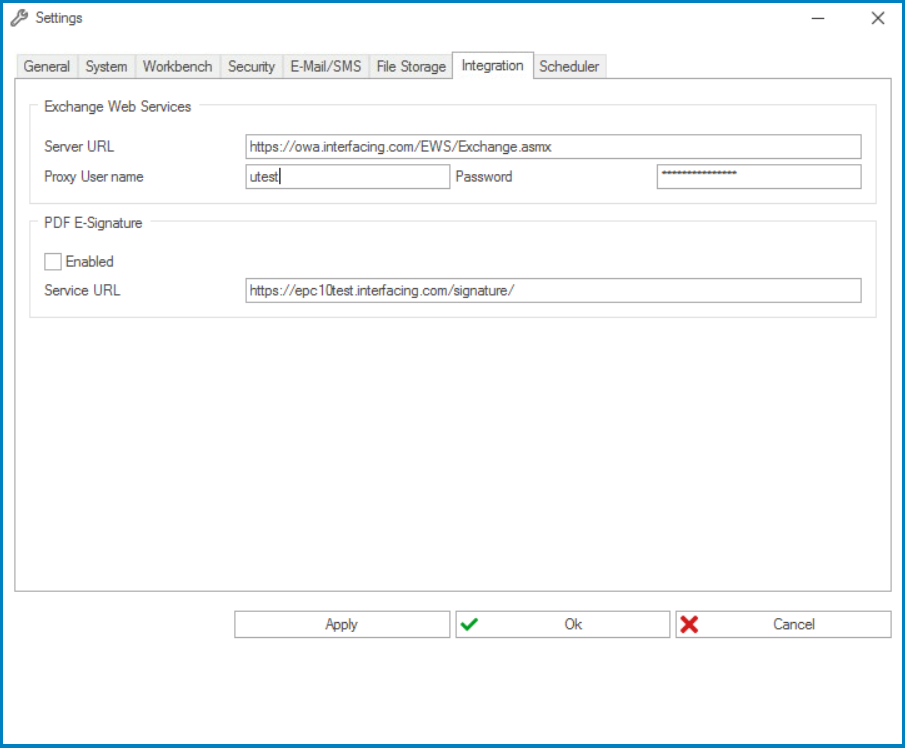
- Server URL: Here, users can input the server URL.
- Proxy User Name: Here, users can input the proxy username.
- Password: Here, users can input the password.
- Enabled: Here, users can choose whether or not to enable a PDF e-signature.
- Service URL: Here, users can input the service URL.
- Scheduler Tab
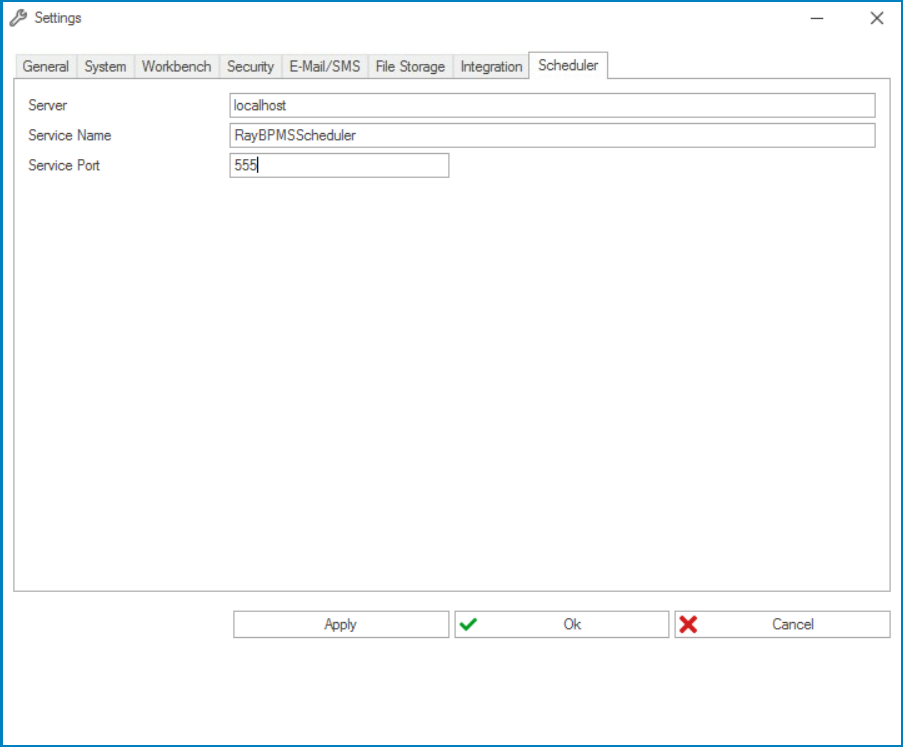
- Server: Here, users can input the server name.
- Service Name: Here, users can input the service name.
- Service Port: Here, users can input the service port number.
- Logs