The Application section of the menu bar is comprised of the following items:

- Add: This button allows users to add a new application.
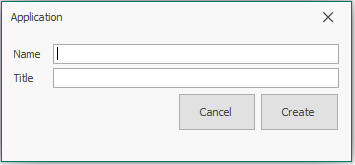
- If selected, it will display the Application form. In this form, users can set the name and title of the application.
- Name: This is a text field that allows users to input the name of the application.
- This is the name that the application will be registered under in the database. This name will also be used later on as part of the established naming convention.
- It is recommended that the name of an application be kept short and simple.
- Title: This is a text field that allows users to input the title of the application.
- This is the title that the application will be registered under in the Application Tree of the Designer.
- Unlike the name, the title of an application can be longer and more descriptive.
- To create and save the application, click on the Create button. To cancel this process, click on the Cancel button.
- Name: This is a text field that allows users to input the name of the application.
- If selected, it will display the Application form. In this form, users can set the name and title of the application.
- Remove: This button allows users to remove an application.
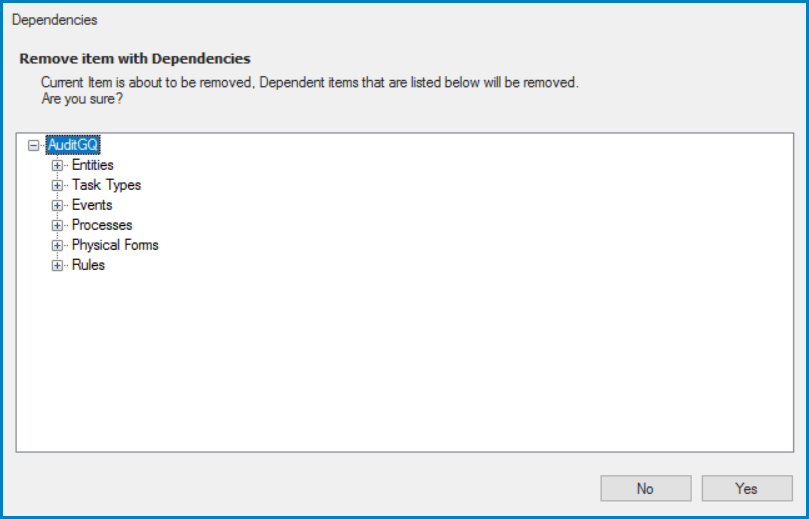
- To begin the removal process, select the application from the Application Tree and then click on the Remove button. It will display the Dependencies form. In this form, users can access an overview of the selected application, including its dependent objects.
- To confirm the removal, click on the Yes button. To instead cancel the removal process, click on the No button.
- To begin the removal process, select the application from the Application Tree and then click on the Remove button. It will display the Dependencies form. In this form, users can access an overview of the selected application, including its dependent objects.
- Export: This button allows users to export an application.
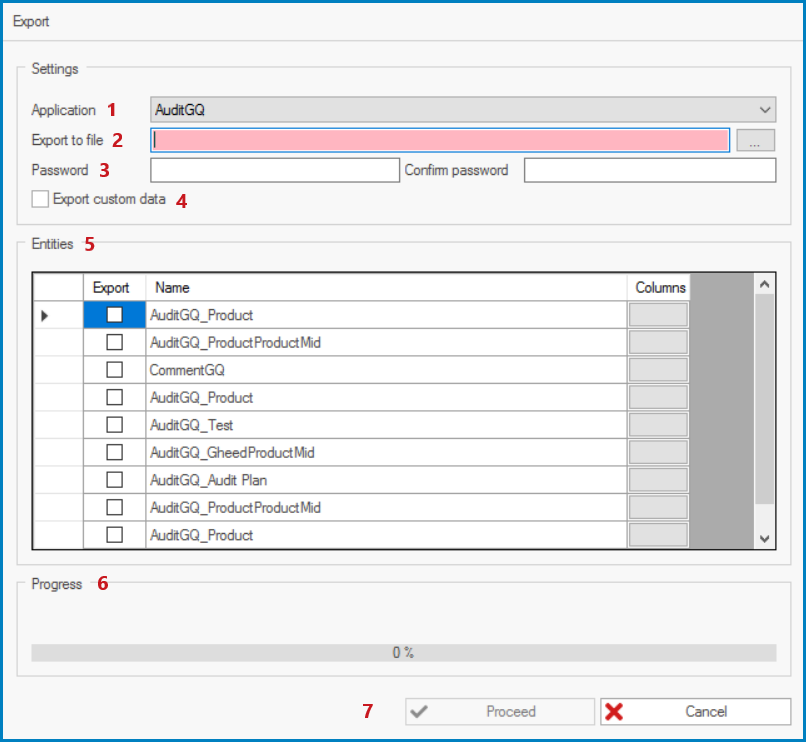
- To begin the export process, select the application from the Application Tree and then click on the Export button. It will display the Export form. Depending on the settings configured in this form, a backup file will be created for the selected application in the .rba format.
- Application: This is a single-select dropdown field that allows users to select the application that they would like to export.
- Export to File: This field allows users to specify the path/folder to which the file will be exported.
- Password & Confirm Password: These are text fields that allow users to input and confirm the password.
- Once a password has been set, the output file will be locked and thenceforth can only be accessed using the password.
- Export Custom Data: This is a checkbox which, if selected, allows users to export custom data.
- All entities belonging to the application will, in turn, be selected for export.
- Entities: In this section, users can access the list of the entities belonging to the application.
- To select an entity for export, enable the checkbox adjacent to it.
- Once the user has determined that they would like to proceed with the export, all selected entities/field data will be transferred to the specified database.
- Selecting an entity automatically selects all attributes of that entity. To alter this selection, use the Columns field adjacent to the entity.
- If the Columns field is selected, it will display the Column Selector form.
- In this form, users can specify their preferences with regards to which attributes are copied
- If the Columns field is selected, it will display the Column Selector form.
- To select an entity for export, enable the checkbox adjacent to it.
- Progress: This bar is used to visualize the progress of the data transfer.
- Proceed or Cancel: To continue with the export, click on the Proceed button. To cancel, click on the Cancel button.
- To begin the export process, select the application from the Application Tree and then click on the Export button. It will display the Export form. Depending on the settings configured in this form, a backup file will be created for the selected application in the .rba format.
- Import: This button allows users to import an application into the DBP.
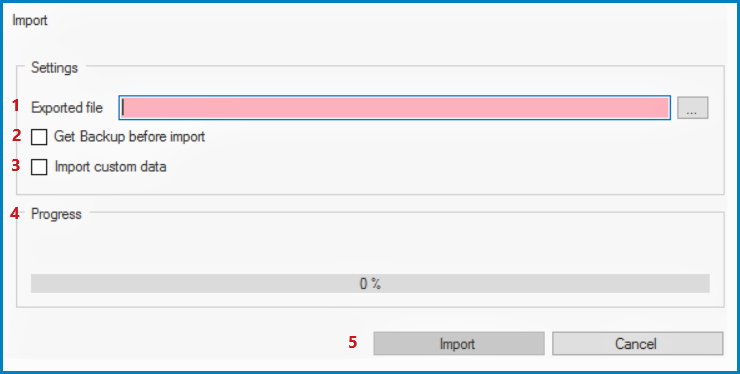
- To begin the import process, select the application from the Application Tree and then click on the Import button. It will display the “Import” form.
- Exported File: This field allows users to select the file/application that they would like to import.
- To import an application, first click on the
button to select the .rba file and then click on the Import button.
- To import an application, first click on the
- Get Backup Before Import: This is a checkbox which, if selected, allows users to backup existing data before the import.
- Import Custom Data: This is a checkbox which, if selected, allows users to import custom data.
- Progress: This bar is used to visualize the progress of the data transfer.
- Import or Cancel: To proceed with the import, click on the Import button. To cancel, click on the Cancel button.
- Exported File: This field allows users to select the file/application that they would like to import.
- To begin the import process, select the application from the Application Tree and then click on the Import button. It will display the “Import” form.


 button to select the .rba file and then click on the Import button.