
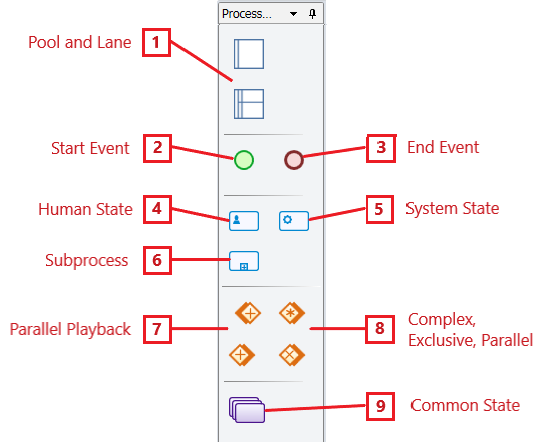
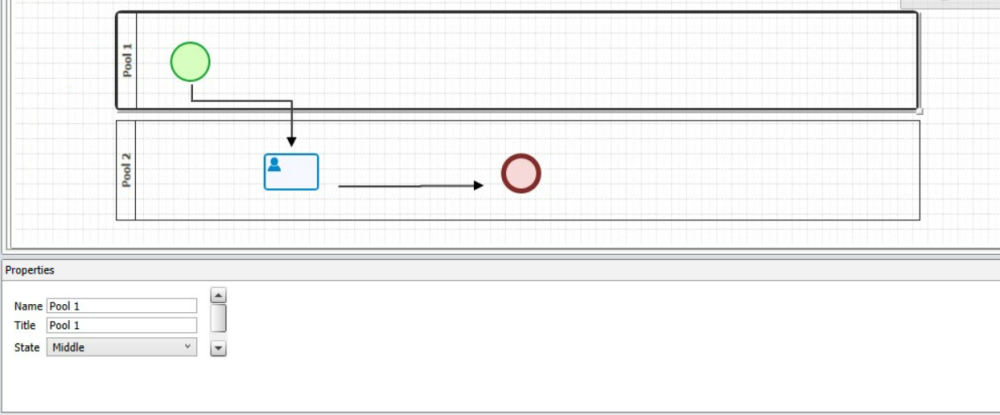
- Pool and Lane
Collectively making up what is known as a “swimlane,” the pool and the lane are used to categorize and group the activities of a process. They allow users, essentially, to visually organize the steps and stakeholders of a process. (The term stakeholders, in this context, refers to the various parties involved in the workflow. Whether they affect it or are affected by it, these parties play a role in the process.)
To use these two elements, first drag the “Pool” from the toolbox and drop it onto the design canvas. Next, drag the “Lane” from the toolbox and drop it onto the pool. (Users can add multiple lanes simply by dragging and dropping more onto the pool.)
Selecting pools and/or lanes on the design canvas will display their associated properties in the Properties field.
Pool Profile
- Name: Here, users can input the unique name for the element.
- A valid name can contain letters, numbers, and the underscore symbol. It cannot, however, contain spaces or other special characters. It also cannot begin with a number.
- Title: Here, users can input the title of the element. This title will be displayed in the diagram.
- Unlike with names, there are no rules determining the validity of titles.
- State: Here, users can select from the dropdown the state of the element.
- States: Start, Middle, End.
Lane Profile

- Name: Here, users can input the unique name for the element.
- A valid name can contain letters, numbers, and the underscore symbol. It cannot, however, contain spaces or other special characters. It also cannot begin with a number.
- Title: Here, users can input the title of the element. This title will be displayed in the diagram.
- Unlike with names, there are no rules determining the validity of titles.
- State: Here, users can select from the dropdown the state of the element.
- Theme Colors: Here, users can select the theme color for the lane.
- Start Event
All process maps require a start event—that is, a trigger that causes the process to begin.

Selecting a start object on the design canvas will display its associated properties in the Properties field. Therein, users will be able to define/select the behavior of the start form.
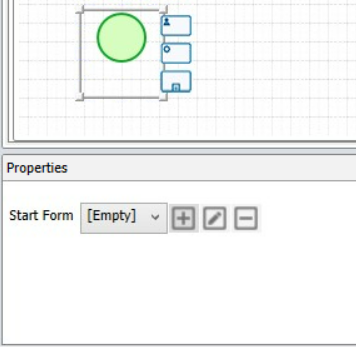
- Start Form: Here, users can either define a new start form behavior or select an existing one from the dropdown.
- To define a new start form behavior, select the
![]() button. It will display the “Form Behavior Properties” form.
button. It will display the “Form Behavior Properties” form.
- For more information on this form, click here.
- To modify an existing start form behavior, select the
![]() button.
button. - To delete a start form behavior, select the
![]() button.
button.
- To define a new start form behavior, select the
 button. It will display the “Form Behavior Properties” form.
- End Event
All process maps conclude with an end event—that is, a final stage signaling the completion of the workflow.
Selecting an end object on the design canvas will display its associated properties in the Properties field.
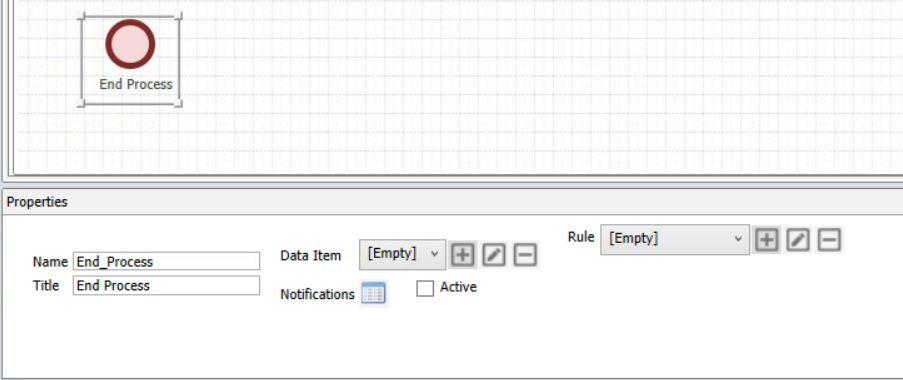
- Name: Here, users can input the unique name for the element.
- A valid name can contain letters, numbers, and the underscore symbol. It cannot, however, contain spaces or other special characters. It also cannot begin with a number.
- Title: Here, users can input the title of the element. This title will be displayed in the diagram.
- Unlike with names, there are no rules determining the validity of titles.
- Data Item: Here, users can either define a new data item or select an existing one from the dropdown.
- To define a new data item, select the
![]() button. It will display the “Data Item Properties” form.
button. It will display the “Data Item Properties” form.
- For more information on this form, click here.
- By defining or choosing a text message in this field, in the history and process interception, the text message inside parameter “num” is displayed. Parameter is defined inside the template.
- To modify an existing data item, select the
![]() button.
button. - To delete a data item, select the
![]() button.
button.
- To define a new data item, select the
- Active: Here, users can mark out the object as active. (Active, in this context, is equivalent to enabling notifications.)
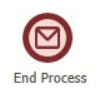
- As shown in the image below, selecting this checkbox will display a small envelope on the object in the diagram, signifying that a notification will be sent at that stage.
![]()
- As shown in the image below, selecting this checkbox will display a small envelope on the object in the diagram, signifying that a notification will be sent at that stage.
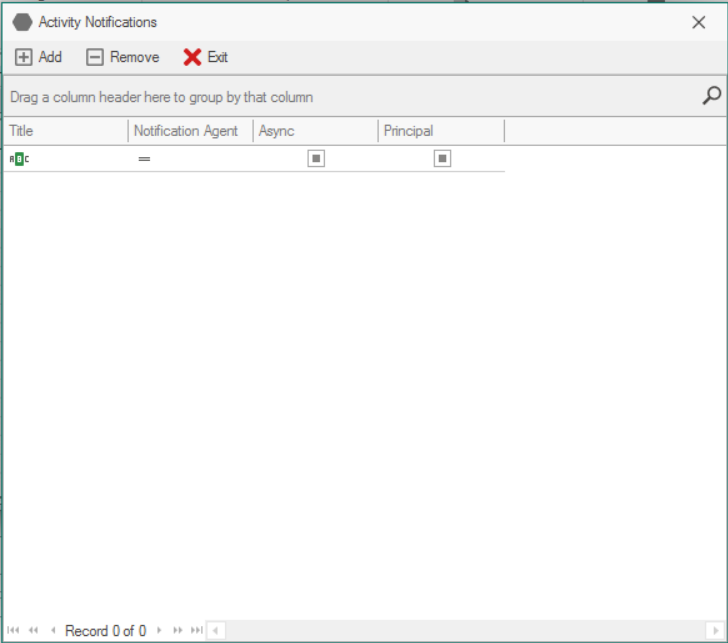
- Notifications: Once the Active checkbox has been selected and the process has been published, users can select the Notifications button. It will display the “Activity Notifications” form.
- In this form, users can define the required notifications for an activity. These notifications, once set in place, will then be executed at the applicable stage in the process.
![]()
- Add: This button allows users to add a new notification.
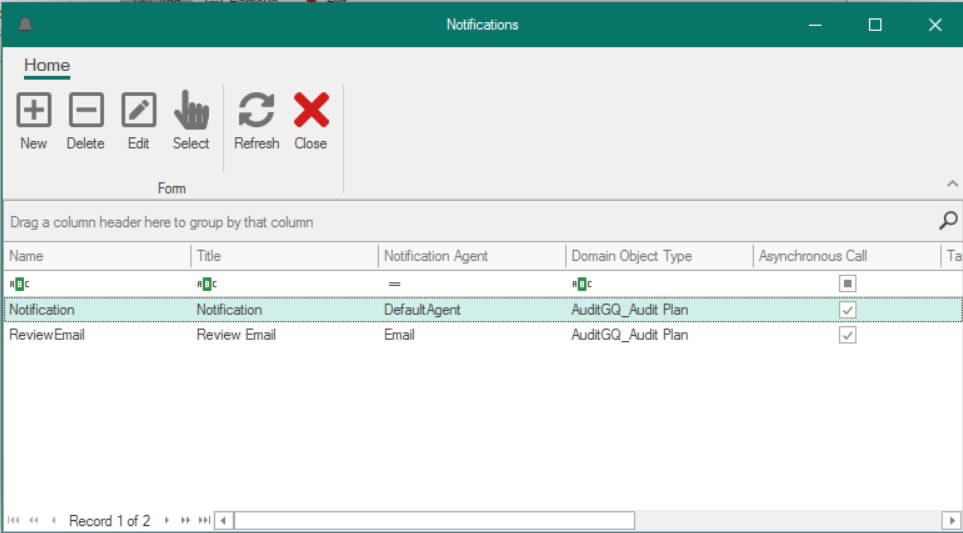
- Selecting this button will display the “Notifications” form, in which users can either define new notifications or select existing ones (if applicable) from the list.
![]()
- New: This button allows users to create a new notification item. It will display the “Notification Item Properties” form.
- For more information on this form, click here.
- Delete: This button allows users to delete a notification item.
- Edit: This button allows users to edit an existing notification item.
- Select: This button allows users to select a notification item (to be triggered during the process).
- Selecting this button will redirect users back to the “Activity Notifications” form—the notification item now listed therein.
- Refresh: This button allows users to refresh the form.
- Close: This button allows users to close the “Notifications” form.
- New: This button allows users to create a new notification item. It will display the “Notification Item Properties” form.
- Selecting this button will display the “Notifications” form, in which users can either define new notifications or select existing ones (if applicable) from the list.
- Remove: This button allows users to remove a notification.
- Exit: This button allows users to exit the “Activity Notifications” form.
- In this form, users can define the required notifications for an activity. These notifications, once set in place, will then be executed at the applicable stage in the process.
- Rule: Here, users can either define a new rule or select an existing one from the dropdown. This rule, once set in place, will be executed per its conditions at the applicable stage in the process.
- To define a new rule, select the
![]() button. It will display the “Rule Properties: New” form.
button. It will display the “Rule Properties: New” form.
- For more information on this form, click here.
- To modify an existing rule, select the
![]() button.
button. - To delete a rule, select the
![]() button.
button.
- To define a new rule, select the
- Human State
If individuals play a role in the execution of the process, use the human state/task.
Selecting a human task on the design canvas will display its associated properties in the Properties field.
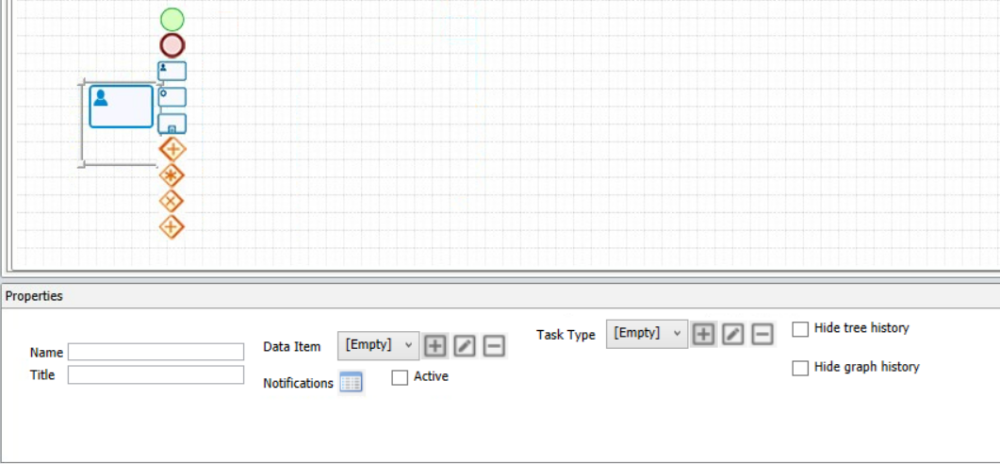
- Name: Here, users can input the unique name for the element.
- A valid name can contain letters, numbers, and the underscore symbol. It cannot, however, contain spaces or other special characters. It also cannot begin with a number.
- Title: Here, users can input the title of the element. This title will be displayed in the diagram.
- Unlike with names, there are no rules determining the validity of titles.
- Data Item: Here, users can either define a new data item or select an existing one from the dropdown.
- To define a new data item, select the
![]() button. It will display the “Data Item Properties” form.
button. It will display the “Data Item Properties” form.
- For more information on this form, click here.
- To modify an existing data item, select the
![]() button.
button. - To delete a data item, select the
![]() button.
button.
- To define a new data item, select the
- Active: Here, users can mark out the object as active. (Active, in this context, is equivalent to enabling notifications.)
- As shown in the image below, selecting this checkbox will display a small envelope on the object in the diagram, signifying that a notification will be sent at that stage.
![]()
- As shown in the image below, selecting this checkbox will display a small envelope on the object in the diagram, signifying that a notification will be sent at that stage.
- Notifications: Once the Active checkbox has been selected and the process has been published, users can select the Notifications button. It will display the “Activity Notifications” form, in which users can define the required notifications for an activity
- For more details on this field, see the previous instance described above.
- Task Type: Here, users can either define a new task type or select an existing one from the dropdown.
- The task type determines the task for the human state, the form behavior, the receiver(s) of the form, and the dynamic task type.
To define a new task type, select the![]() button. It will display the “Task Type Properties” form.
button. It will display the “Task Type Properties” form.
- For more information on this form, click here.
- To modify an existing task type, select the
![]() button.
button. - To delete a task type, select the
![]() button.
button.
- The task type determines the task for the human state, the form behavior, the receiver(s) of the form, and the dynamic task type.
- Hide Tree History: This button allows users to hide the tree history.
- Hide Graph History:This button allows users to hide the graph history.

- System State
If a process requires system rule enforcement, use the system state/task.
Selecting a system task on the design canvas will display its associated properties in the Properties field.
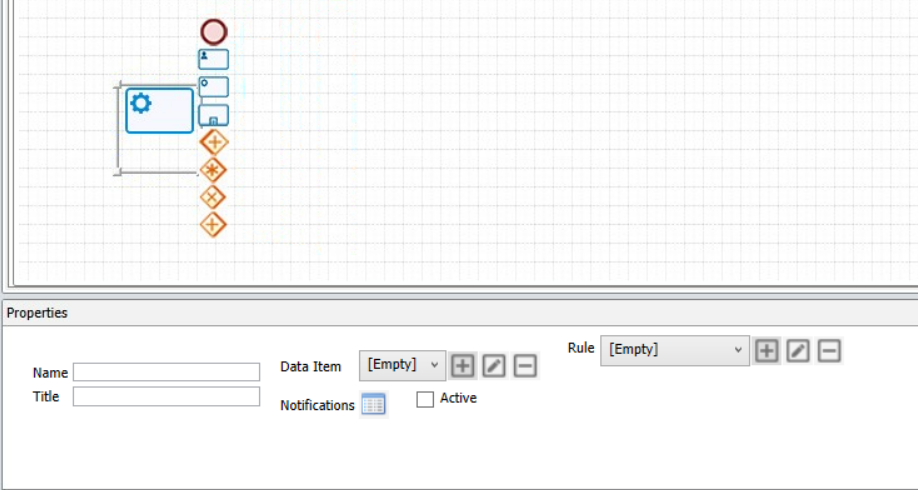
- Name: Here, users can input the unique name for the element.
- A valid name can contain letters, numbers, and the underscore symbol. It cannot, however, contain spaces or other special characters. It also cannot begin with a number.
- Title: Here, users can input the title of the element. This title will be displayed in the diagram.
- Unlike with names, there are no rules determining the validity of titles.
- Data Item: Here, users can either define a new data item or select an existing one from the dropdown.
- To define a new data item, select the
![]() button. It will display the “Data Item Properties” form.
button. It will display the “Data Item Properties” form.
- For more information on this form, click here.
- To modify an existing data item, select the
![]() button.
button. - To delete a data item, select the
![]() button.
button.
- To define a new data item, select the
- Active: Here, users can mark out the object as active. (Active, in this context, is equivalent to enabling notifications.)
- Selecting this checkbox will display a small envelope on the object in the diagram, signifying that a notification will be sent at that stage.
- Notifications: Once the Active checkbox has been selected and the process has been published, users can select the Notifications button. It will display the “Activity Notifications” form, in which users can define the required notifications for an activity
- For more details on this field, see the previous instance described above.
- Rule: Here, users can either define a new rule or select an existing one from the dropdown. This rule, once set in place, will be executed per its conditions at the applicable stage in the process.
- To define a new rule, select the
![]() button. It will display the “Rule Properties: New” form.
button. It will display the “Rule Properties: New” form.
- For more information on this form, click here.
- To modify an existing rule, select the
![]() button.
button. - To delete a rule, select the
![]() button.
button.
- To define a new rule, select the
- Subprocess
If you need to call upon another process during the workflow, use the subprocess.
Selecting a subprocess on the design canvas will display its associated properties in the Properties field.
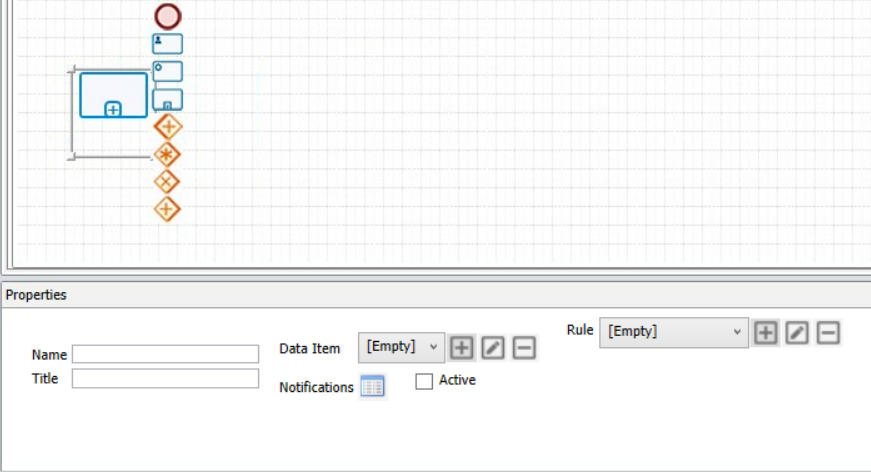
- Name: Here, users can input the unique name for the element.
- A valid name can contain letters, numbers, and the underscore symbol. It cannot, however, contain spaces or other special characters. It also cannot begin with a number.
- Title: Here, users can input the title of the element. This title will be displayed in the diagram.
- Unlike with names, there are no rules determining the validity of titles.
- Data Item: Here, users can either define a new data item or select an existing one from the dropdown.
- To define a new data item, select the
![]() button. It will display the “Data Item Properties” form.
button. It will display the “Data Item Properties” form.
- For more information on this form, click here.
- To modify an existing data item, select the
![]() button.
button. - To delete a data item, select the
![]() button.
button.
- To define a new data item, select the
- Active: Here, users can mark out the object as active. (Active, in this context, is equivalent to enabling notifications.)
- Selecting this checkbox will display a small envelope on the object in the diagram, signifying that a notification will be sent at that stage.
- Notifications: Once the Active checkbox has been selected and the process has been published, users can select the Notifications button. It will display the “Activity Notifications” form, in which users can define the required notifications for an activity
- For more details on this field, see the previous instance described above.
- Rule: Here, users can either define a new rule or select an existing one from the dropdown. This rule, once set in place, will be executed per its conditions at the applicable stage in the process.
- To define a new rule, select the
![]() button. It will display the “Rule Properties: New” form.
button. It will display the “Rule Properties: New” form.
- For more information on this form, click here.
- To modify an existing rule, select the
![]() button.
button. - To delete a rule, select the
![]() button.
button.
- To define a new rule, select the
- Output Parallel Gateway
If multiple tasks need to be executed concurrently during the workflow, use the parallel playback (also known the output parallel gateway).
Selecting a parallel playback on the design canvas will display its associated properties in the Properties field.
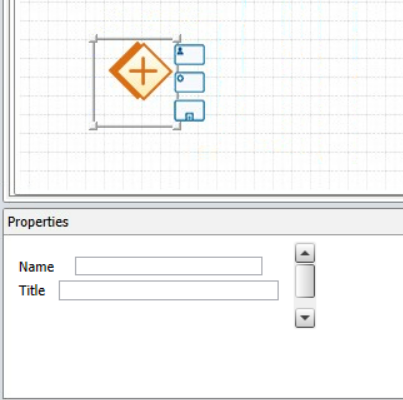
- Name: Here, users can input the unique name for the element.
- A valid name can contain letters, numbers, and the underscore symbol. It cannot, however, contain spaces or other special characters. It also cannot begin with a number.
- Title: Here, users can input the title of the element. This title will be displayed in the diagram.
- Unlike with names, there are no rules determining the validity of titles.
- Complex, Exclusive, and Input Parallel Gateways
If the output parallel gateway is used during the process, users need to regroup the workflow by using either the complex, exclusive, or input parallel gateways. (Likewise, if any of these gateways are used first during the process, users will need to regroup the workflow by using the output parallel gateway.)
Selecting a gateway on the design canvas will display its associated properties in the Properties field.
Complex Gateway Profile
- Name: Here, users can input the unique name for the element.
- A valid name can contain letters, numbers, and the underscore symbol. It cannot, however, contain spaces or other special characters. It also cannot begin with a number.
- Title: Here, users can input the title of the element. This title will be displayed in the diagram.
- Unlike with names, there are no rules determining the validity of titles.
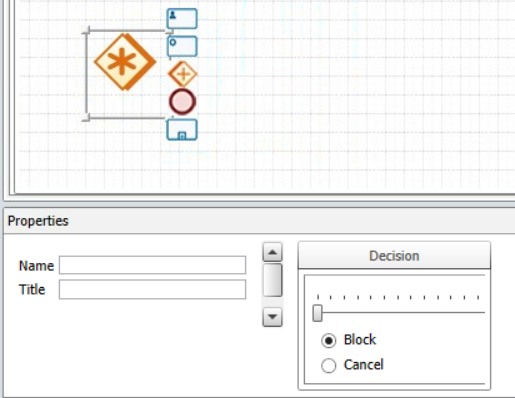
- Decision: Here, by way of the slider bar, users can define the minimum number of branches needed in order for the associated tasks to be executed.
- When the number of branches reaches the specified value, the status of existing tasks in other branches can be defined using the following radio buttons:
- Block: This option, if selected, will cause for the tasks to remain in the same state. That is to say, they will remain in the end-user’s list of tasks and the end-users will be required to complete them.
- Cancel: This option, if selected, causes for the existing tasks to be removed from the user’s list of tasks.
- When the number of branches reaches the specified value, the status of existing tasks in other branches can be defined using the following radio buttons:
Exclusive (XOR-Join) Gateway Profile
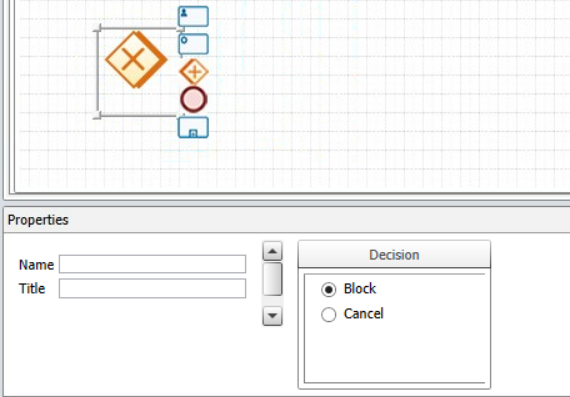
- Name: Here, users can input the unique name for the element.
- A valid name can contain letters, numbers, and the underscore symbol. It cannot, however, contain spaces or other special characters. It also cannot begin with a number.
- Title: Here, users can input the title of the element. This title will be displayed in the diagram.
- Unlike with names, there are no rules determining the validity of titles.
- Block: This option, if selected, will cause for the tasks to remain in the same state. That is to say, they will remain in the end-user’s list of tasks and the end-users will be required to complete them.
- Cancel: This option, if selected, causes for the existing tasks to be removed from the user’s list of tasks.
Input Parallel Gateway Profile
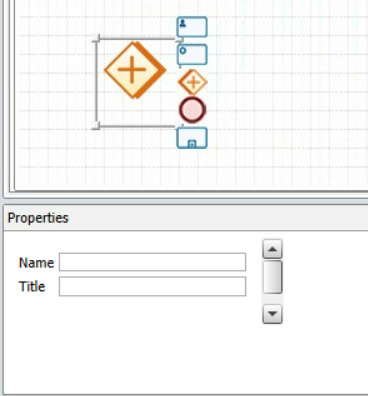
- Name: Here, users can input the unique name for the element.
- A valid name can contain letters, numbers, and the underscore symbol. It cannot, however, contain spaces or other special characters. It also cannot begin with a number.
- Title: Here, users can input the title of the element. This title will be displayed in the diagram.
- Unlike with names, there are no rules determining the validity of titles.
- Common State
When we have the same result after an event in different parts of a process we can use the common state to make the process clearer.
When used in several parts of the process from an event that ultimately results in the same result, “public activity” is used to make the process from an orderly perspective.
In other words, placing a common activity and establishing a link between it and the beginning of the repetitive path of the process, is equal to connecting that event to all of the selected activities in the common activity.
By selecting General Activity on the Diagram page, the properties window will be accessible
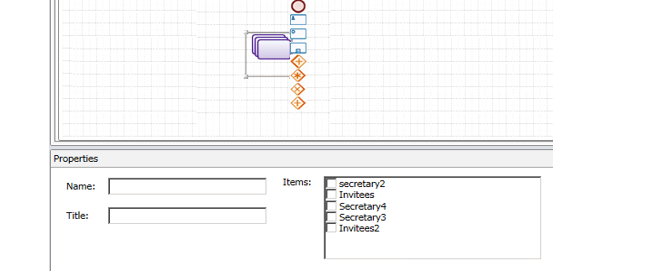
Name: Each element or activity needs a unit name in this box to be typed in English.
Title: The title displayed in the diagram page on the element.
Activities: This list shows all the activities in the process. By selecting them you are actually connecting the following event to them.
- Incident
The “Incident “ is used to communicate between the elements used in the diagram page.
By selecting the event on the diagram page, the properties windows is accessible
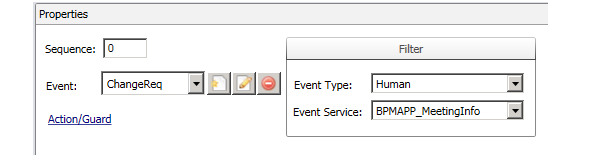
Sequence: If there is a multi-event activity, the sequence of the buttons on the form can be set to direct the workflow to a particular incident.
Event Type and Event Service: By selecting the ‘Event Type’ and the ‘Event Service’ (related entity) in ‘filter’ box, the display events are filtered in the ‘Event’ box based on the specified category.
Event: Adding and assigning events to the element. It is also possible to edit and delete events.
Note: By defining an event in this box, the event type and its event service will be selected by default in the Filter category box.
Action / Guard: If an action or guard is required at the time of the occurrence of an event, then this link can be assigned to an event, an action, or a guard.