
The menu bar of the Process Designer consists of the following items:
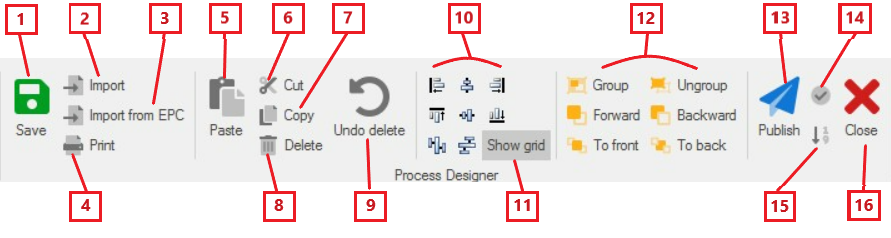
- Save: This button allows users to save the process map.
- Import: This button allows users to import a process map into the program. Users can import processes that are designed in the XPDL format.
- Import from EPC: This button allows users to import process maps from EPC into the program.
- Print: This button allows users to print the process map.
- Paste: This button allows users to insert any data that has been stored in the clipboard into the diagram.
- Once selected, any element that has been copied or cut in the diagram will be pasted into the diagram.
- Cut: This button allows users to remove selected data from the diagram.
- To use this function, select an element in the diagram and then click on the Cut button.
- Copy: This button allows users to duplicate selected data.
- To use this function, select an element in the diagram and then click on the Copy button.
- Delete: This button allows users to delete selected data.
- To use this function, select an element in the diagram and then click on Delete button.
- Undo Delete: This button allows users to undo a previous deletion.
- Ordering: These are a set of functions that allow users to alter the alignment of elements in the diagram.
- Users can group elements from the right, left, middle, upper, and lower boundary by selecting the elements and choosing the alignment.
- Show Grid: This button allows users to superimpose a grid onto the design canvas.
- Grouping: These are a set of functions that allow users to alter the display priority of elements in the diagram.
- Users can change the display priority (front, back, etc.) of an element by selecting it from the diagram and choosing the desired option. It is possible to change the display priority of multiple elements.
- Publish: This button allows users to publish the process map.
- Once selected, a confirmation window will appear asking users to confirm the publication.
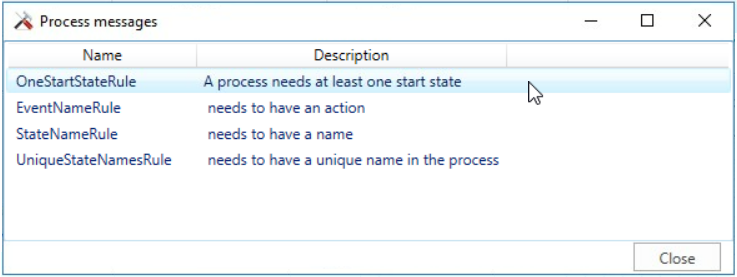
- Validate: This button allows users to check the validity of the process design.
- If the process design is valid, a message will appear in the lower left side of the diagram stating “Process Validated Successfully.”
- If the process design is invalid, a pop-up window will appear identifying the errors for the user (as shown in the image below).
- To be redirected to the location of an error, double-click on it.
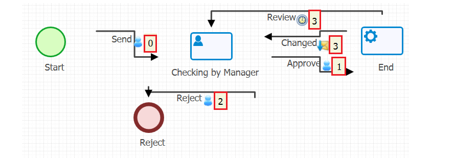
- Event Order: This button allows users to label objects in the diagram by the order in which they occur in the process.
- Close: This button allows users to close the Process Designer.