
Provisioning Manager provides the ability to integrate with Active Directory and provision accounts based on Active Directory groups. Configuring auto-provisioning with Active Directory requires four steps:
- Configure LDAP agreements – the LDAP agreement is used to access Active Directory. Multiple LDAP agreements may be used with auto provisioning.
- Enable Active Directory Auto-provision – enable the Auto-provisioning service in the Service Group(s) and set the default LDAP agreement.
- Configure Auto Provisioning tasks – Auto Provisioning tasks are used to map Active Directory attributes to Provisioning Manager data. Multiple Auto Provisioning tasks may be configured to provide flexibility.
- Schedule Auto Provisioning tasks – Auto Provisioning tasks must be scheduled to process provisioning tasks.
Step 1 – Configure LDAP Agreements:
Configure an LDAP agreement(s) that will provide Provisioning Manager access to the new users accounts to be auto-provisioned. Reference the LDAP topic in the Initial Configuration section.
Step 2 – Enable Active Directory Auto-provision
- Select Service Groups from the System menu
- In the list, click Service Group Name to edit the item
- Navigate to the Active Directory Auto-provision section
- Check the Enable AD Auto-provision box
- Choose the Default LDAP server
- Configure Default Username Bind Attribute
- When finished, click Save
Step 3 – Configure Auto-provisioning Job:
- Log into Provisioning Manager with an Administrator account
- Select Automation from the System menu
- Click on *Add *to configure a new Auto-provision Job
- If required, choose a Service Group
- Provide a name for the Job
- Check enable (This will enable the task to run once scheduled)
- Choose the LDAP agreement for this Job
- Set the Username Bind Attribute (This is the attribute used to locate the user to be provisioned)
- Select a Job for Auto-provisioning by dragging it into the Attribute Mapping section
- Map the Job fields to an AD Attribute. Check to enter custom local values

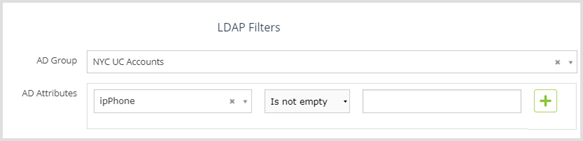
- Optionally, configure AD filters to narrow down the search
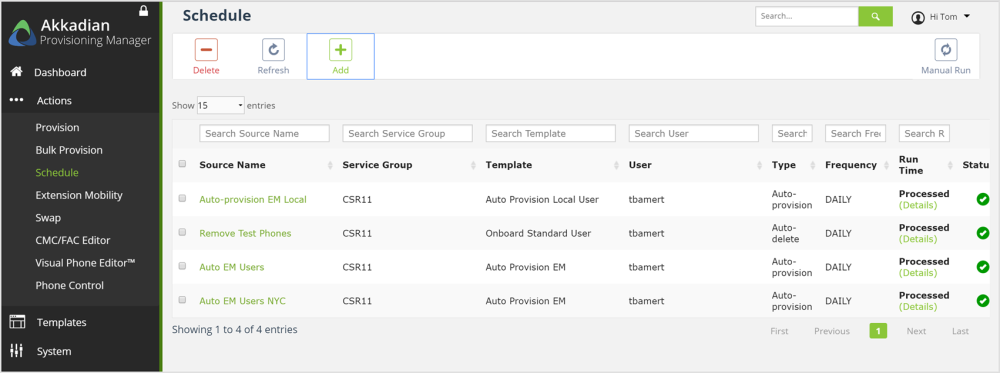
Step 4 – Scheduling the Auto-provision Jobs:
- Select Schedule from the Actions menu
- On the menu, click Add to schedule a job
- Select the Auto-provision type
- Select the Auto-provision task
- Choose the frequency to run the task
- Choose the starting date of the task
- Set the task run time
- Set the notification email
- Set the Process all accounts within the last value. (The task will only process accounts with a create date included in this period)
- Click Add to schedule the task

The schedule for any Job can be edited by clicking on the Source Name or the job can be deleted by checking the box next to the scheduled job you wish to delete and clicking the Delete button.
Post your comment on this topic.