
| |
This is the Edit pencil icon. |
| |
This is the Expand icon (used to view the list of Recording Statistics). |
| |
This is the Condense icon (used to close the list of Recording Statistics). |
| |
This is the Camera icon that represents the camera stream in use. |
| |
This is the Camera icon that represents a disabled camera stream. |
After a camera has been added to a Recording service server, settings such as the stream resolution and frame rate can be updated through the camera stream’s configuration.
Orchid Alto VMS places limits on some of the camera settings in order to maintain overall system performance. These limits are defined with each of the applicable camera settings. If you enter values in excess of these limits, the system will automatically adjust the settings to comply.
- From the list of registered cameras on the server’s Cameras tab, click the name of the camera you want to edit. (The list will expand to display all of the information for the selected camera. This includes the camera name, the tunnel IP address, and all of the available streams.)
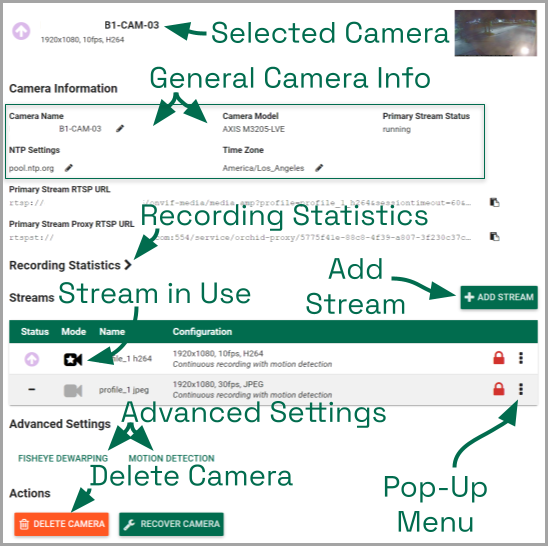
Camera Information
- To change the camera name, click the Edit pencil to the right of the camera name. Enter a new name in the Camera Name field and press the Update Camera button.
This screen also displays the camera model and the status of the camera stream in use. These settings are informational and cannot be altered here; please refer to the System Status section for status descriptions.
Next, Orchid Alto VMS will display the NTP settings and the Time Zone setting.
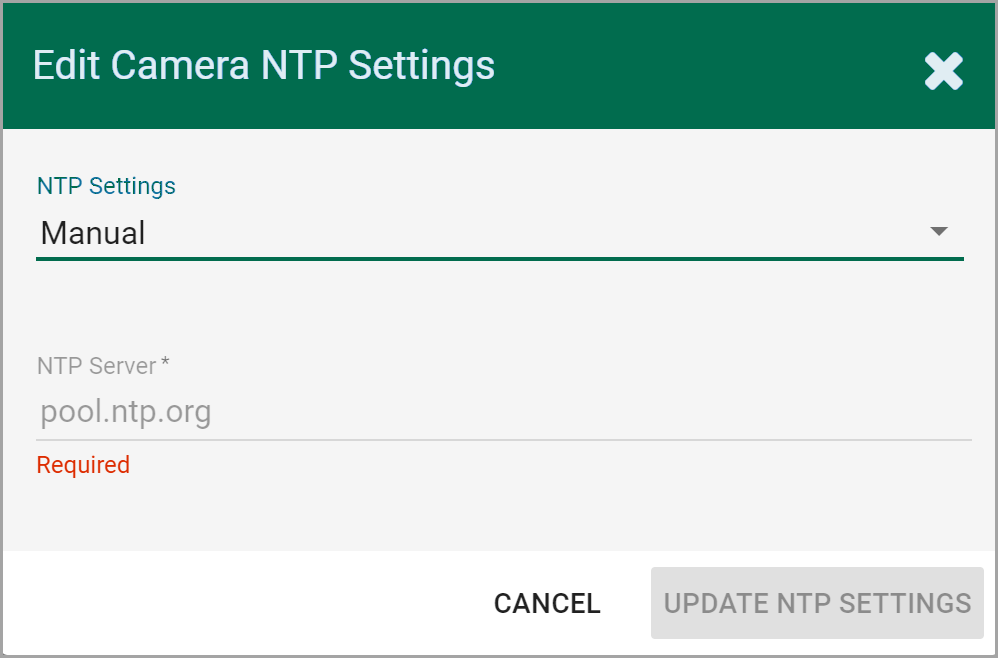
- To change the NTP settings, click the Edit pencil to the right of the NTP settings.
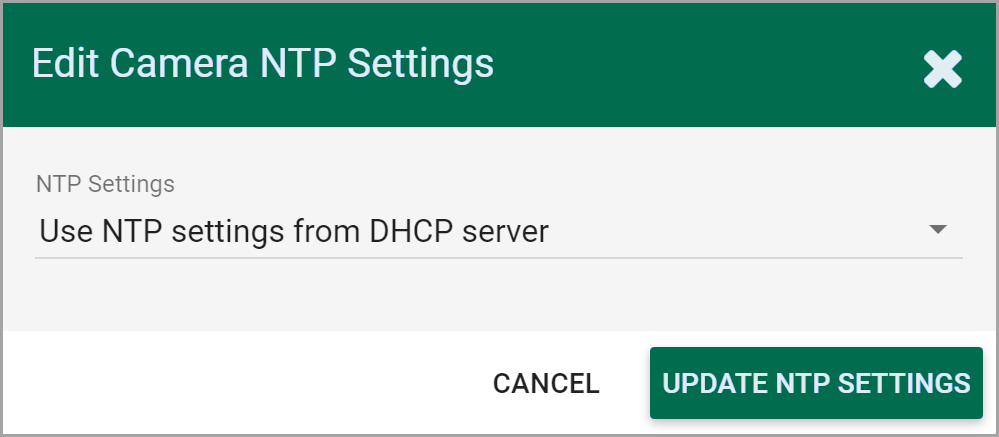
By default, the system will pull the Network Time Protocol (NTP) from the Dynamic Host Configuration Protocol (DHCP) server; this helps to ensure that all of the cameras on the network are using the same system clock.
- If you need to use a different server, do the following:
- Use the NTP Settings drop-down list to select Manual.
- Enter the name of the server you want to use.
- When all settings are complete, click the Update NTP Settings button.
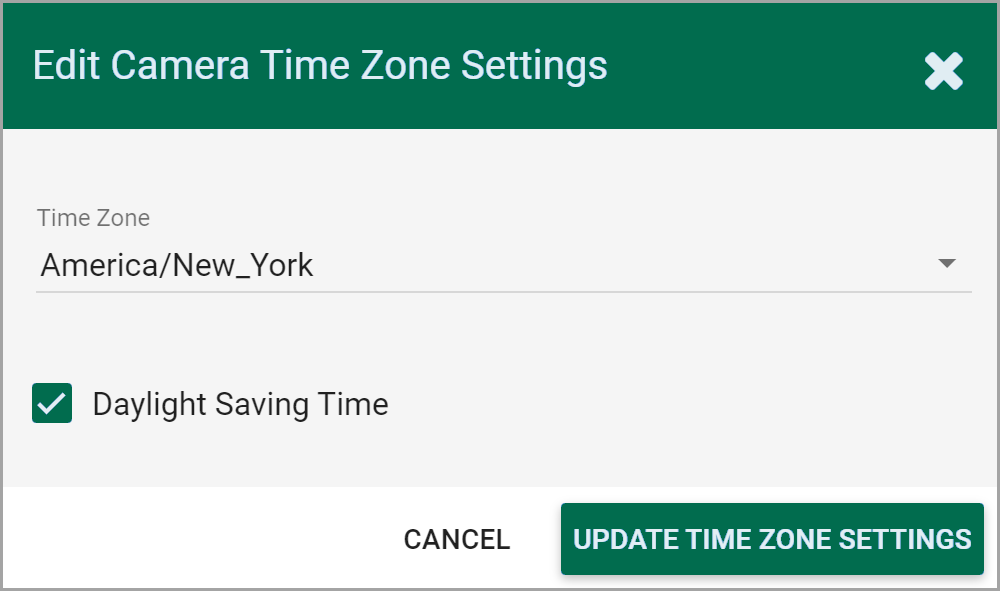
- If you need to change the time zone for the camera, do the following:
- Click the Edit pencil to the right of the Time Zone.
- Use the Time Zone drop-down list to select the appropriate time zone.
- Mark the Daylight Saving Time checkbox if your region observes daylight saving time.
- When all settings are complete, click the Update Time Zone Settings button.
Beginning in version 22.3, the system will display the Transport Protocol setting. This gives you a chance to specify how the video will be transported from the camera to the Recording server.
- To change the Transport Protocol setting, click the Edit pencil to the right of the Transport Protocol setting.
The Edit Camera Transport Protocol screen will appear. By default, the system will use the AUTO setting. This means that the system will attempt to connect using UDP and will automatically rollover to TCP if it cannot establish a connection.
- If you want to select a different setting, do the following:
- Use the drop-down list to find the setting you want to use. Available settings include: AUTO, UDP, UDP_MCAST, HTTP, AND TCP.
- After you make your selection, click the Update Transport Protocol button.
Recording Statistics
The next thing you’ll notice are the Recording Statistics. This section can be expanded to show the average percentage of packet loss and the average bit rates for the recording stream. These values are typically used for troubleshooting. (For more details, please refer to the Checking for Packet Loss topic.)
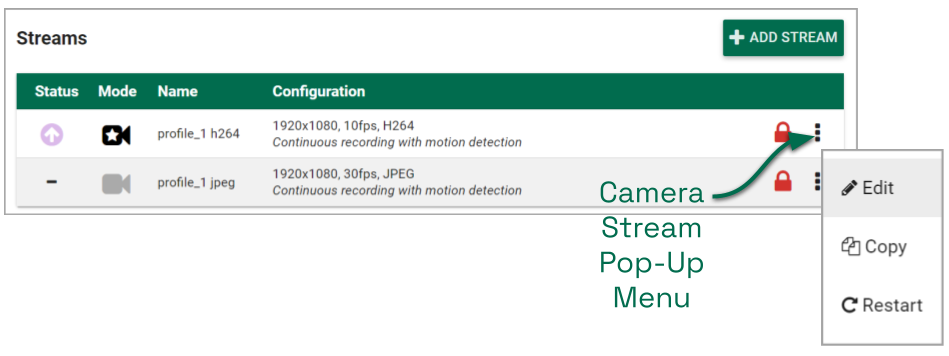
Streams
![]()
A camera stream is a profile with all of the basic settings used by the Recording server to record video from the camera. The stream currently being used, the primary stream, is indicated by a darkened camera icon.
- To select a new stream, click the Camera icon located to the left of the name of the stream you want the Recording server to record with.
To the right of each camera stream, you’ll find a pop-up menu.
- Click on the menu to work with each camera stream. (The contents of the pop-up menu will vary based on the stream.)
| |
This is the Edit pencil icon. Click this icon to make changes to the stream settings. |
| |
This is the Copy Stream icon. Click this icon to copy these stream settings to other camera streams. |
| |
This is the Restart icon. Click this icon to refresh the connection to this camera stream. This option is not available on inactive streams. |
| |
This is the Delete icon. Click this icon to delete the camera stream. This option is not available on locked streams. |
- To edit a stream, click the stream’s pop-up menu and then click the Edit pencil icon. After clicking the Edit icon, a screen will appear with all of the stream settings available for editing.
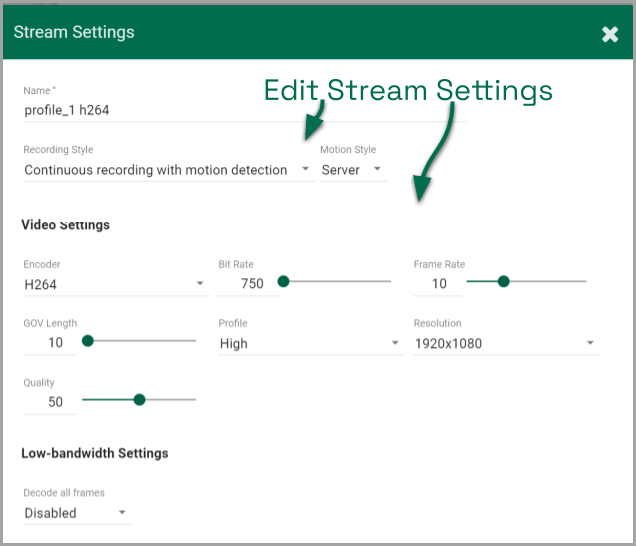
- Review or change the stream name so users can easily identify the camera stream.
- Review or change the Recording Style for the camera stream.
Recording Style
You may choose between one of five different Recording Styles. Refer to the descriptions below (and the table that follows) before making your selection.
- Continuous Recording with Motion Detection: The Recording server will continuously record video from the camera and perform motion detection. This is the default and recommended setting.
- Continuous Recording without Motion Detection: The Recording server will continuously record video from the camera, but will not perform motion detection. This option offers a modest reduction in CPU load on the Recording service server.
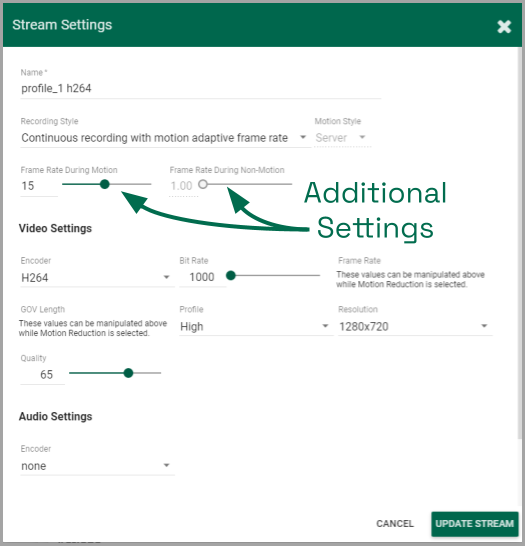
- Continuous Recording with Motion Adaptive Frame Rate: The Recording service will record at a higher frame rate while motion is detected, and a different (slower) frame rate while no motion is detected. These frame rates are user-selectable (as shown in the screenshot following the table). Due to the way H264 compresses video, this recording style typically shows significant savings in disk usage only for inexpensive cameras with noisy sensors, or cameras in low-light environments.
- Proxy Only: The Recording server will provide live video from the camera but will not record video.
- Recording Only When Motion Detected: The Recording server will only record video from the camera when motion is detected. This may result in a reduction in cloud storage usage, however, motion detection accuracy may vary and result in video loss.
| Continuous recording with motion detection – Default | Continuous recording without motion detection | Continuous recording with motion adaptive frame rate | Proxy only, no video will be recorded | Recording only when motion is detected | |
|---|---|---|---|---|---|
| Recording and playback are available | Yes | Yes | Yes | No | Yes – When motion is detected |
| Thumbnail previews are available | Yes | Yes | Yes | No | Yes |
Motion Style
If you choose a Recording Style with motion detection, Orchid Alto VMS will allow you to select either camera-based or server-based motion detection for each camera stream.
Server-based motion detection (which is the default) means that the Orchid Alto VMS software will determine if motion occurs in the recorded video. In this case, the Orchid Alto VMS server will analyze consecutive frames of video for changes that would indicate motion. With this Motion Style, you may take advantage of advanced Motion Detection settings that permit you to select which regions of the camera view are eligible for motion detection, and the minimum object size that qualifies for motion detection.
Camera-based motion detection means that one of the camera’s metadata events will be used to detect motion. This can be accomplished in a variety of ways, and will vary by camera. Typically these metadata events will come from the camera’s built-in motion detection scheme. In other instances, the camera’s I/O port may be connected to an external passive infrared (PIR) sensor that will detect motion. In any case, the camera-based motion detection feature can provide better support for very high resolution cameras, especially, 360-degree cameras. Any adjustments to the camera-based motion detection will have to be performed through the camera’s web interface.
- Use the Recording Style drop-down list to select a new recording style.
- If you select a Recording Style that includes motion detection, you may need to make additional selections.
- Use the Motion Style drop-down list to select a motion style. Options include Camera and Server (the default).
- If you select the Camera motion style, use the Camera Event drop-down list to select the criteria the camera will use to detect motion. Available selections will vary based on the camera and may require some experimentation. (Refer to the table below for some common Axis camera events.)
- Use the Motion Style drop-down list to select a motion style. Options include Camera and Server (the default).
| Camera Type | Event | Description |
|---|---|---|
| Axis | RuleEngine/VMD3/vmd3_video_1, VideoSource/MotionAlarm, RuleEngine/MotionRegionDetector/Motion | These three event types will work for camera-side motion detection. They differ slightly with the data types used in their message data, but all three use the VMD engine because they are only available if VMD is installed and running. If in doubt, select RuleEngine/VMD3/vmd3_video_1. |
| Axis | VideoAnalytics/MotionDetection | This is for cameras with built-in motion detection that pre-dates VMD support. The three Axis events listed above are preferred, if available. |
| Axis | Device/Sensor/PIR | Use this event type only if you know for certain that PIR sensors are built into your camera. Almost all cameras report this, even cameras that are not equipped with PIR sensors. |
| Axis | Device/IO/Port, Device/IO/VirtualPort | For cameras using external PIR sensors, this is usually the event that corresponds to movement (e.g. closed circuit = no motion, and open circuit = motion). The difference between Port and VirtualPort depends on how your PIR sensor has been configured. If unsure, try both. |
- If you select the Continuous recording with motion adaptive frame rate recording style, you will need to set both the Frame Rate During Motion and the Frame Rate During Non-Motion. (The Frame Rate During Motion will dictate the available settings for the Frame Rate During Non-Motion. Allowable settings for the Frame Rate During Non-Motion range from 1 up to a setting that is less than or equal to the Frame Rate During Motion.)
- Continue to review and change camera stream settings for video and audio as needed. Refer to the definitions below for help in selecting settings.
Video Settings
Each camera type reports its own default values provided by the camera manufacturer. Use those default values unless they conflict with the stated maximum settings allowed by Orchid Alto VMS.
- Encoder: The type of compression used for the camera’s video. The Recording service server only supports H264 video.
- Bit Rate: The target data size (in kilobits per second) of the compressed video. Increasing this value will typically improve image quality at the expense of increased storage usage and reduced retention. This setting is limited to 1000 kbps. (If you enter a value in excess of this limit, the system will automatically adjust the setting to comply.)
- Frame Rate: The number of frames per second transmitted within the video stream. Most users are best served by values between 7 and 12. Higher frame rates provide more video detail at the expense of reduced video retention and increased bandwidth usage. This setting is limited to 15 fps. (If you enter a value in excess of this limit, the system will automatically adjust the setting to comply.)
- GOV Length: When using H264 compression, this value specifies how often the camera sends a full image frame (instead of a “change frame” which only describes differences between frames). For example, if this is set to 15, the system will send a full image frame once every 15 frames. Be aware of how this setting may impact video quality. As the GOV length decreases, the system will need to send more keyframes of video (within the set bit rate). This may result in a loss of quality for those keyframes. The default value is recommended.
- Profile: When using H264 compression, this specifies an H264 Profile of either Baseline, Main, or High. Higher profiles offer better compression (which means increased retention and lower bandwidth usage) at the expense of increased CPU utilization when decoding video. The highest available profile is recommended.
- Resolution: The resolution of video transmitted by the camera. Higher values increase video detail at the expense of reduced video retention and increased bandwidth usage. This setting is limited to 1920×1080 (or 2 Megapixel resolution). (If you enter a value in excess of this limit, the system will automatically adjust the setting to comply.)
- Quality: This value affects how much the video is compressed. Higher values increase video quality at the expense of increased storage requirements (and thus reduced video retention). The default value is recommended.
Audio Settings (if supported)
Audio control is not supported at the Player/Stage level. However, the Recording server is still recording audio for those cameras that support it, and this audio will be available in exported video files. Future versions of Orchid Alto VMS will support audio over WebRTC.
These Audio Settings will appear on the screen only if the camera supports audio and will determine how the Recording server records the audio. Each camera type reports its own default settings. Use those default values unless otherwise noted.
- Encoder: The type of compression used by the camera’s audio. Orchid Alto VMS supports “None” (audio is disabled), G711, and AAC (recommended if audio is desired).
- Bit Rate: The target data size (in kilobits per second) of the compressed audio. The default value is recommended.
- Sample Rate: Affects the quality of recorded sound. The default value is recommended.
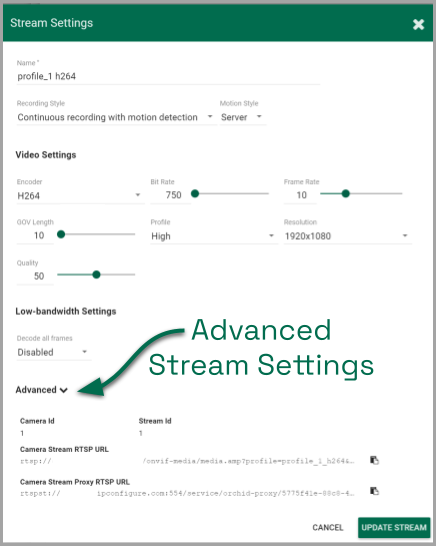
Advanced
The last section on the screen provides additional information about the camera stream. This includes the Camera ID, the Stream ID, and the URLs, all of which may be helpful for troubleshooting the camera stream.
- Click the Expand icon (
![]() ) to view the Advanced stream information.
) to view the Advanced stream information. - Click the Condense icon (
![]() ) to close the Advanced stream information.
) to close the Advanced stream information.
- Once the stream settings have been updated, click the Update Stream button to save the new stream settings. It may take a few seconds for the settings to change based on the camera being updated.
- You may review the impact that the stream settings have on video playback for each camera. Simply click on the corresponding thumbnail to watch a current live video feed.
Post your comment on this topic.