Adding a Camera to Orchid Alto VMS
Register Your Camera in Orchid Alto VMS
This series of steps will explain how to add your camera to the Orchid Alto VMS system.
- Using your web browser, log into your Alto system using the Administrator username and password you were given when you signed up for Alto.
- The path to your system should look like this: https://<your-id>.ipconfigure.com (where <your-id> is the system identifier assigned to your Orchid Alto VMS system).
- When Alto opens, click on the menu icon in the top-right corner of the screen, then select Servers.
- Click on the Alto recording server to expand it, then click the Add Camera button.
- If you have multiple, numbered recording servers, add new cameras to the highest numbered recording server.
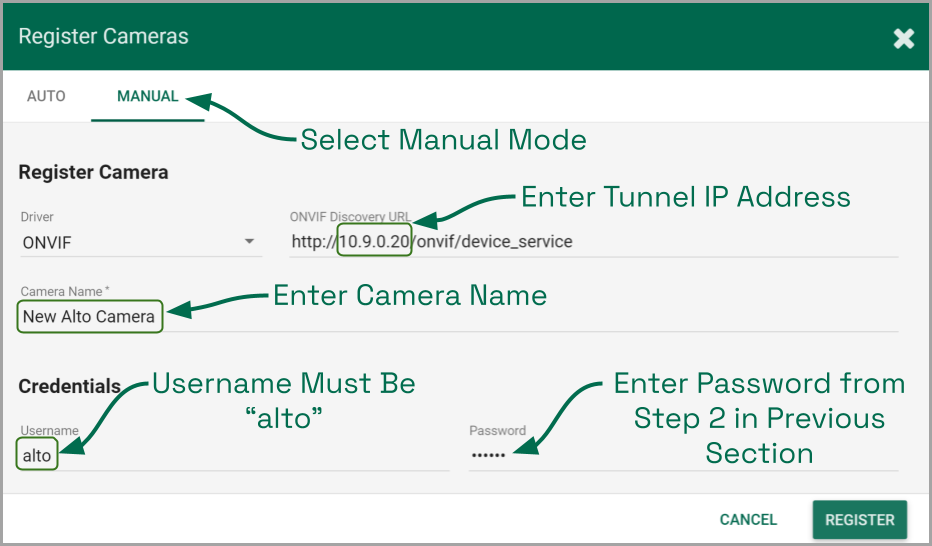
- The Register Cameras screen will open in Auto mode. Select the Manual tab.

- Select the ONVIF driver from the drop-down list.
- In the ONVIF Discovery URL field, enter the camera’s Tunnel IP Address as part of the URL. (Refer to your notes from the Camera Configuration process.)
- Enter a unique name for the camera. This will allow you to distinguish the camera from other cameras set up within the Recording service server.
- In the Username field, type alto.
- In the Password field, enter the ONVIF password you set for this camera. (Refer to your notes from the Camera Configuration process.)
- Once all settings are entered, press the Register button to add the camera to Alto.
When complete, the new camera will be added to the list of registered cameras. You may now add another camera, or review/edit the camera stream settings. (Please refer to the next section for details on stream settings.)


Post your comment on this topic.