
Once you’re sure that all required artists, contributors (if you have the Artist statement module), assets/tracks and label information are entered correctly, you can then start to create your release.
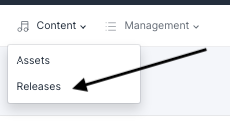
- To start this go to the ‘Releases’ page via the ‘Content’ section at the top of the page
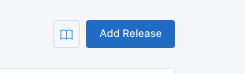
- Then click on ‘Add Release’ in right hand corner:
RELEASE INFO
RELEASES – Page 1
The next page is ‘Releases.’ This is where you input the main details of the release and those that are to be displayed at release level on the store.
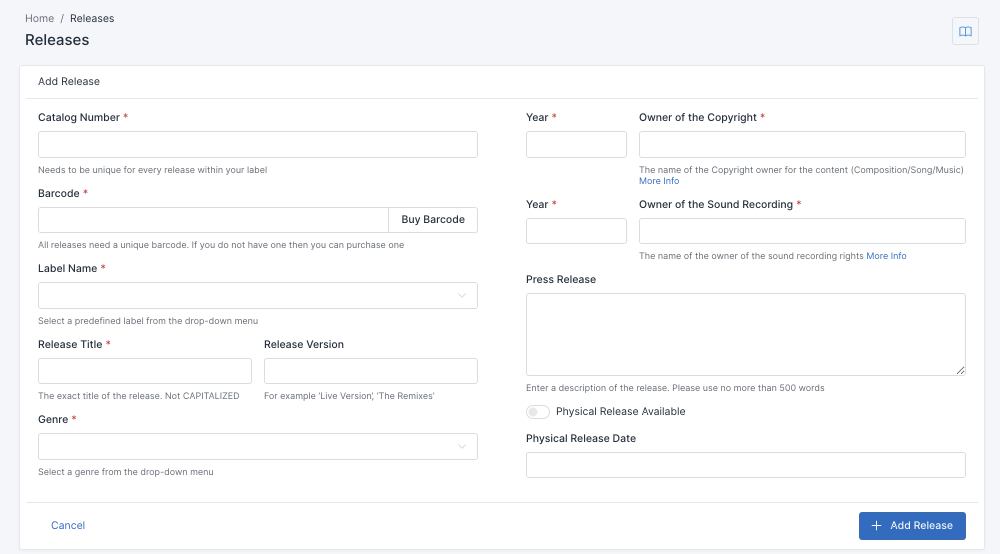
These are the required fields:
RELEASE INFORMATION:
- Catalogue Number: Unique within your label for your release. To make sure ALL stores display your catalogue number in the same way, catalogue numbers should not contain any slashes as this is not possible to deliver. eg DET07, not DET/07.
- Label Name: Select a predefined label from the drop-down menu. If you do not see one here then you have not completed the label information correctly, so please return to this section here
- Release Title: The exact title of the release. Not CAPITALISED, please use Leading Capital Letters eg. ‘Thanks for Coming’ and NOT ‘THANKS FOR COMING’ or ‘thanks for coming’ or ‘Thanks For Coming’
- Release Version: This is not commonly used, but is for any extra display information on the release info that you feel necessary. For example: DGP – Thanks for Coming (2016 Remastered Version) or (Live Version)
- Genre: Select a genre from the drop-down menu. These are quite generic choices as they need to align with the genre gorupings on the stores. We try to map them best we can to appear how you wish, but often a store may change this upon delivery if they feel it fits better in another genre on their store due to their customer trends for that genre. Please contact us if you want to have it in a specific genre and we will try our best to achieve this upon delivery.
- C-Line: The name of the Copyright owner for the content (Composition/Song/Music) for the release as a whole, as well as the year this copyright began.
- P-Line: The name of the owner of the sound recording rights and the year these rights started. This is most likely the entity who paid for the audio master and is more often than not the Record Label.
- Barcode: All products need a unique barcode (UPC or EAN), even a release from a label. If you do not have a barcode for this release you can simply buy one from us for € 5 Euros by clicking ‘Get Barcode’ or provide your own if you have previously purchased one. This amount will be deducted from your next statement. You cannot proceed without one, nor can you purchase one from us without completing all the information in ‘My Details’ from the settings menu. Please complete that before proceeding, more info here.
- Press Release: Enter a description of the release of no more than 500 words or simply enter your press release here. When copying and pasting text in the LMS make sure special characters (especially accents and apostrophes) are displayed properly. Special characters are stored in different ways (encodings) depending on the language and version of your computer’s operating system.
RELEASE PAGE 2 – Artwork, Territories & Selecting Tracks
- Release Artwork: The artwork that you want to use for the release. Please scroll down for specific ‘Artwork Dimensions’ to follow, but generally remember that it needs to be 3000×3000 pixels and the LMS will use only that part of any image you upload. So any square images bigger than this need to be re-sized to 3000×3000 pixels.
Artwork Dimensions:
- Artwork: You can upload your artwork by clicking on ‘Select New Image’ on the right hand side of the page. Select your release artwork from your computer or cloud/dropbox and click “Submit”. Please take note of the strict requirements for the Artwork you submit for a release:
- 3000 by 3000 pixels This is the exact dimension that will be delivered. You can upload bigger or even landscape, but the LMS will choose only 3000×3000 pixels part of the image. If you have a square image larger than 3000×3000 pixels, then you need to re-scale to 3000×3000 pixels. Do not scale up artwork as it will cause the artwork to look blurry. Eg. Changing from 800×800 pixels to 3000×3000 pixels
- jpg format
- Colour Mode: RGB (CMYK is not accepted)
- Formatted for use as square image – All artwork still needs to be sent out as a square image at 3000×3000 pixels, but now if you have an image that is not square and you are not able to re-size yourself, then you can now still upload it to the release artwork section and move it around to pick a square part of the image that you would like to use.
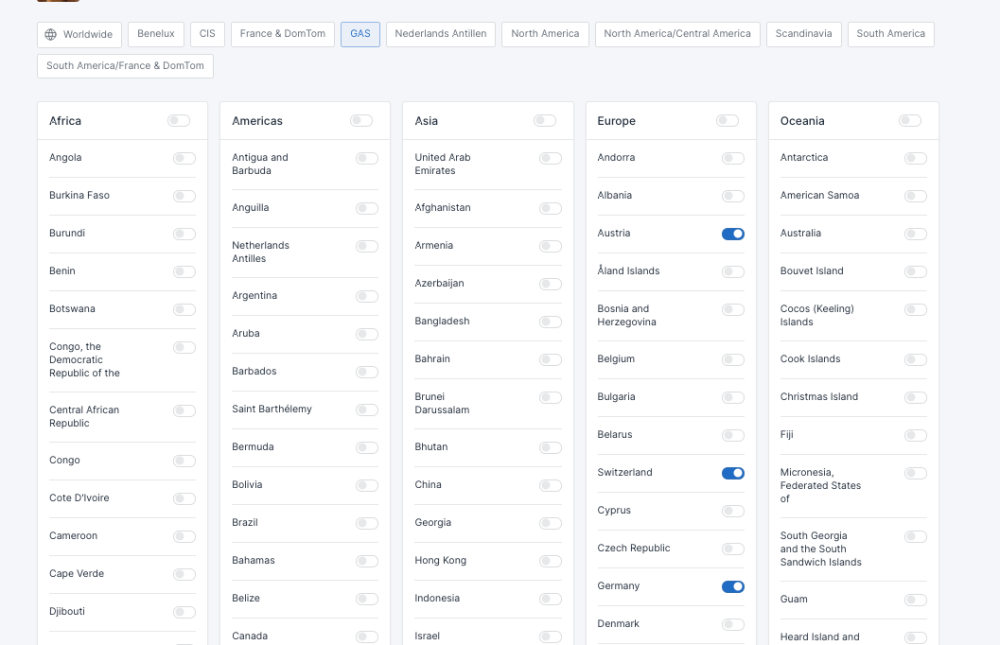
- Territories: Please only complete this section if you want us to stop your release appearing in certain countries or territories in the world or click the box that says ‘Worldwide.’ Any box you tick means you DO want the release to appear in that country. If it is not ticked then you DO NOT want us to make the release available in that territory. We have now added some boxes for commonly grouped territories eg. Balkan, Benelux, GAS etc. You can then pick whether to include only these or exclude only these.
Example 1: Release is ONLY available in the GAS Region (Germany, Austria, Switzerland) – Click on Worldwide to deselect all territories and then click the GAS button to select these territories:
Example 2: Release is NOT available in the GAS Region – Make sure all territories are selected and then click GAS button to exclude the countries in this region:
Step 1:

Step 2:

Once the territory info is complete then click on ‘Save & back to overview’ to continue with the next steps
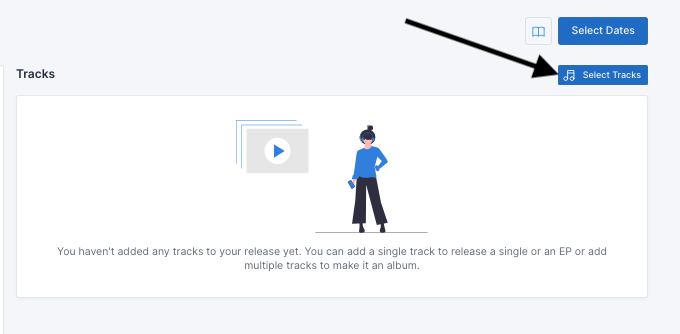
SELECT TRACKS:
Once the Release Info is complete then click on the next tab entitled ‘Select Tracks.’
Select Asset: For each asset you wish to add to the release, click on the green plus sign on the right hand side of the track info.

Repeat this process for each asset that should appear on the release until you have all the assets listed in the list at the top of the page
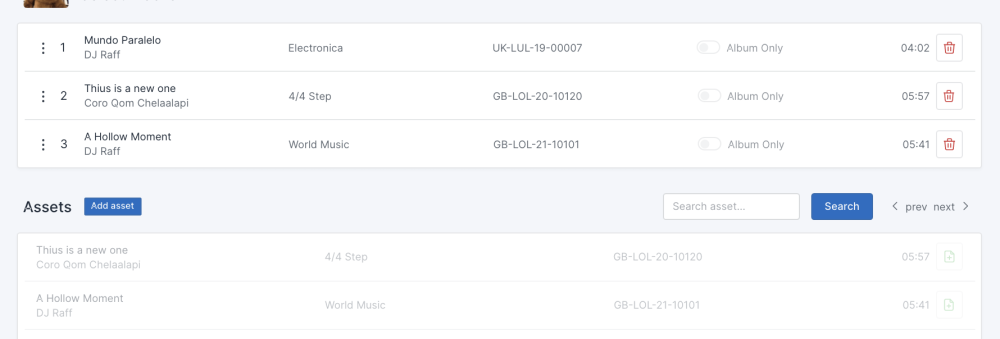
Add Asset: Earlier in the process you will have created an Asset (see page 8). If you forgot to add an asset you want to use on your new release, then you can still create it here. Click on the ‘Add Asset’ button to open the asset page in a new tab. Once you have finished the asset, save it as normal and then return to the release page you were previously on. Refresh the page and the new asset will appear in the list so you can select it.
*If you have selected the wrong asset then just click the red trash icon ![]() and pick the correct one from the list below instead.
and pick the correct one from the list below instead.
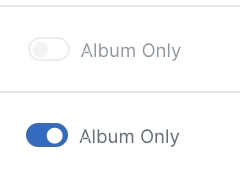
- Album Only: If you wish for this particular track/asset to be sold only when the complete release is purchased, then there is a possibility to do this. However, the option only becomes available once 7 tracks have been added as there are rules on the number of tracks allowed to be album only.
- Go Back: If you feel the track and release info is complete, then please click the ‘Go Back’ button in the top right hand corner of the page. If you need to go back to check another page or come back to the release later then you can do so as your progress is automatically saved.
RELEASE PAGE 3 – RELEASE DATES:
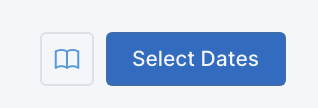
You will now have returned to the release overview page. You still have the chance to edit anything you have done so far on the release, either via the update information button, select tracks or territories button. If you do not need to edit any of this information then you can proceed to the next step which is ‘Select Dates.’
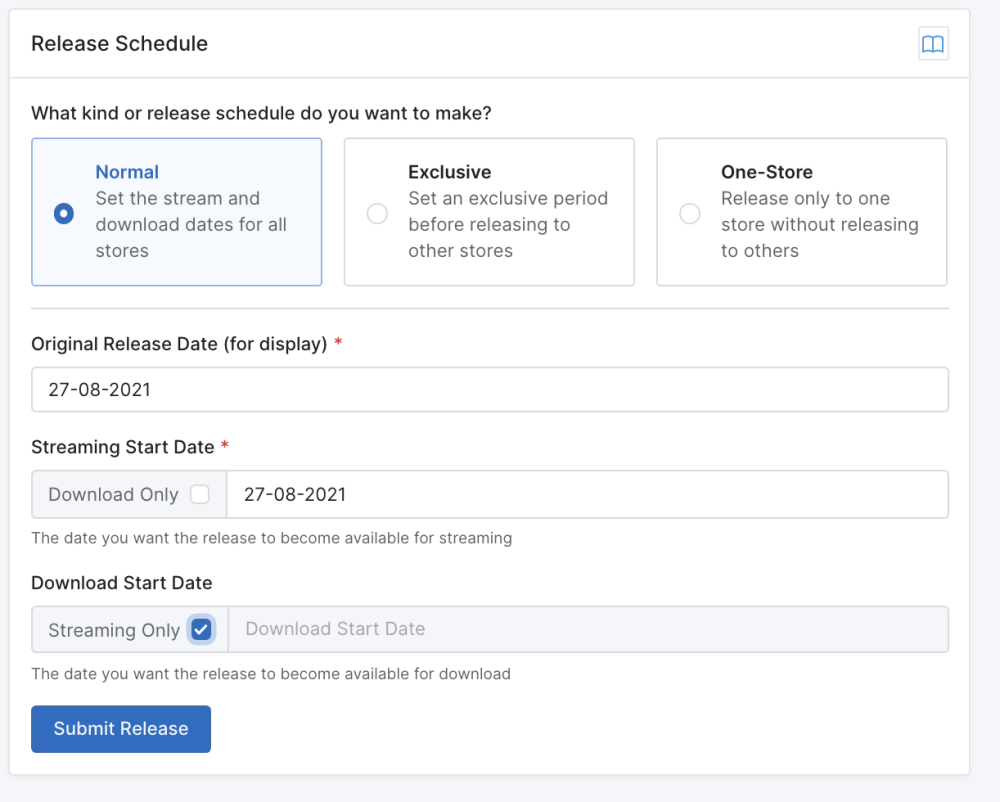
There are now three different options for scheduling a release date, these are explained below:
NORMAL
This is for releases that do not require a specific upfront store exclusive and instead have the same release date across all streaming stores or download stores or both. Here you can also choose a download only or a streaming only release if that is what is required.
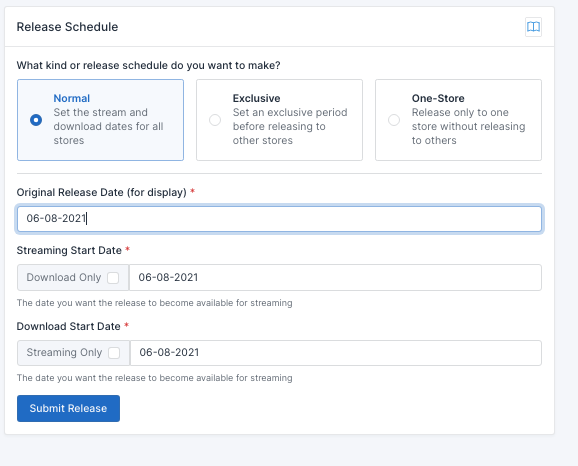
Original Release Date – First of all pick the original release date. This is the earliest date it will appear on digital stores. This will be your new release date or if it is back catalogue then the original date of the release will go here.
Streaming Start Date – If your original release date is new and in the future, then this section will be automatically filled with that date also. If you wish the date to be after that date and different to the download start date, then you can set that here. If you want it to be earlier then you need to change the original release date to be an earlier date.
Download Start Date – If your original release date is new and in the future, then this section will be automatically filled with that date also. If you wish the date to be after that date and different to the streaming start date, then you can set that here. If you decide you want it to be earlier then you need to change the original release date to be an earlier date, this will then change all dates.
Here is an example of a release where the streaming dates is two weeks before the download date:

Streaming or Download Only – To pick a download only or streaming only release then you do this by ticking the relevant box. As an example here is what is required to choose a streaming only release:
EXCLUSIVE
This is for releases that are scheduled to be available on a store or service before it is available in other places that carry the same format. It is no longer necessary to delay the release date everywhere, so for example you can have a Beatport exclusive on the same date as the streaming date, as this is a download exclusive, so only the download date needs to be delayed in that scenario.
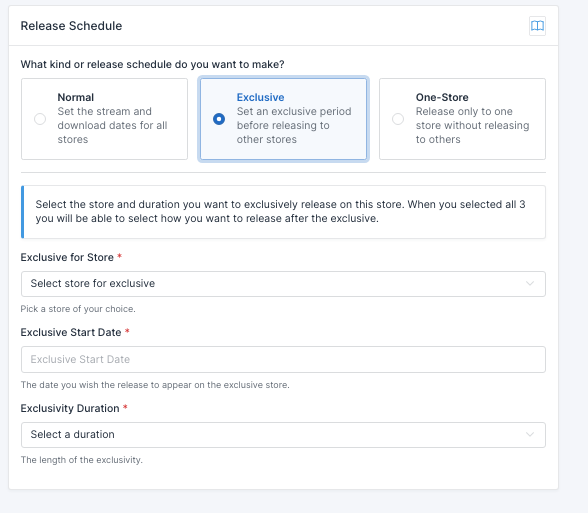
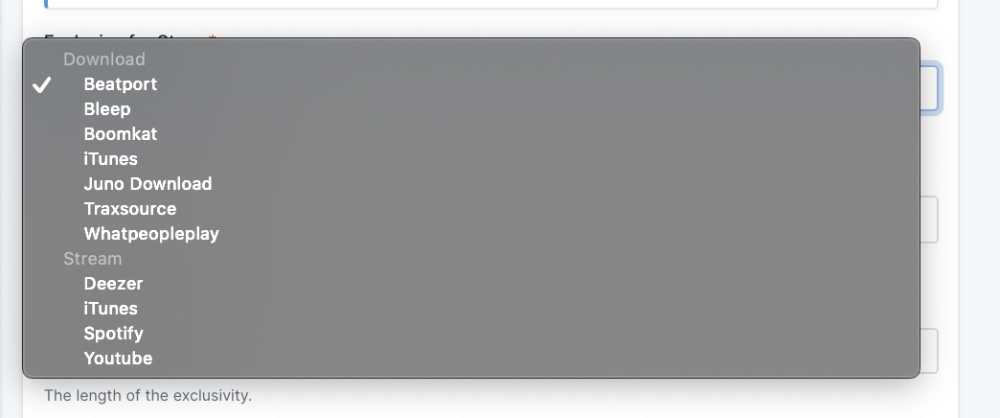
Exclusivity for Store – Here you pick which store or service you wish to have the release on before other services of the same format. Pick the desired service from the drop down menu:
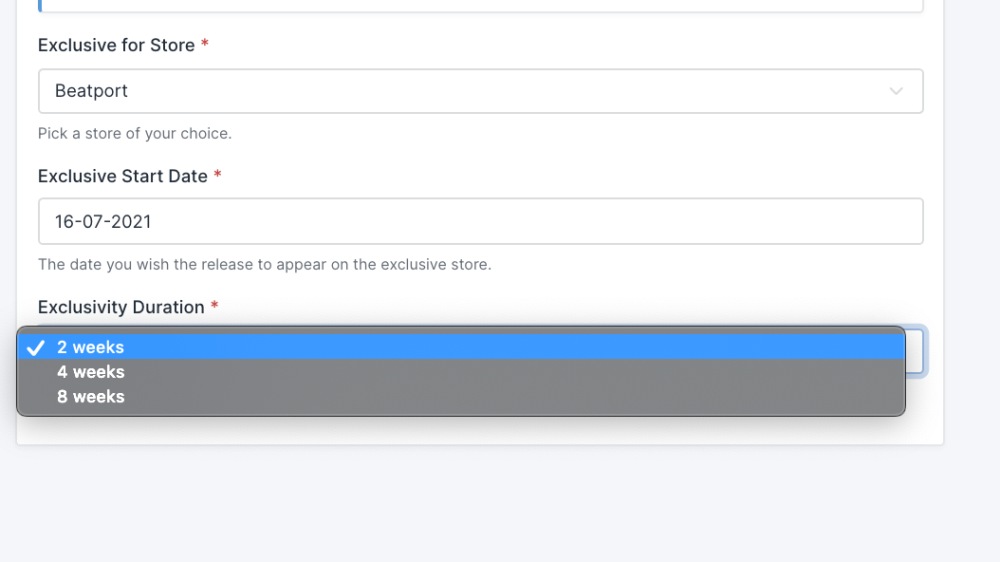
Exclusive Start Date – The date you want to the exclusive to start. We have set this to be at least one week from the time that you are submitting the release.
Exclusivity Duration – Here you pick how long you want the release to be available on the exclusive store ahead of the general release on other stores. This can be 1 week or more, but if the exclusive is on Beatport then the minimum is 2 weeks.
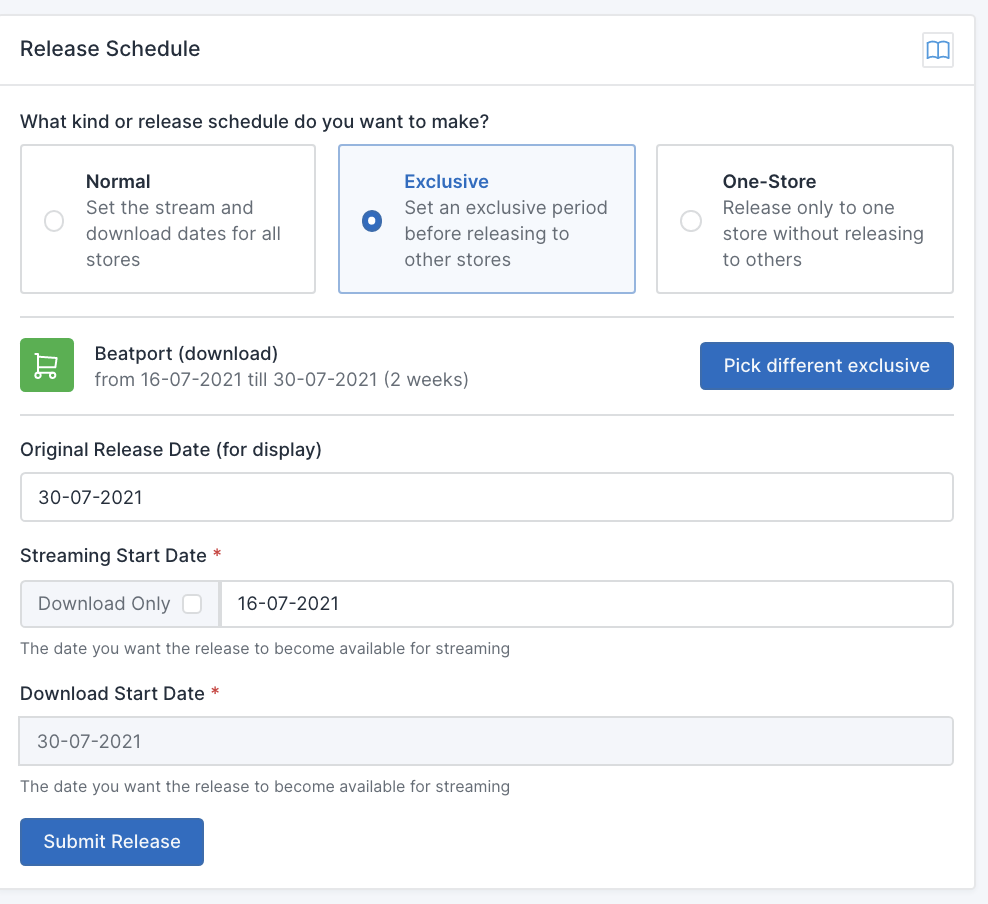
Streaming/Download Start Date – Once you pick the exclusivity duration then the original, download and streaming date will appear. If you want to start the exclusive the same date as the other format date then you can pick it here. The format you have chosen for the exclusive will be pre-filled here already. For example, below is a digital exclusive on Beatport and the streaming date has been set to the same date. The Download start Date cannot be changed as it is a download exclusive:
ONE-STORE
If you would like to send your release to only one store then you can pick that option here.
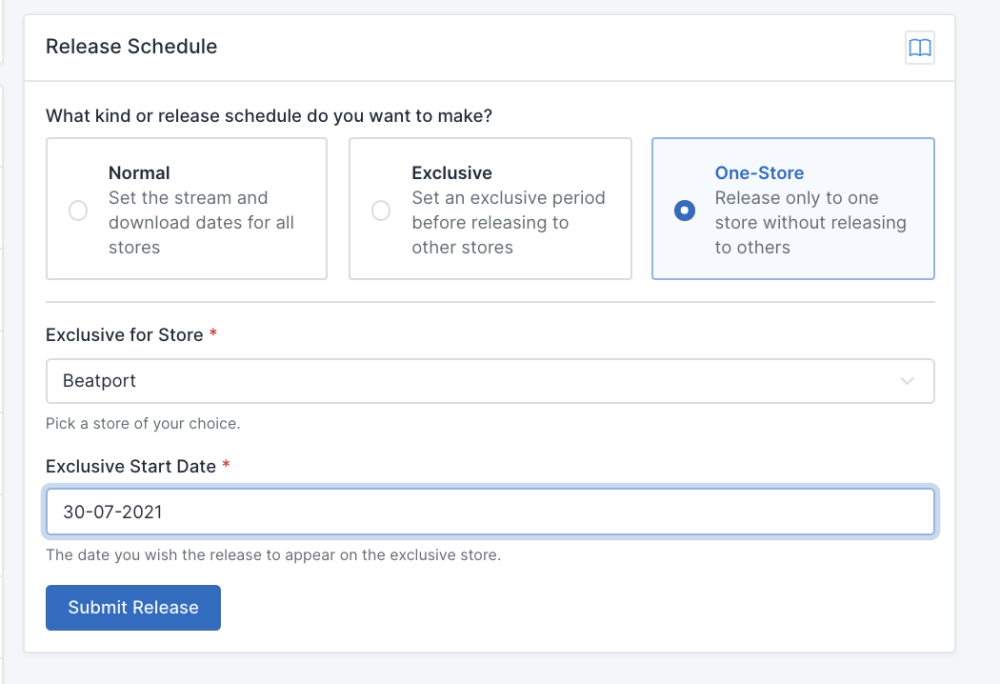
Exclusive Store – Pick the store you would like the lifetime exclusive to appear on.
Exclusive Start Date – The date you would like the release to appear on the chosen store.
SUBMIT RELEASE
Once you are happy with your release date choices then you can click the Submit Release button to complete the process and send the release to your distributor for approval. It will then be checked and if anything doesn’t look right then you will be contacted. You will still have a chance to contact us with any changes, this is explained on the next page.
SPECIAL REQUESTS
Above the date options you will also see two boxes for special requests.
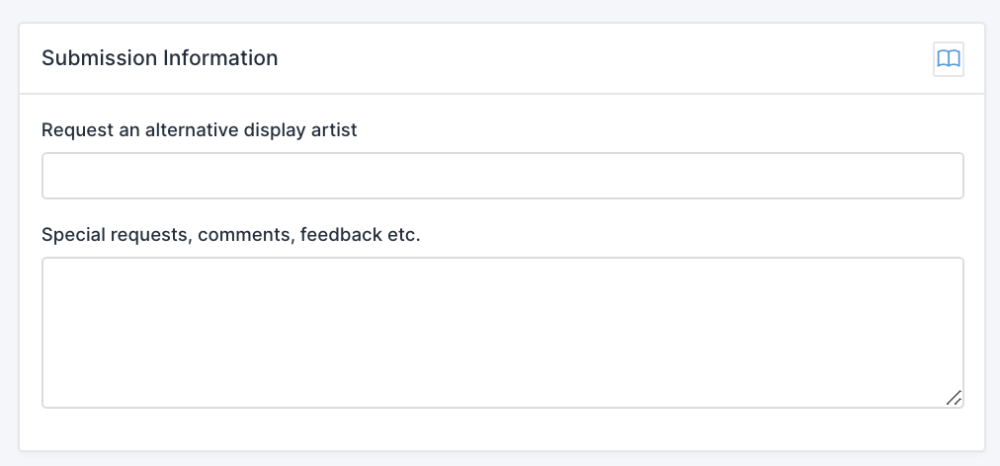
Request an alternative display artist: This is primarily for a Various Artist release, as sometimes a label may want the main artist name to appear as one of the artists on the release, rather than as ‘Various Artists.’
Special Requests: If you have any special requests, feedback or extra marketing info, then please enter it here and we will see if this possible. If it is not then we will contact you before delivering the release. It is also somewhere you can input any pre-order or pre-sale preferences, please talk to your Label Manager if you have any questions regarding this.