
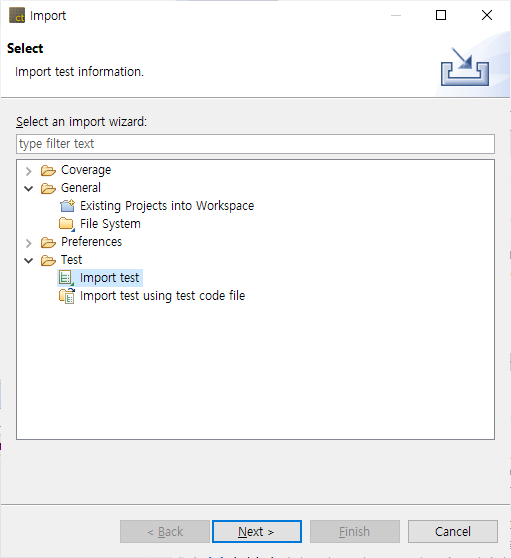
- In the Import Wizard, select [Test] > [Import Test] and click [Next].
![]()
- Enter the information for the test to be imported and click [Finish].
![]()
- In [Import path], enter the path to import the test.
- In [Unit Test] group, check whether to import [Test] and [Test Data] respectively.
- In [Integration Test] group, check whether to import [Test].
- When importing the integration test, it is imported with the test data in a set.
- In [Stub] group, select the stub to be imported among [Connected stubs] and [All stubs].
- Connected stubs: It imports only the stubs associated with the test you want to import.
- All Stub: It imports all the stubs in the path to import.
- In [Includes] group, select whether to import with fault injections.
- In [Option] group, select the method to import if stubs exist.

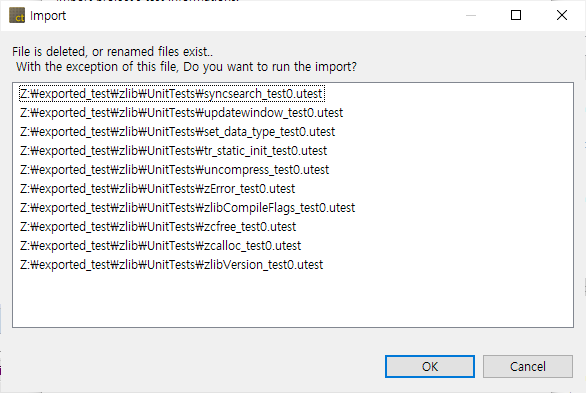
- If there are items that the name has been changed or the file has been deleted when importing the test information, the notification windows is displayed, allowing you to select whether to import the information except for that items. This notification window is displayed only if the information was exported from CT 2.6.14 or later version at a time. If the information is exported from the other menu and previous version, the notification is not displayed.
![]()
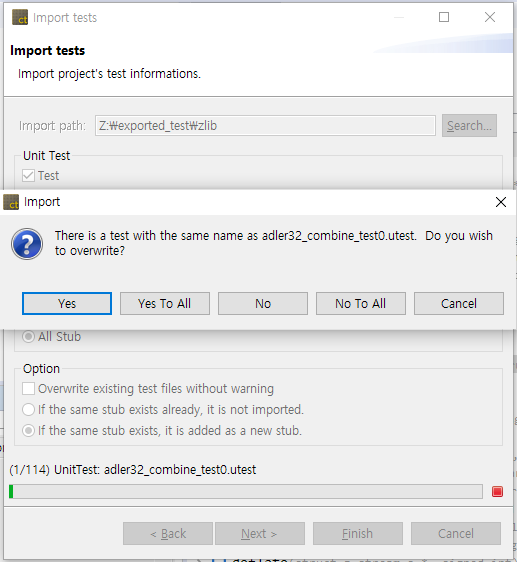
- If the same test exists in the project, select whether to overwrite the test. Select [Yes] to overwrite and select [No] to cancel the import.
![]()
- After the import has completed, it is applied to the selected project.
Import information exported from CT 2.6.14 or earlier
- Enter the path to import the test in [Import path].
![]()
- If [testinfo.export] file exists in the test path to be imported, select the directory containing the file.
If you import the information exported separately from CT 2.6.14 or less version, select the higher-level directory containing the information exported.
- If [testinfo.export] file exists in the test path to be imported, select the directory containing the file.
- In [Unit Test] group, check whether to import [Test] and [Test data] respectively.
- In [Integration Test] group, check whether to import [Test].
- The test and data must always be in the same directory, and if it is not, the data is not imported.
- In [Stub] group, select the stub to be imported among [Connected Stubs] and [All stubs].
- For the stubs created in CT 2.3 version, or the stubs migrated to CT 2.6, if the same stubs exist in the project, the import cannot be carried out.
- For the stubs created in CT 2.6 version, if the same stubs exist, you can select either not to import them optionally or to create as a new stub additionally.
- There is no feature to link the stubs to the test in CT 2.3 version, so you need to link directly to the test when migrating to version CT 2.6 or later.
- In [Option] group, select whether to overwrite the existing test files if they exist and how to handle them when the same stub exists.
Need more help with this?
Don’t hesitate to contact us here.
Copyright © 2025 Suresofttech
—
Powered by 