
The Results Page is where you will spend most your time.
This is where all the searches are displayed that you can preview,
—-SEARCH BAR—-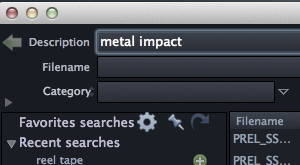
In the top left corner is the Green Back/Forward button in the upper left of the window that works similar to a web browser quickly showing previous/next searches.
You can also press the DELETE/BACKSPACE button to cycle back and when you see the search you want you can press (Ctrl+Enter) to search it to avoid too many mouse clicks.
Also (Ctrl+BACKSPACE) will cycle forward thru the list.
You can still of course CLICK on it also to go back or Ctrl/Command+CLICK to go forward.
The Boolean searching rules were already discussed in the beginning of the manual in the
Getting Started Section along with other Search Bar Features.
The bottom two search boxes have ‘Browse Arrows’ to the right of them.
These can be used to browse the selected field in the database.![]()
ex. so if you just want to see all your file types in your current DB just click these arrows like above.
In the middle of the bottom two search boxes is a link button.
when this is ON the Browse Arrows for the bottom two search boxes filter off of each other.
—-SnapSnots—-
you have the ability to store and recall SnapShots.
To change SnapShots, right click the Results List Header
—-THE PEEKTREE—-
To the far left is a sidebar we called the PeekTree.
It’s a tree control that now has 9 different nodes in it.
This is like the command station inside BaseHead that truly shows what sets it apart from the others!
You can Show/Hide it by pressing (E) and show the settings for this sidebar by clicking the blue gear looking icon and can pin it to always stay open or not so can then press (E)
whenever you want to just PEEK to look at it and it will hide again once you click an item. That is how it got it’s name….8)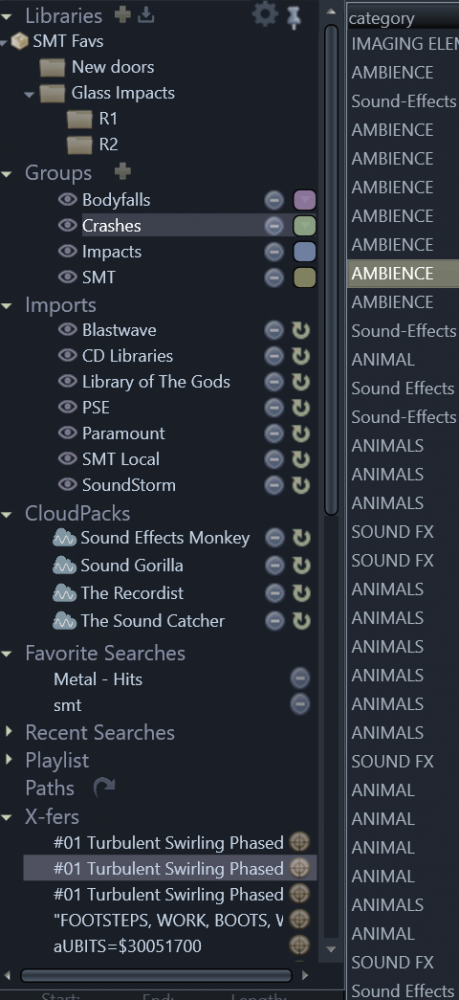
The PeekTree nodes are….
—Collections— (Ultra Only) (Formerly know as Libraries)
this feature is handy for pulling sound effects to give to other people or what I use it for is saving favorite sounds used on a show that I want quick access to cuz I know I will be using them a lot in the near future. My Go To sounds!
Some things you can do with Collections….
- Create a new Collection by pressing the green plus Icon.
- ‘Export Collection’ – export these Virtual folders with Files to you hard drive to be able to give to someone else with an included .lib file.
- Save off just a .lib file without audio.
- Import a folder structure off the hard drive as a starting point (with or without audio files)
- If you click a folder Icon it will show the contents in the Results grid (if they exit in the current DB)
- Import an existing .lib File
- Create a Database from a Collection
When a Collection has been exported and transferred all the files are dimmed inside marking they have already have been transferred.
you can mark them ‘Un-Transferred by right clicking the files or folder inside the Collection.
NOTE: Collections, unlike the below ‘Groups’ and ‘Imports’ are NOT attached to the database by Design.
So you can create them and switch between databases and they will still be visible and available to use.
—Imports— (Non-Lite versions)
shows all your named Imports here you created from the Import Window.
We suggest sub-dividing your Database to give you more control for adding and removing chunks of your library like in the above picture I have my 400,000+ database divided into 6 ‘Imports’ for easier maintenance.
Things you can do with Imports….
- Click the left purple eye icon to hide them from searches
- Single CLICK them to show ALL inside the ‘Import’ in the Results List and browse them
- Ctrl+CLICK to focus on selected libraries for searches. When force focusing this will only display results from the selected libraries
- Press the *Green Rescan icon *to check for newly added or removed files and update them in the Database.
- Press the Blue delete icon to Remove them from the Database or Delete them off the hard drive
(All the above functions can be found a right click menu also)
As of BaseHead v2020.9.84 the “Focused Selection” (CTRL + Click) will now “live update” the filtered search results.
This allows you to perform a search then use the focus library selection to filter based on selected libraries without having to perform another search.
—GROUPS— (Non-Lite versions)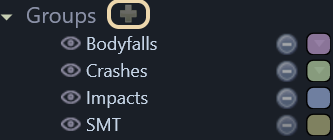
Groups can be created from the PeekTree OR also on the Import Window.
They can have one of 16 customization colors added to them that will show in the Details Panel and also the Results List.
You can colorize Groups and import into them OR drag files into them OR change Groups of selected records from the Details panel
Some things you can do with Groups…
- Click the purple left eye icon to hide them from searches.
- Single CLICK them to show ALL inside and browse the Group.
- Ctrl+CLICK them to highlight them yellow and do a focused search inside them only and ignore the rest of the database.
- You can color code them with the color combobox and the color will display in the Details Panel on the right and Results Page.
- Remove them from the Database or Delete them off the hard drive.
- You can also Ctrl/Option +DRAG items from the Results list to the ‘Groups’ node to add them to the Group.
How will your use them? It’s all up to your imagination….8)
Pro-Tip: Another quick way to create new ‘Groups’ super fast is from the Details Panel by right clicking a [field] and choose “Create ‘Group’ from XXX”
—CLOUD PACKS—
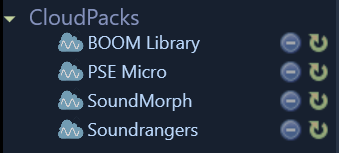
these web stream-able SFX packs can be added from the Online Page and appear in the PeekTree.
They have the same functions as ‘Imports’ basically, like focused searching, with the one difference is none of these files reside locally.
If you want to add some CloudPacks of your own then check out THIS PAGE.
NOTE: if you have a slow internet connection then best not to use these…. ;-)
—FAVORITE SEARCHES— (Non-Lite versions)
a place to put your searches you use all the time.
You can add them to this node by pressing the green plus icon from the Recent Searches node.
—RECENT SEARCHES— (Non-Lite versions)
shows all your recent searches and allows you to add these to the Favorite Searches node.
—Paths—
shows all recent transfer paths so you can quickly hot swap between them.
Also….If you click the hooked blue icon you can add multiple paths of recently opened sessions of the current selected target application.
—Playlist—
shows all the files recently auditioned so you can go back easily to the ones you heard and liked quick.
—Xfers—
shows all files that have been transferred lately….(both source and destination.)
This is handy if your DAW crashed before saving to help you see all your recent files you recently sent to it to help get you back to square one quickly.
(When the orange target icon is pressed the destination file is shown)

—Wwise—
in 5.1 or higher we added hardwired integration for Audioknetic’s Wwise allowing you to toss files back and forth while retaining full parameters from
Check out the Wwise WAAPI Walk-Thru page for more info.
make sure you turn this node on from the PeekTree Settings panel. (It’s hidden by default)
—PEEKTREE SETTINGS—
To adjust the max. count and hide/show any PT node open up the PeekTree settings window by clicking the blue gear icon at the top right corner of the PeekTree.
The width of the PeekTree can no also be set to three different widths
Watch the below video to see the PeekTree in action!.
(version 4.x video)
Need more help with this?
Having Issues? Click to Troubleshoot or Create a Support Ticket.