
Once you found the sound you are looking for you can do any of the functions of the Command Bar
These same functions (AND MORE) can be found in the…. —-Actions Menu—-
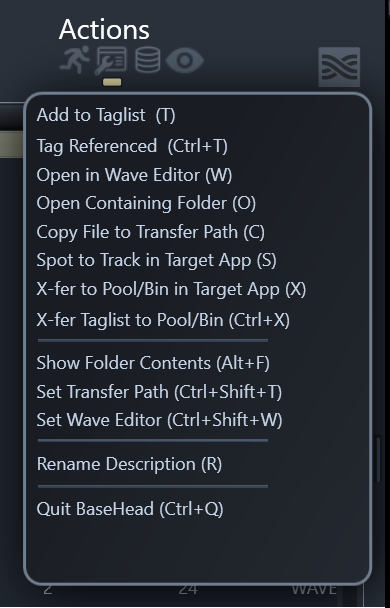
Action can be seen by right clicking the Results Page or clicking the Actions Menu icon on the top right of the Main Page to see the full list of available functions.
NOTE: On BH Mac all Main Menus are at the top like standard native Mac programs.
FYI….We don’t cut corners and waste time with horrible cross-platform GUI’s and frameworks.
BaseHead separately written for both Windows and macOS to ensure the best performance and best user experience possible for our users.
Double the work, but we think it’s worth it! What do you think? …8)
Now onto the Basic Functions……
Add to TagList (T)
will add the selected sound to the Taglist Page.
Once a list has been created you can drag and drop it all by either showing the Taglist Page and holding down (Ctrl or Option) and drag from the list.
You can also hold (Ctrl or Option) and grab the DnD Bar on bottom left of the main Results Page to drag the whole list without ever looking at it.
You can also transfer all the current checked sounds on the Taglist to the target applications’ Pool/Bin using (ALT+X) from either the Taglist Page OR Results Page.
Tag Referenced (Ctrl/Command+T)
will add the selected sounds to the Taglist Page the same as “T”, but the file will be referenced to the original path instead of Sample Rate converted and copied to the Transfer Path first.
This can come in handy if you are working with long ambiance files and want to work fast and don’t care about the Sample Rate or if you have your DAW set to do the Sample Rate converting instead.
Open in Wave Editor (W)
this with toss the file into the set wave editor on the Options Page, which is usually something like Wavelab or Sound Forge.
Open Containing Folder (O)
will show the selected record in Explorer/Finder.
Copy File to set Transfer Path ( C )
will copy selected files to your currently set Transfer Path. Click the folder icon on the bottom Info Strip to set a Transfer Path manually.
Spot to Track (S)
if your one of the type of guys that prefers to lay a cursor/marker down in your DAW and toss files to it instead of Drag and Drop then this is the option for you.
Select your Target Application on the Options page and hit (S) to toss files to a track in your DAW.
Support hardwired DAWS:
Nuendo/Cubase, REAPER, Pro Tools, Logic Pro X and Adobe Premiere Pro.
X-fer to Pool/Bin in Target App (X)
files are tossed to the Pool/Bin in Nuendo/Cubase or Pro Tools or other supported DAW’s
X-fer Taglist to Pool/Bin (Alt+X)
current checked file on the Taglist page are tossed to the Pool/Bin in Nuendo Cubase or Pro Tools
(Note: Spotting features for non-hardwired DAW’s can only send one file at a time)
Show Folder Contents (Alt+F)
will show the folder contents of the selected record in the Results Page.
Force Show All Records (Ctrl+Shift+F)
this bypasses the ‘Max Records Returned’ set value on the Options Page and instead returns All records.
Clear All Search Boxes (*Ctrl/Command+Shift+F)
this bypasses the ‘Max records Returned’ setting on the Options Page and returns all records.
Set Transfer Path (Ctrl/Command+Shit+T)
lets you select the path all files are copied to or just click the blue folder on the bottom Info Strip to set.
Set Wave Editor (Ctrl/Command+W)
lets you select a wave editor for 2 track editing (usually SoundForge or Wavelab)
Once set press ‘W’ to toss a file to it.
Rename Description ( R ) (non-lite versions)
pops up a dialog box that lets you change the* [description]* field for WAV, BWAV and now AIF files in version 4.x.
Once you Inject a* [description]* it will be permanently burnt into the files BEXT and iXML chunks.
Other Misc Commands
Re-trigger Playback (`)
simply triggers the currently playing file from the top
Play Random Sound (?)
will randomly pick a sound from the returned results and play it.
OR click the dice looking icon on the bottom left of the main window.
 —-Options Menu—-
Every item in this menu are Enable/Disable type items that relate to the Results List mainly. The options on the Options Page are more global program wide type options instead.
(See the Options Page/Menu Section for more info)
Dim Played Records
when ON will slightly dim the records you already played to give you visual feedback.
Retain Dimmed Records
when ON keeps track of which records you clicked on already until manually cleared. You will see the number of records increasing near the Results Tab. To reset it to back zero simply click on the greenish number label.
Hide Indexes > 1
hides indexes greater then 1 in the Results List when ON.
Fixed Row Heights
turn this ON if you don’t want to see Multi-Row Descriptions in the Results List.
Double Click to Open in Wave Editor
when checked ON will Open the double clicked File in the set Waveform Editor
Select text on Focus
when ON the current text in a search box will be highlighted on next search.
Show Extra Split Channels
when ON all other split channels files other than .L. or _1. will also be show in the Results List.
Spell Check Searches
when ON will enable Spell Check in the Search Boxes on the Results Page.
 —-Database Menu—-
Here’s where you do a lot of your DB management.
Import Files
imports files and scans meta-data to be added in the DB.
FYI: Importing can also be initiated by dragging files to the Results page.
Open Database
opens a new DB
Create New Database
creates and selects a new DB
Rename Current Database
renames the current loaded DB
Delete Current Database
deletes the current loaded DB from your hard drive
Remove Current Database
will remove this DB from the DB Hotswap box.
Clear All Records in Current Database
clears all records from the current loaded DB so you can start fresh.
——————-
Remove Duplicate Records
will remove entries that are the oldest when two or more of the same are found in the DB with the same name at the same [folder] or [path].
Cleanup Missing Databases
checks if databases in the bottom left DB Hotswap box still exist.
If not….they are removed from this drop down box.
——————-
Delete Record
will remove selected records from the database only.
Delete File
will remove selected records from the database and also the associated file from the hard disk.
Silent Delete File and Record
Holding Ctrl+Shift+Alt and Pressing DEL will delete both file and record immediately without asking.
Import/Export Text File
various formats of text files can be Imported and Export now.
See Import/Export section to learn more.
Create ‘Import’ from Database
allows you to take a existing .db file and import it as a separate ‘Import’ into the current database giving your full control to search inside it and remove it at anytime in the future cleanly.
Remove Offline Media
checks if files currently shown in the Results List are “Media Offline” and if so they are removed from the Database.
Show Offline Media
shows all of the current Results List that is ‘Media Offline’
Rebuild Indexes
rebuilds the databases indexes. If you are seeing slow performance for function like ‘Imports’ Re-scan then run this function and it should be running snappy again in no time!
 —-View Menu—-
This Menu contains some of the new panels among other Hide/Show options.
The Panels are covered in the Panel Section of this manual.
Clear All Search Boxes – (Ctrl+Shift+C)
clears all 4 search boxes at once.
The rest of the View Menu should be self explanatory.
Need more help with this?
Having Issues? Click to Troubleshoot or Create a Support Ticket.