
First off to avoid some confusion, there is an Options Menu AND also an Option Page.
The Options Menu is for items related only to the Results Page and the Options Page is more for global type options.
Options for more dedicated features can be found in their sections also throughout the program.
Example….The PeekTree and Waveform View have their own option menus.
Just look for the little gear icons in each section.
So first let’s take a look at the main Options Menu.pro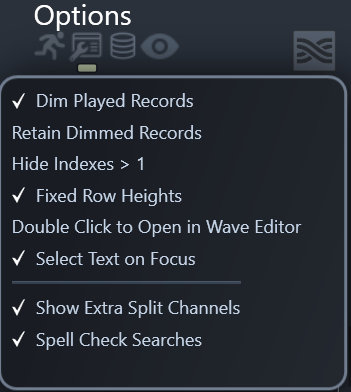
These options are only for things related to the main Results List.
(For macOS this menu is where all standard macOS applications show menus….at the very top of the screen named “Options”)
*Dim Played Records***
dimmed any records that have already been played in the Results Page.
Retain Dimmed Records
when ON keep track of all records you have clicked on since the value was cleared last
Clearing of this can be done by clicking the greenish number under the Results Tab
Hide Indexes > 1
when checked ON all results returned that have a index greater then 1 will be hidden on the Results Page.
Fixed Row Heights
turn this option ON if you don’t want to see Multi-line Descriptions in the Results List.
Double Click to Open
when checked ON double clicking a record in the Results List will toss the file into your set Wave Editor.
Show Extra Split Channels
when ON all other split channels files other than .L. or _1. will also be show in the Results List
Spell Check Searches
when ON will enable Spell Check in the Search Boxes on the Results Page for Windows users.
The macOS version has this option (plus a few others built in) if you right click the search boxes and go to “Spelling and Grammar”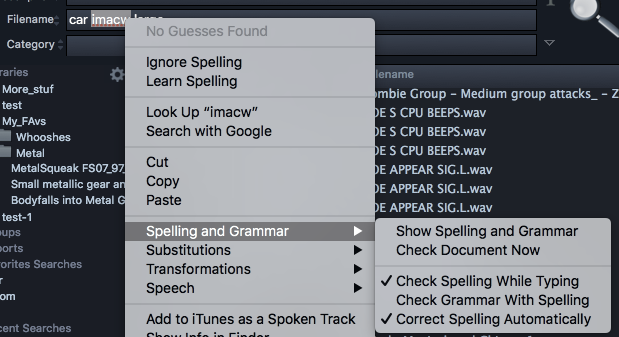
—-OPTIONS PAGE—-
now let’s take a look where the more global options reside….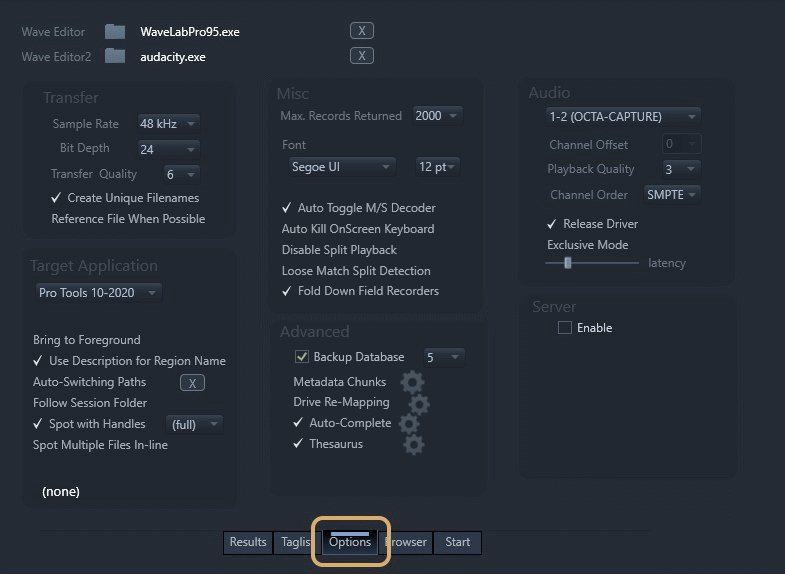
(click the Options Tab at the middle/bottom of the program to access this page)
Wave Editor and Wave Editor2
choose a wave editor like WaveLab or Sound Forge.
Then you can press (W) to toss the selected file to it for additional editing that can’t be done in BH.
Holding Ctrl will send the file to the 2nd set wave editor
Make sure “Reference File when Possible” is set to ON if you want to do destructive editing to the original file inside your wave editor.
—-TRANSFER SETTINGS—-
attributes and more for newly created transferred files.![]()
Target file sample rates can be set up to 192Khz with a bit depth up to 32 for the Ultra Edition .
96/24 is maximum for the Standard Edition and 48/24 for the Lite Edition.
Pro-Tip: if you want to drag multiple files processed out of BaseHead you should tag them first and then hold Ctrl/Option and drag the Taglist from the DnD Bar otherwise you might be holding down the mouse button for a while….hehe
So press (T) and sit back and wait till all the files are copied and processed and then drag them over!
Create Unique Filenames
When ON will always add , (3), (4)… onto the end of files if the same name appears in the transfer folder already instead of using the existing file for functions like ‘Spot to Track.
FYI: when this option is OFF BaseHead will not over-write files with the same name. it’s recommended to leave this ON cuz hard drive space is cheap. ;-)
NOTE: We also don’t recommend turning this OFF if using an earlier version of Pro Tools cuz on next launch it might say some of these files are missing
Reference File When Possible
You must understand this setting fully before using it so that we don’t get hundreds of tech support emails asking why some files copy and others don’t.
When RFWP is ON it will try to Reference the original file location instead of running thru SRC and copying the file to the set Transfer Path. It’s a faster way of working cuz minimal copying is done, but in some cases they must be copied also so files will be scattered all over the place that you will need to condense later on.
Some main things to know about RFWP:
All selected regions will NEVER be referenced and will still be copied to the set Transfer Path UNLESS spotting with handles ON.
If VST’s are Enabled, files will also still be copied and if the pitch slider is engaged a copy will be also be made.
Also, spotting with handles with the pitch slider will NOT show the correct region since this is calculated based on destination SR still.
If this all doesn’t make complete sense to you then leave this setting OFF until it does. hahaha 8)
*—-TARGET APPLICATION—-*_ (non-Lite versions)_
this is where to set a destination DAW the transferred files will be tossed to using Spot to Track (S) and X-fer to Pool (X).
Target Applications with Hardwired/Advanced Support:
- Nuendo 5-10
- Cubase 6-10
- Pro Tools 10-2019
- REAPER
- Logic Pro X
- Premiere Pro (Added in version 5.2)
- Pyramix
Target Applications with Basic Support: (PC only cuz not possible on macOS)
- Audition
- Fairlight
- Samplitude X3 (x64)
- Sequoia
- SONAR
- Studio One
- Vegas
FYI….It’s impossible to support Ableton Live at this time cuz they don’t have a File/Import Audio key command so please stop asking to support it until they do…..haha…..8)
NOTE: Depending on what DAW is selected, your options will be shown that are available once selected.
Delay Slider (PC)
when using a DAW with generic support you might need to raise the delay slider up to slowdown the key commands being fired to your DAW if it’s tripping up.
Target DAW Language (PC)
if you are running a Windows install in German then select it here.
Bring to Foreground
when checked ON, if you drag and drop a sound from BH or hit (S) or (X), the selected target application will jump into focus.
This is very useful when working on one monitor or when you are using Edit Mode with video in Nuendo.
Note: This can be temporarily disabled, if you need to drag a file to another location or internally inside BH, by holding the ALT key on PC or Cmd key on Mac.
Use Description for Region Name (Pro Tools, Nuendo/Cubase, REAPER, Logic Pro X)
when checked ON sends the [description] to the region name instead of the newly generated [filename].
Auto-Switching Paths (Nuendo/Cubase. Pro Tools and REAPER)
this feature is used to detect which project is open or in focus currently.
You can assign a different transfer path to each project and when BH sees it appear again it will change the transfer path automatically to follow to what is was last set to.
One great use for this is if you are working on a 5 Reel Film and each of the 5 reels has a different audio files folder.
Once they have been set once, the next time you load that project, BH will change to the assigned Project Folder each time it sees that project open in the future.
Also…Adding -01, -02, -03 etc… to the end of the session filename will be ignored also so you don’t have to reset the Transfer Path each time you do a quick ‘Save As’ in your DAW.
Go to the How To Video Pages to see this feature in action!
(IMPORTANT: your DAW must be 64bit to use these feature in version 5.x and beyond)
Follow Session Folder _(Nuendo/Cubase, Pro Tools and REAPER)
when checked ON the Transfer Path will follow the audio file folder for the current Active Project automatically.
Go to the How To Video Pages to see this feature in action!
(IMPORTANT: your DAW must be 64bit to use these feature in version 5.x and beyond)
IMPORTANT Pro Tools Mac Users:
“Follow Session Folder” can not be used with macOS Spaces or in FULL SCREEN mode cuz macOS blocks messages between programs in this state
Spot with Handles (Nuendo/Cubase, Pro Tools, REAPER and Logic Pro X)
when checked ON the whole file will be transferred after hitting (S), but just the selected region will be on the timeline.
These handles are also user definable to the right of this option. Keep in mind this setting will break RFWP since a new region needs to be created.
.
Pro Tools Users: make sure BH copies the files instead of Pro Tools. If PT touches the file and re-copies it, it will ignore all handle information for any file sent to it from and external application.
Also…This feature only works with the “S” action/command as expected and designed. It is impossible to drag and drop with handles, since you need to use an API to pull this off and the drag and drop protocol also doesn’t support sending region information. So if you need handles on your transferred files then you have to use “S”.
Spot Multiple Files In-line (Nuendo/Cubase, Pro Tools and REAPER)
when ON it will place spotted files head to toe on the same track instead of up and down on the timeline.
IMPORTANT Pro Tools Mac Users:
“Spot to Track” can not be used with macOS Spaces or in FULL SCREEN mode cuz macOS blocks messages between programs in this state
Active Project (Nuendo/Cubase, Pro Tools and REAPER)
this will show what project is active in your DAW.
Used for ‘Auto-Switching Paths’ and ‘Follow Session Folder’ if supported.
(Note: Pro Tools and REAPER are pinged every 7 seconds when BH is in the foreground)
DnD Application switching (macOS Only)
Use this to choose a Target app you want to bring to the foreground after DnD is initiated if it’s not in the Target App popup box already.
Click the tiny button with the (X) to the right to clear this selection.
(Note: This will be disabled if a Target Application is selected)
—-MISC OPTIONS—-
Max Records Returned
Lets you limit how many records to be returned to speed up the Results List.
NOTE: The lower the number the faster BaseHead will return results.
Never set this to (all) besides for temporary special circumstances.
Font
I think you can figure this one out………..8)
Auto Toggle M/S Decoder
When ON will auto-switch the M/S Decoder ON/OFF whether the word “M/S” (without quotes) is found in the [microphone] field.
Auto Kill OnScreen Keyboard (PC Only)
When ON you will not be asked you to Kill the Onscreen Keyboard at launch. It will be automatically killed if found.
Disable Split Playback
When ON Detection of Split Files (.L .R .C.. OR _1 _2 _3…) with Grouped Playback is Disabled
The waveform will no longer turn orange with split files grouped.
Loose Match Split Detection
When ON matches numbered extension Split files to name and rough length instead of the iXML metadata for files that might be missing this info
Fold Down Field Recordings
When ON an attempt to auto-detect multi-track field recordings will occur and fold down the tracks to stereo output for monitoring.
This functionality can also be toggled on/off from the Fold button on the QAP.
Files can force this auto-detection by adding “F/R” (without quotes) in the [microphone] field.
—-ADVANCED—-
Database Consistency Check
this is a built in SQLite function that looks for errors and repairs them and is only ran at launch.
Toggle it on for a few days if you suspect a problem and make sure to turn it back off cuz it will slow down database loading.
Backup Database Weekly
when ON weekly DB backups are stored at ~Documents/BaseHead 5.x/DB Backups
You can also choose how many to store with the combo box next to this option.
Metadata Chunks Panel (F3) (Ultra Only)
This advanced user only panel gives you full control of what metadata is imported, edited and added to newly transferred file.
If this panel makes no sense to you, then close it and never open and look at it again 8)
Drive Re-Mapping (Ultra and Standard)
when checked ON will allow you to map new locations if folders have been moved in the top 4 boxes or let you compensate for a path between PC and Mac databases for files that are not at a normal network path.
Simply add the source path you want to change in a left box and what you want to change it to in the right box.
ex. To change the path of D:\OldDrive\SFX\Metal Impacts\ to E:\NewDrive\SFX\Metal Impacts/
first press the settings icon and open the Re-Name Panel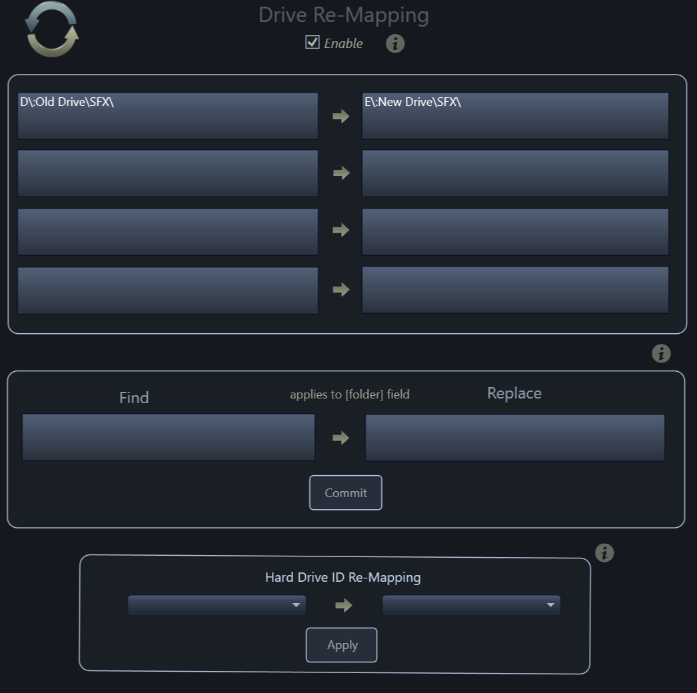
then just type D:\OldDrive\ in the left box and E:\NewDrive\ in the right box
(NOTE: Make sure you check the option ON on the options page otherwise it won’t be enabled)
Find/Replace
this middle section allows you to physically change the database [folder] or [path] in the current opened database.
Test your changes in the top section to make sure you got the values correct.
Then once you get it work and want to make the change permanent then copy and paste the values into this middle section and press ‘Commit’.
Hard Drive ID Re-Mapping (PC Only)
are for when a drive is NO longer on the system and the hard drive ID is orphaned and you want to map the whole drive to another one that is a copy of the original.
Orphaned drives will appear in the left combo box and you can map them to a new drive letter in the right box.
Make sure you press ‘Apply’ once you’ve made your choice.
So how do I re-map a drive scanned on a Mac to a Drive Letter on PC?
Mac and PC local drive paths are very different. One has a drive letter that changes constantly (PC) depending on when it was plugged in and where and the slashes are opposite also.
We create both [folder] (PC) and [path] (Mac) on import, but we can only guess or get you part of the way there.
You need to tell BH what the other path is a bit still via Drive Re-Mapping
So if you scanned a drive on mac that pulls up as G: on PC then…
First…look at the path it’s looking for in the Details Panel.
It might be like \\localhost\FlashDrive\SFX\
So to remap this to G: path put in any left box put \\localhost\FlashDrive\SFX\ and in the matching right box put G:\SFX\
NOTE: ALWAYS! swap out paths from the very start! Re-Mapping won’t swap out in the middle.
FYI….If you are moving around a lot on PC you’ll want to switch to Importing via Hard Drive ID’s
Video that demonstrates drive remapping:
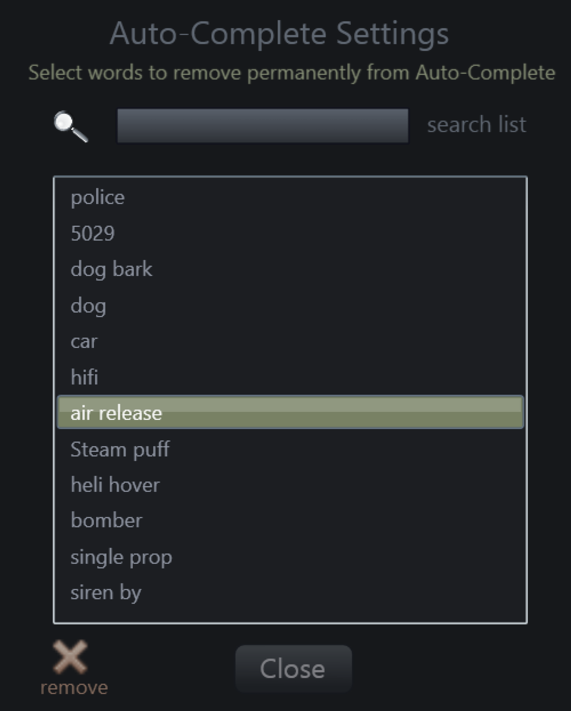
Auto-Complete (Non-Lite versions)
when ON will fill in the search boxes with previous successful searches.
Click the settings icon to be able to remove items from this list..
Thesaurus (Ultra Only)
When ON the middle search box will show an editable search string while typing based on the internal Thesaurus.
this can also be turned on from the green T icon on the search bar.
you can edit this internal thesaurus here and also add your own terms in the User Tab.
Click the settings icon next this checkbox on the Options Page to show it and make changes.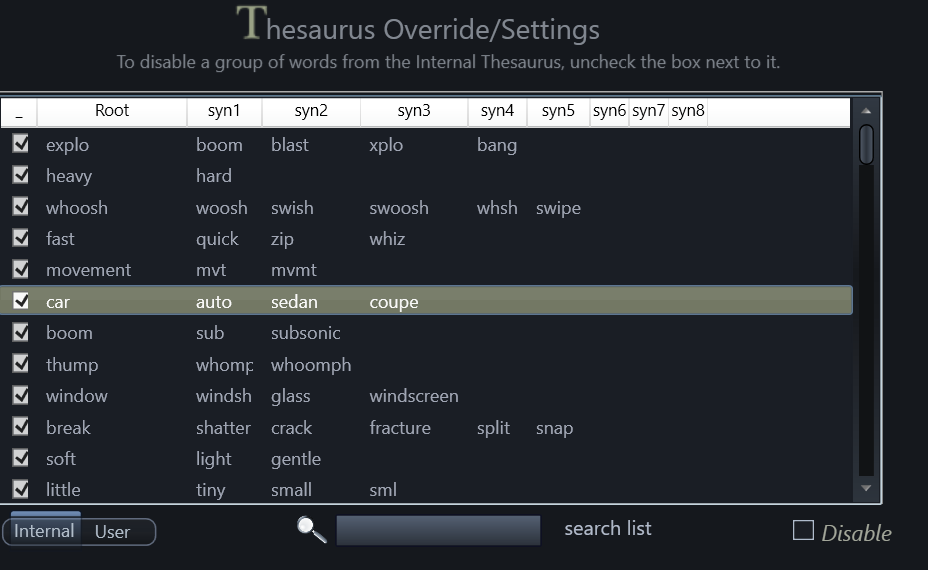
Disable CloudPack Caching
When ON.. streaming CloudPack & HTTP files will NO longer write temp WAV files to the local directory:
Win: ~AppData\Roaming\BaseHead Inc\BaseHead\Cloud
Mac: ~Application Support/BaseHead/Cloud
This option is recommended to always be OFF for better performance (unless you are low on disk space)
FYI: WAV cache files are cleaned up everytime the application closes or launches so are only cached for the current session.
—-AUDIO OPTIONS—- 
Audio Device Selection
this is where you select the sound card output that you want BaseHead to play out of.
_Windows cards with WASAPI drivers are the only ones supported right now, but most all cards should work with it if they work in Windows 10,8,7 or Vista. _
Channel Offset
if you select an audio device and the playhead is moving in BH but you are not hearing any audio you might need to do a channel offset to move the BH outs over the channels that are router to you speakers.
This is where you would do that 8)
Playback Quality
can be set for 0-3. For best performance leave it at 0.
If recording the output of BaseHead with then raise it up higher if you desire.
Channel Order
choose between Film, SMPTE and DTS channel orders here.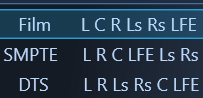
Release driver
check this to release the driver in background.
Exclusive Mode (PC)
turn ON to grab exclusive control of your audio hardware.
Latency Slider
raise up if you are hearing pops and clicks during playback.
ReWire (PC/Mac)
ReWire can be used as your audio output to playback up to 6 channels directly into your DAW.
This can be turned on from the main page with the upper right yellow ReWire icon.

This video shows ReWire in action
(version 4.x video)
Another highly recommended option for Windows users to feed audio into your DAW (32 or 64 bit) is made by VB-Audio called VoiceMeeter
The only thing I don’t like about VoiceMeeter is that it wasn’t made 8 years ago….8)
MAC USERS!
A great alternative to ReWire for BaseHead Mac is Source Nexus![]()
http://source-elements.com/source-nexus/
This works with AAX, VST and AU and it all versions from Lite to Ultra.
It will stream 8 channels of audio to you DAW and a lot more solid and modern and more flexible then ReWire.
NOTE: Once they make a PC version of SN we will probably rip ReWire completely out of the Windows version also cuz it’s superior in every way!
Also as a point of interest, you can also check out LoopBack which is a virtual audio cable routing application that can send auto between applications
https://rogueamoeba.com/loopback/
—-SERVER—-
Enable Server Databases
the allows you to have multiple users access and edit the same centralized database.
Head over to the BaseHead Server product page to learn more about this add-on option.
Need more help with this?
Having Issues? Click to Troubleshoot or Create a Support Ticket.