
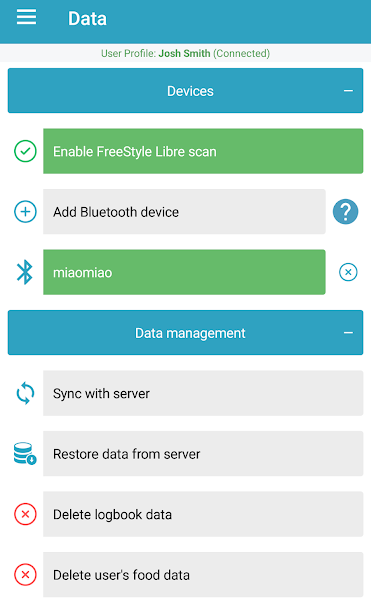
Activating the CGM features
Diabetes:M can receive data from sensors. This can be done in two ways:
- Scanning the sensor – if your phone has NFC capabilities, you can “scan” the sensor with your phone and it will receive the latest entry and the entries from the last 8 hours
- Using a bluetooth transmitter – Diabetes:M can receive data from Miao Miao and Ambrosia’s Blucon. Those are small transmitters that sit on top of the sensor and pass data to the phone every 5 minutes.
Sensor scan
In order to use the NFC scanning capabilities of the app, you must enable it first. This is done by going to Data -> Devices -> Enable sensor scan. After that you can touch the sensor with your phone, it will vibrate, hold for 1-2 seconds until it vibrates a second time and receive a reading.
Bluetooth transmitter
This feature is available only for users with a subscription.
You can add Miao Miao or Blucon/Nightrider as a bluetooth device. Search for a bluetooth device, choose the transmitter and enter a password/code if needed. The transmitter will appear in the added devices list in green and will start receiving data.

CGM dashboard
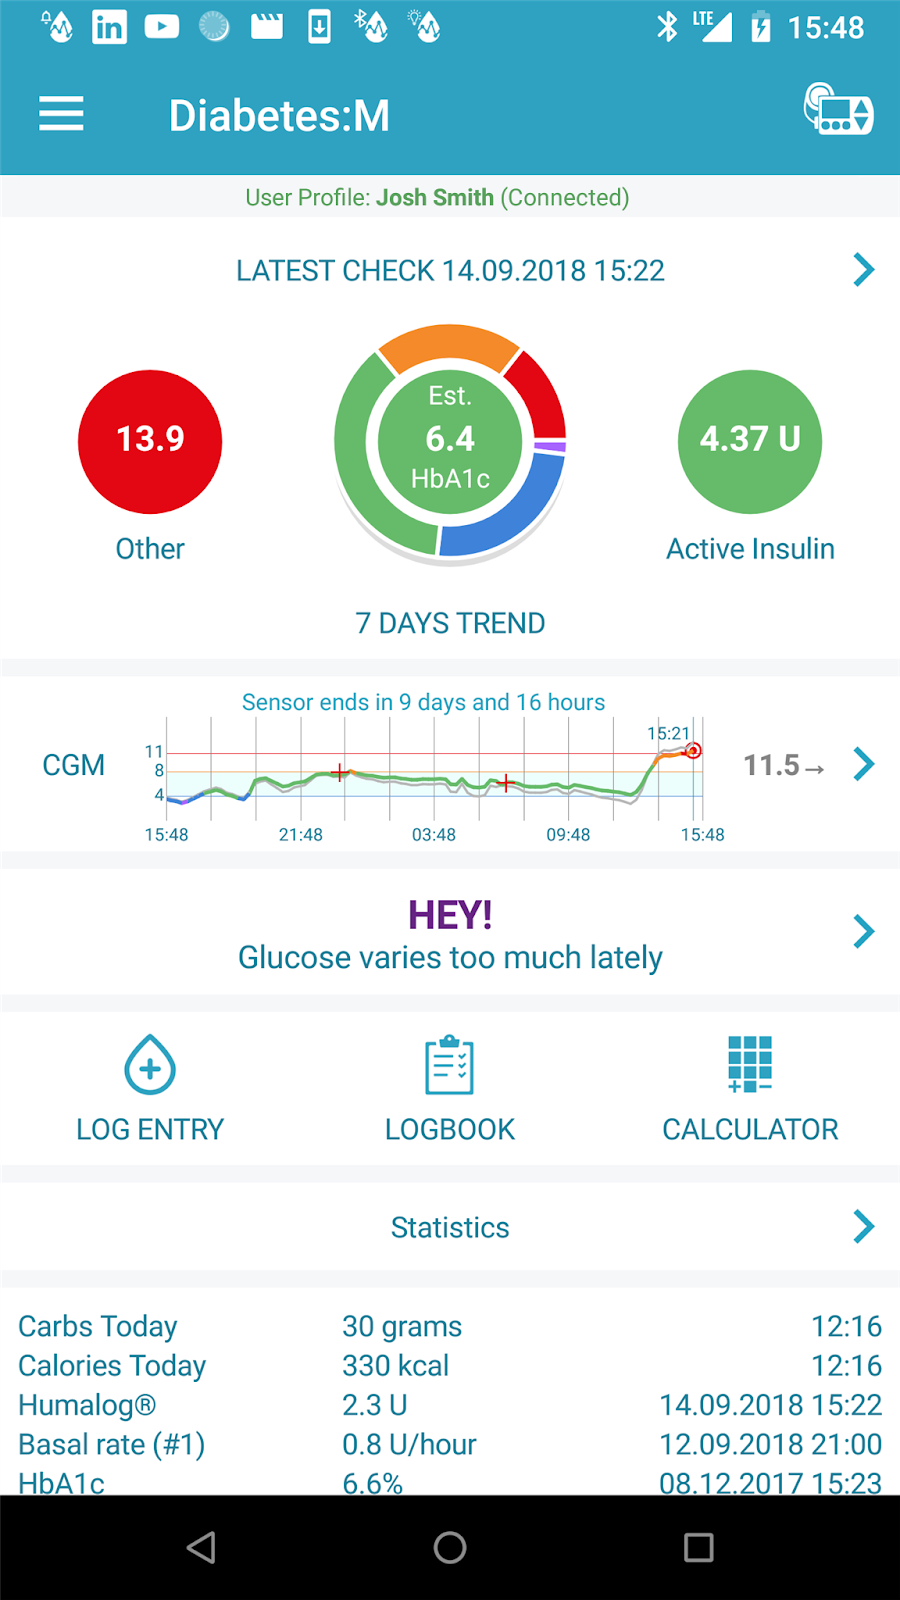
When the CGM features are activated, a CGM dashboard will appear on the main screen of the app.
There are a few things to know about it:
- It shows some horizontal lines and a green zone. Those lines represent your glucose target levels set in the settings.
- There are vertical lines with times under them representing the time period
- The colored line on the graph shows the calibrated glucose readings with the appropriate color according to your glucose targets settings
- The gray line which may appear above/below the colored one shows the raw not calibrated values coming from the sensor. If there are no calibrations or the raw values are almost equal to the calibrated ones, this line won’t be visible as it will be under the colored one.
- The sensor’s status is shown above the graph, also if there’s a transmitter, the transmitter’s statuses will be shown there too. For example if the transmitter’s battery is low it will be shown there.
- The latest sensor reading including the trend is shown on the right of the graph. It’s colored according to the glucose level. If it’s shown in gray, this means that it is older than 5 minutes.
CGM settings
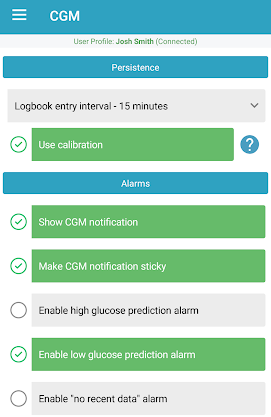
Clicking on the CGM graph will lead you to the CGM settings. There you can setup a few things:
- Logbook entry interval – Diabetes:M doesn’t save all the entries in the logbook. This is the time interval to save an entry. If it’s set to 15 minutes, than a reading from the sensor will be saved to the logbook every 15 minutes.
- Show CGM notifications – if this is selected, every time a new reading is received, the app will fire a notification with the reading and the trend. This can be very useful if you have a transmitter and your phone is lying on the desk and you can see the latest reading without opening the app. Those notifications will also go to smart bracelets, fitness bracelets or smart watches if their software allows them to receive notifications from third party apps.
- Make CGM notification sticky – this will pin the CGM notification showing your last glucose value. The notification will be updated every 5 min, but your phone’s notification light won’t flash and the screen won’t turn on.The notification will still go to smart bracelets/watches every 5 min.
- High/low glucose prediction alarm – the app can fire an alarm if your glucose goes over 11 mmol/L or below 4 mmol/L
- Enable “No recent data” alarm – will fire an alarm when there are no readings coming from a sensor transmitter for the last 20 minutes
- Display interval – this will change the displayed time interval on the graph
- Display calibration points – the calibration points will be shown as red crosses on the graph. If disabled, they will be hidden.
CGM calibrations
Sometimes the values coming from the sensor are not very accurate. That’s why we support calibrations.
Every manually inserted glucose entry in the logbook, which is NOT marked as estimated or sensor, will be considered as a calibration.
After 20-25 minutes, a red cross will appear on the CGM graph showing the calibration.
Here are some important notes about calibrations:
- Calibrations should be made on stable glucose level – calibrations work better when the current glucose level is stable, for example at least 2 hours after a meal and when there are no correction in the last 2 hours.
- It’s better to make at least 1 calibration on normal glucose level and 1 on higher glucose level – higher glucose levels usually are not measured very accurately by sensors and it’s good to have 1 calibration when your glucose level is higher.
- Add calibrations at least once per 2-3 days – our calibrations last for 3 days each, so it’s good to make at least 1 calibration per 2-3 days for best results
- “Use calibration” setting must be enabled – in order to see calibrated values instead of raw ones, this must be enabled in the CGM settings.
Haben Sie noch weitere Fragen?
Kontaktieren Sie uns.