
The My Documents Widget allows users to view a list of documents assigned to their user’s role and/or resource or documents assigned to other roles, resources, org units and/or assets within the organization.
Please follow the instructions below to customize the “My Documents” Widget.
1. Upon login, you will be greeted with the following page:
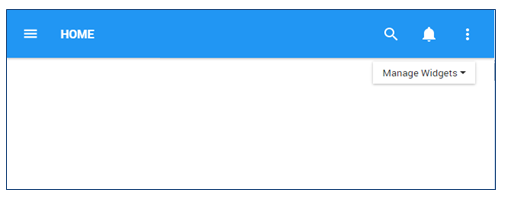
2. To add widgets to your home page, navigate to the the 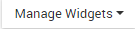 button and select the widget you want to add from the Dashboard Manager
3. Once the “My Documents” Widget has been added to the Home page, select the  icon at the top right corner of the Widget and select the
  option.
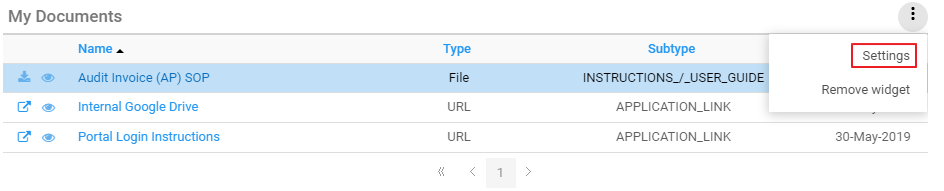
4. Click on the “Settings” option and a pop-up window will be generated as follows
5. After customizing the settings, click on the  button to save the changes made.
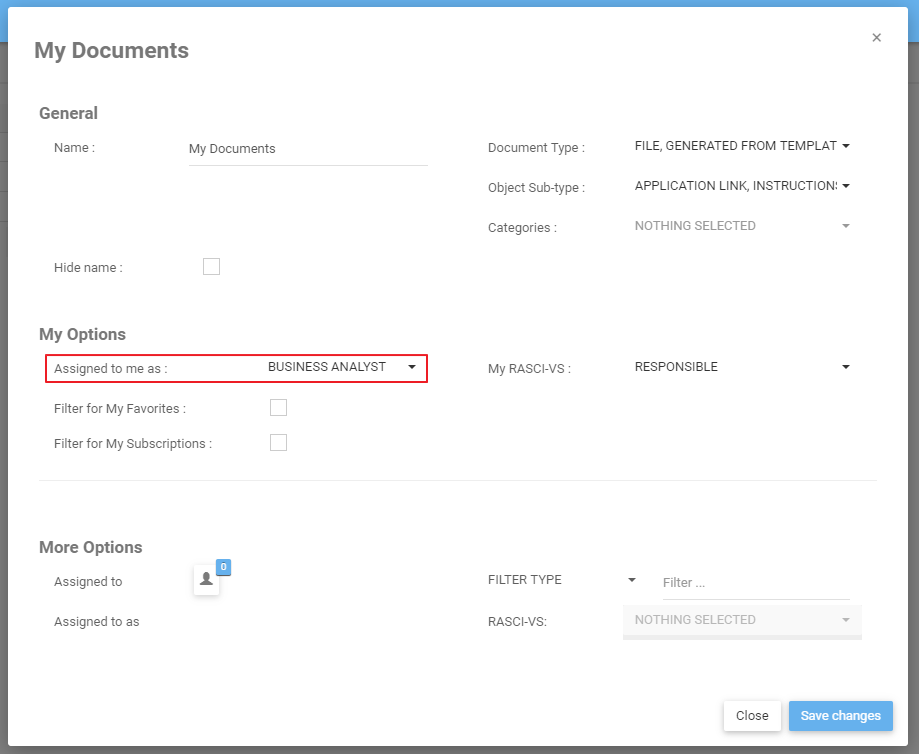
My Documents Widget Settings Parameters
In the settings window, there are a number of parameters that a user can use to customize “My Documents” widget and improve their Home Page.
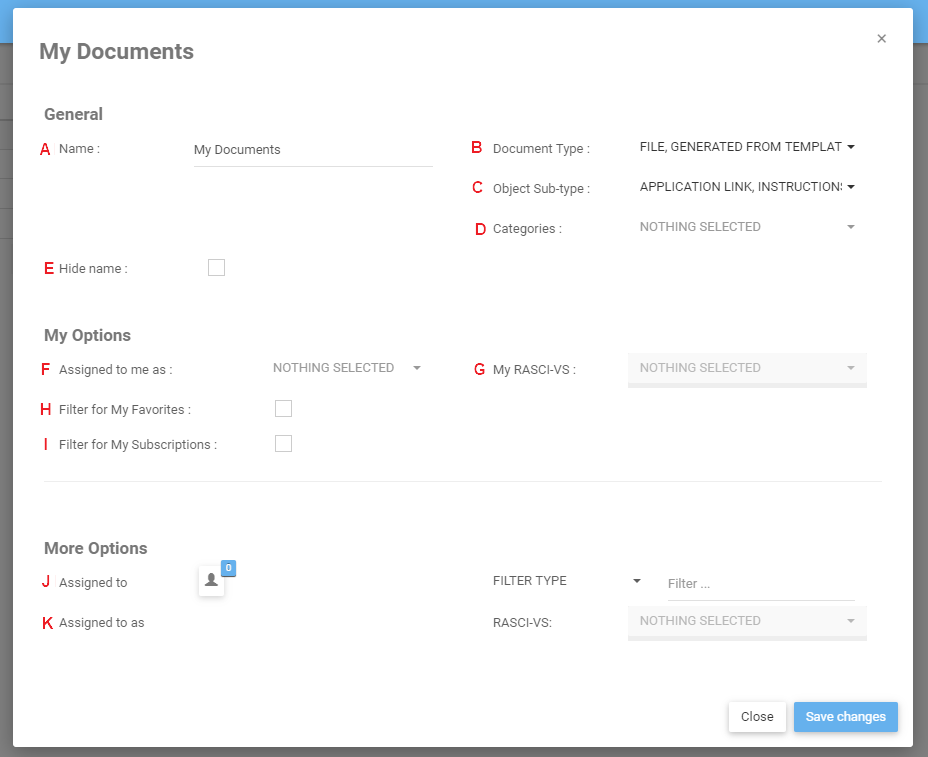
| Item | Setting | Purpose |
|---|---|---|
| A | Name | Allow user to customize the title of the Widget. |
| B | Document Type | The primary filter of the “My Documents”. Allow users to select a specific document type to be featured. |
| C | Object Sub-Type | Allow users to filter by the assigned object sub-types (sub-types can be manually assigned in the properties of an object). |
| D | Categories | Allow users to filter by the assigned object categories (categories can be manually assigned in the properties of an object). |
| E | Hide Name | Allow users to hide the display name of the widget. |
| F | Assigned to me as | Allow users to filter through their assigned Roles and Resources. |
| G | My RASCI-VS | Allow users to organize their Roles and Resources based on their level of involvement. |
| H | Filter for My Favorites | Allow users to sort specific objects by favorites vs. non-favorites. |
| I | Filter for My Subscriptions | Allow users to sort specific objects by subscribed items. |
| J | Assigned to | Allows users to filter objects that are related to other Roles, Resources, Org Units and Assets. |
| K | Assigned to as | Further criterion helping users view filter objects indirectly relating to personal Roles & Resources. Allows users to filter indirect relationships based on RASCI-VS criterion. |
A. Name: The “Name” Section will allow a user to customize the name of the Widget. To edit the “Name” section, please follow the instructions below
i. Navigate cursor over existing name box
ii. Edit name by selecting name box and typing in desired name
B. Document Type: The Document Type is the primary filter when customizing the “My Documents” Widget. This filter should be set first, as all subsequent items are derivative of the Document Type. To select Document
s to be featured in a Widget, use the “Document Type” field and follow the instructions below:
i. Navigate cursor over the Document Type task bar
ii. Click on the task bar, which will generate a drop-down menu
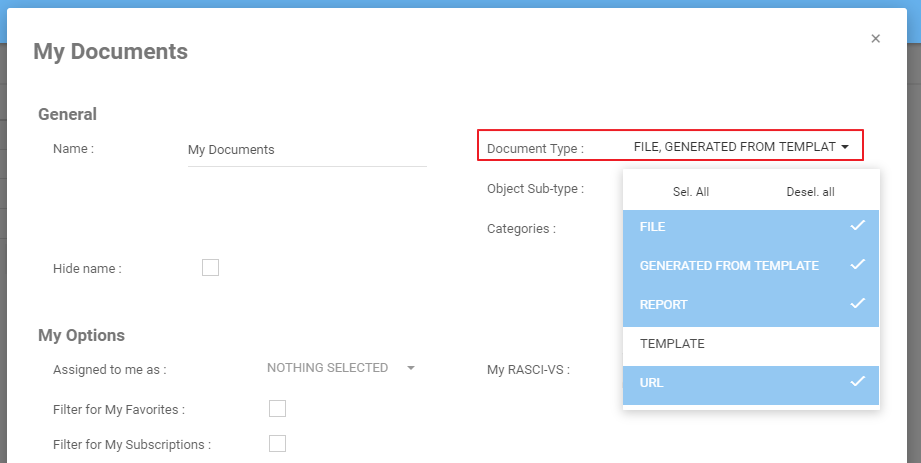
iii. Select/Deselect desired Document(s) to be featured in Widget window by navigating cursor and clicking on respective Document Types. Additionally, the drop-down menu features  and
and  buttons that can be used for mass selection.
C. Object Sub-Type: Users can use sub-type as an additional filter. This will filter for the selected object type that has a particular sub-type assigned. Sub-Types can be defined by administrators. These sub-types can then be associated to any object in EPC in the object’s properties. Users can filter for multiple sub-types across document types. To learn more about sub-types, click here.
Users can select multiple sub-type for documents. To add a filter, follow these steps:
i. Select the Object Sub-Type dropdown
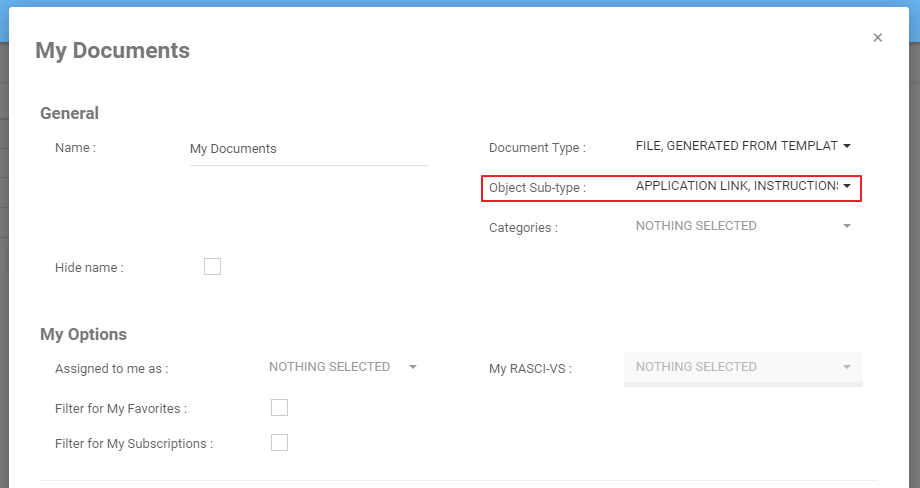
ii. This will generate a dropdown of possible sub-types based on the object type
iii. Select one or more sub-type to apply the filter
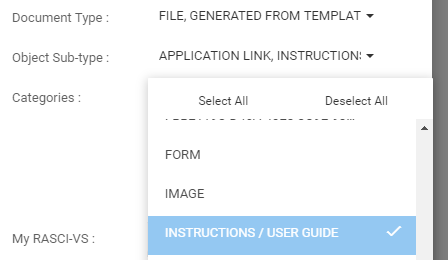
D. Categories: Objects in EPC can be assigned multiple categories, depending on business needs. Categories are used to classify objects; users might want to filter all processes and assets that are currently outsourced and belong to the IT department. In this case, the “Outsource” and “IT” categories would be used as filters. Note that since multiple categories can be assigned to a single object, users are able to select many object types. To learn more about categories, click here.
To filter objects by categories, follow these steps:
i. Select the Categories dropdown
ii. This will generate a dropdown list
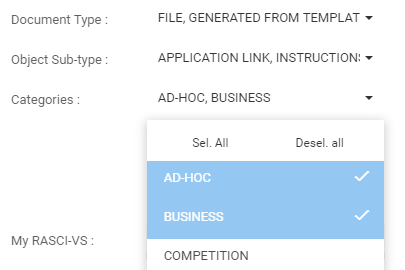
iii. Select one or more categories to apply the filter
E. Hide Name: To hide the display name of the widget, select this option.
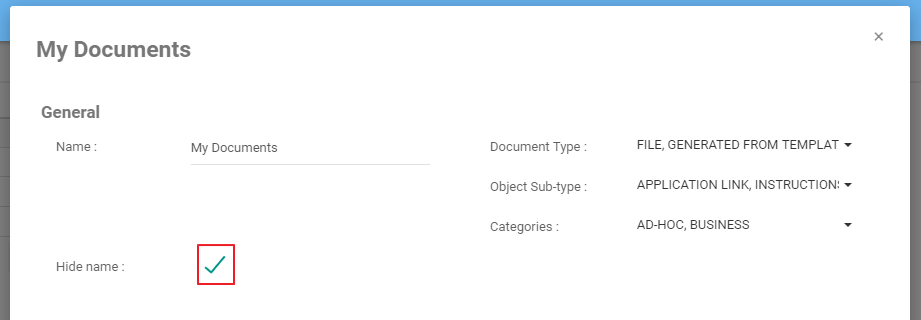
The widget will appear in your page without its display name.

F. Assigned me to as: Roles will be assigned to users by EPC Modelers. Individuals can be assigned one or multiple roles, depending on their versatility within an organization. The reason individuals are often assigned multiple roles that do not necessarily mirror their job contract is to effectively segregate processes while providing appropriate levels of governance.
Example: if an employee works primarily as an HR Coordinator, but also works as an Event Planner for the organization they will be assigned both positions within the EPC, regardless of the specific job title on an individual’s contract.
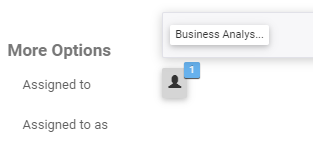
Once roles have been assigned to users, they will appear in the following section:
The drop-down list will feature all of the roles and resources that the Web App user has been assigned. As seen below, the list for this specific user is populated with 2 roles (Business Analyst and Support Specialist) and with his specific resource profile (Kevin Tran).
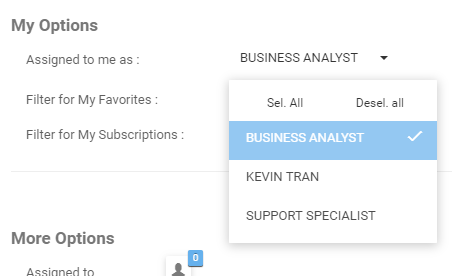
Users can select one, or multiple options to better filter the information within the widget. To select these Options, please see the steps below:
i. Select the “Assigned to me as” Task bar
ii. This generate a drop-down menu
iii. Select the Role or Resource you would like to feature in the Widget by clicking on the item in the list. You can select several filters at once.
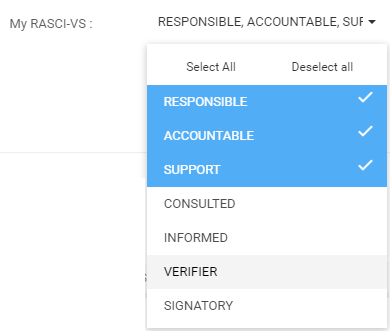
G. My RASCI-VS: The My RASCI-VS filter allows users to filter through their assigned roles and resources and prioritize them based on their involvement in accordance with the RASCI-VS Matrix. This filter allows users to create Widgets categorized based on their level of involvement.
R – Responsible
A – Accountable
S – Support
C – Consulted
I – Informed
V – Verified
S – Signatory
Please see My RASCI-VS section above for detailed explanation of the RASCI-VS Matrix in Section 3.4.
Users can select multiple different filters should a user want to include more information within the given Widget.
H. Filter for My Favorites: In order to help users prioritize information for users, a “Filter for My Favorites” section can be used. Users can select the “Filter for My Favorites” option, and Widget will feature only the specific Documents that are favorited by a user.
i. To “Filter for My Favorites” , navigate cursor over tic-box
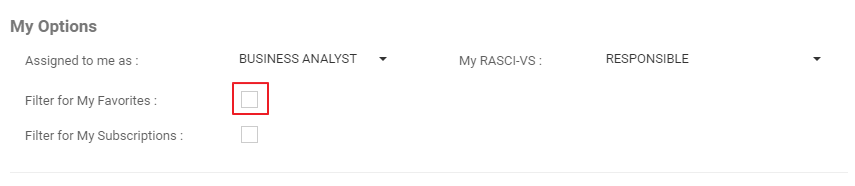
ii. Select option by clicking on box. This will generate a green checkmark to confirm that option has been selected
I. Filter for My Subscriptions: In order to help users prioritize information for users, a “Filter for My Subscriptions” section can be used. Users can select the “Subscriptions” option, and Widget will feature only the specific Documents that the user is subscribed to.
i. To “Filter for My Subscriptions” , navigate cursor over tic-box
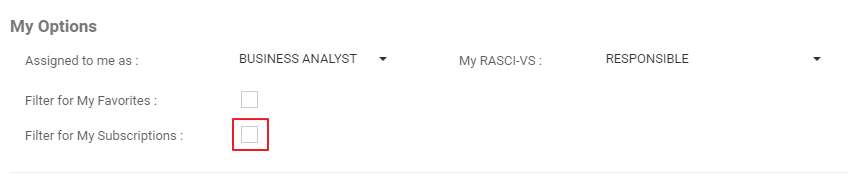
ii. Select option by clicking on box. This will generate a green check mark to confirm that option has been selected
J. Assigned to: This filter is designed for users to view Documents that are associated with specific Roles, Resources, Org Units and Assets within the organization.
Using this filter will extend the scope an individual user can have within the organization.
To use the “Assigned to” filter, please see the following steps
i. Navigate to the My Documents – Settings page
ii. Click on the search bar. A list of all org units, assets, roles and resources will be generated. Start typing to search for a specific object.
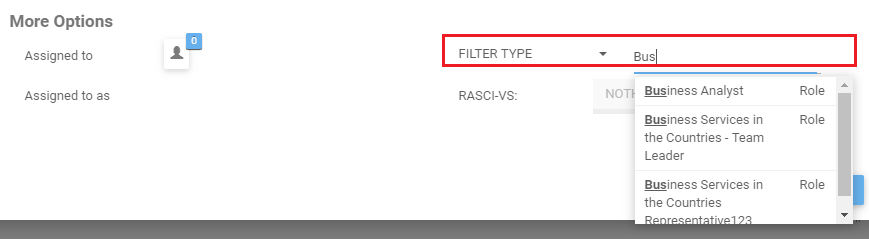
iii. To set a filter, click on Filter Type. Select the desired filter. Note that multiple filters can be selected.
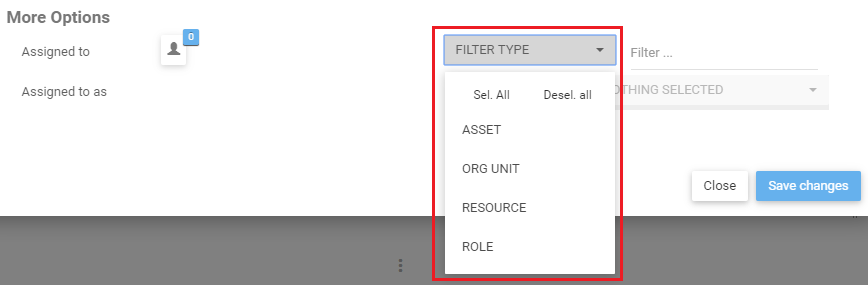
If a user is unsure of specific spelling of a particular item, the user may also use the  buttons listed above the auto-populated list. These are navigation arrows that let users sift through the different pages on search results generated.
viii. Select the desired object clicking on the desired item. Note that the confirmation of selection from an item will not appear in the drop-down menu. It will appear in the  icon on the left hand-side of the page. To confirm that a user has selected the right object, click on the icon to display the selected filters.
K. Assigned to as: The “Assigned to as” filter is an extension of the “Assigned to” filter. It allows for further segmentation and classification of objects selected using the RASCI-VS Matrix. This allows users to view additional Documents, who/what is related to them, and how they are related.
Note that this filter is locked until a user has properly selected an object in the “Assigned to” filter.
To filter using the Assigned to as function, please see the following instructions:
i. Navigate to the My Documents – Settings page
ii. Select Object in “Assigned to” Filter. Please see the Assigned to (G) above for further detail.
iii. After having selected a (or multiple) objects in the Assigned to section, navigate your cursor to the RASCI-VS drop down menu. Click on the item and it will generate a drop-down menu
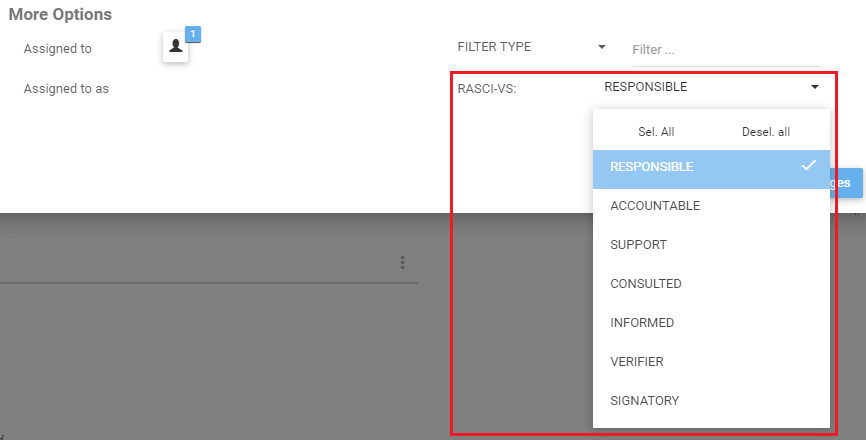
v. Select appropriate RASCI-VS metrics. Note that users can select multiple RASCI-VS metrics for viewing.
Need more help with this?
Visit the Support Portal