
Coming Soon
This page is still under construction, and will be ready as soon as possible. In the mean time, please contact our support team if you have any questions. http://fxhome.com/questions/submit
The print command in Imerge Pro will print the current viewer contents at any time. Printing is directly linked to the viewer, and is not part of the batch controls. there are several ways to invoke the print command, so you can use whichever is most convenient for you.
![]() Click the print canvas icon in the top toolbar of the software interface.
Click the print canvas icon in the top toolbar of the software interface.- Open the project menu, and select the Print… command.
- Press the keyboard shortcut CTRL+P (CMND+P on Mac).
Printing an image
Printing an image requires only a few basic steps.
- Click the print canvas icon
![]() in the top toolbar of the software interface. Alternately, you can use any other print command, if you prefer.
in the top toolbar of the software interface. Alternately, you can use any other print command, if you prefer. - The print canvas window opens. Adjust the settings as required.
- Click the print button at the bottom of the window to begin printing.
Print canvas
The print canvas screen gives you access to basic printing controls. In most cases, all the controls you will need to access are available on this screen. Advanced print settings can be accessed using the advanced settings button.
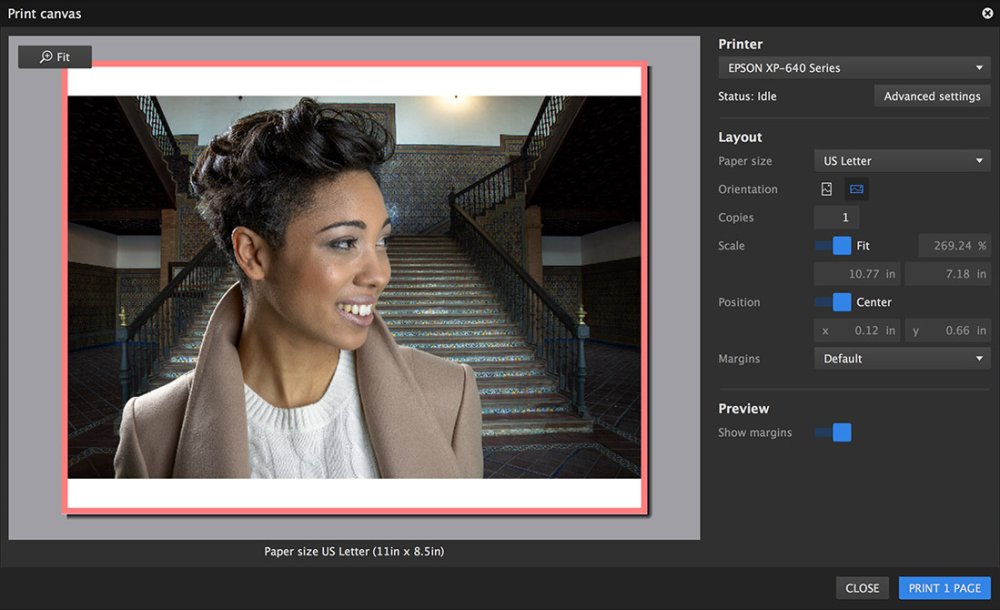
- Preview: The majority of the print screen is used to display a preview of exactly what will be printed. Check the preview for accuracy before clicking the Print button.
Printer
- Printer menu: Select the printer you wish to use. All printers connected to your computer or network will be listed in this menu.
- Status: This shows the status of the printer. Idle means the printer is ready to print, and once printing begins, it will change to indicate an active state.
- Advanced Settings: Click this button to open the advanced settings dialog. Further details of the advanced settings are available lower on this page.
Layout
- Paper size: Select the size that corresponds to the paper that is loaded into your printer.
- Orientation: Choose the orientation for your print.
- Vertical: The top edge of your image will be aligned to one of the short edges of the paper.
- Horizontal: The top edge of your image will be aligned to one of the long edges of the paper.
- Copies: Enter the number of copies you wish to print.
- Scale: Adjust the scale of the printed image here.
- Fit: This toggle, when enabled, will auto-adjust the image size to print the largest possible image within the available space inside of the margins. Disable it to manually adjust the image size.
- Percentage: When the Fit toggle is disabled, you can drag this value to alter the print size, as a percentage of the original size.
- Print size: “Indicates the size of the printed image in physical measurements. Drag either value to adjust the print size.
- Position: These settings control the position of the printed image on the page.
- Center: This toggle centers the image on the page, and is enabled by default. Disable it to manually adjust the image position.
- Coordinates: When the Center toggle is disabled, drag either of these values to change the image position on the paper.
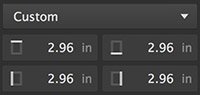
- Margins: Defines the size of the border at the edges of the paper which cannot be printed on.
- Default: The default setting uses the smallest standard margins allowed by your selected printer.
- None: Removes all margins, for full bleed printing. Note that this option may not be supported by all printers.
- Custom: Accesses four custom controls, for the margin on each edge of the paper. Enter the value you wish to use for each margin.
![]()
Preview
- Show margins: When this toggle is enabled, the margins will be displayed on the print preview, as a pink border. Disable the toggle to prevent the margins from being shown on the preview.
Advanced settings
The advanced settings button provides access to additional settings, which may vary based on the printer you have selected, and the operating system you are running. We can’t discuss every printer on the market, but we will look at the differences between the Windows and Mac advanced settings.
Windows advanced settings
The Advanced button opens the default Windows print dialog. Many aspects are similar to the built-in print screen in Imerge Pro, but some additional controls can be accessed.
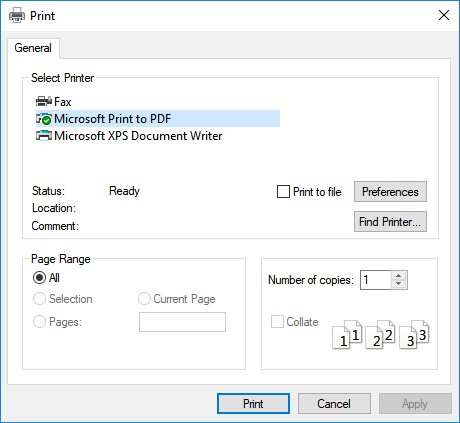
- Select Printer: Choose the printer you wish to use.
- Status:* Indicates the current status of the printer.
- Print to File: Use this toggle if you wish to print to a document on your hard drive, rather than printing a physical copy.
- Preferences: Opens the preferences for your selected printer. The contents of the dialog that opens will vary based on the printer model.
- Find Printer: If the printer you wish to use does not appear in the list, make sure it is physically connected to your computer, then click this button to find it.
- Page Range: Select the specific pages that will be printed.
- All: Prints all pages.
- Selection: Prints only the part of the page that was selected before the print dialog was opened.
- Current Page: Prints the current page only.
- Pages: Allows you to specify specific pages to be included in the print.
- Number of Copies: Enter the number of copies that you want to print.
- Collate: Enabling the collate option means that all copies of each page will be printed grouped together. So if three copies of a two page document are printed, the pages will print in the following sequence:
- Collate Disabled: 1, 2, 1, 2, 1, 2
- Collate Enabled: 1, 1, 1, 2, 2, 2
- Print: Once all settings are acceptable, click this button to begin printing.
- Cancel: If you wish to close the advanced settings dialog and abandon any changes you have made, click cancel.
- Apply: If you wish to store the changes you have made and close the advanced settings dialog without actually printing the document, click apply.
Mac advanced settings
The Advanced button opens the default Mac print dialog. Many aspects are similar to the built-in print screen in Imerge Pro, but some additional controls can be accessed.
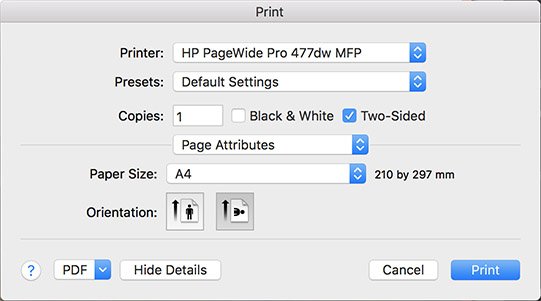
- Printer menu: Select the printer you wish to use. All printers available on your computer or network will be listed in this menu.
- Presets: All presets available for your selected printer can be accessed here. You can also create and save new presets.
- Copies: Enter the number of copies that you want to print.
- Pages: Select the pages to be included in the print.
Clicking the Show Details button at the bottom of the dialog will open additional settings ad options. Once clicked, the button changes to Hide Details, as shown in the image above.
- Black & White: Enable this toggle to print a black monochrome version of the image.
- Two-Sided: For printers that support two-sided printing, this toggle enables or disables that option.
- Details menu: Additional advanced settings can be accessed through the options in this menu. The properties displayed in the lower half of this dialog will vary based on the option to select in this menu.
- Page Attributes: Adjust the size and orientation of the page.
- Layout: Set the arrangement of the pages on the sheet.
- Color Matching: Access the options for color management, to set whether it is handled by the printer, or through manual color management controls on your computer.
- Paper Handling: Set the paper size and the order in which the pages are printed.
- Cover Page: Settings to manage the printing of a cover page with the print job.
- Print Settings: Set the type of paper being used, and the print quality.
- Color Options: Additional color options.
- Two-sided Printing Settings: Enable or disable two sided printing, for printer models that offer that feature.
- Supply Levels: Provides an estimate of the ink remaining in the printer.
- PDF: Settings for printing to a PDF file, rather than to a physical copy.
- Show details/Hide Details: Toggles the additional details in the lower half of the dialog on and off.
- Cancel: If you wish to close the advanced settings dialog and abandon any changes you have made, click cancel.
- Print: Once all settings are acceptable, click this button to begin printing.
Need more help with this?
Don’t hesitate to contact us here.