
Displacement
Distorts the currently selected background based on color or tonal data.

- Type: Select the type of displacement to be used, from this menu.
- From background: Uses the image beneath the selected layer as the source for generating the displacement.
- From map: Uses an external image of your choice as the source for generating the displacement.
- Select file: When Onto Map is selected, this property will appear, where you can choose an image to be used as the source of the displacement. Click the file icon at the right to open a file explorer window and choose an image.
- Channel: Choose the channel of the source image that will be used to generate the distortion.
- Luminance: Distorts the target layer based on the luminance channel of the selected image, which values of 0 in the luminance channel having no effect, and values of 255 having full effect.
- Red: Distorts the target layer based on the red channel of the selected image, which values of 0 in the red channel having no effect, and values of 255 having full effect.
- Green: Distorts the target layer based on the green channel of the selected image, which values of 0 in the green channel having no effect, and values of 255 having full effect.
- Blue: Distorts the target layer based on the blue channel of the selected image, which values of 0 in the blue channel having no effect, and values of 255 having full effect.
- Alpha: Distorts the target layer based on the alpha channel of the selected image, which values of 0 in the alpha channel having no effect, and values of 255 having full effect.
- Contrast: Modifies the contrast of the source image, to manipulate the results of the distortion.
- Smooth detail: Blurs the source image, to reduce the details used in the distortion.
- View map: Shows the map being used to generate the displacement.
- Shift X: Adjust the amount of distortion applied on the X (horizontal) axis.
- Shift Y: Adjust the amount of distortion applied on the Y (vertical) axis.
- Edges: Choose how the effect is handled around the edges of the image.
- No Repeat: When the edge of the image are distorted out of place, the space at the edges remains empty.
- Tile: When the edge of the image are distorted out of place, the space at the edges is filled with a repeated copy of the image.
- Mirror: When the edge of the image are distorted out of place, the space at the edges is filled with a mirrored copy of the image.
- Blend highlights: Increasing this value makes the highlights of the source image visible on the target image.
- Blend shadows: Increasing this value makes the shadows of the source image visible on the target image.
Quad Warp
Use quad warp when you need to reposition the corners of a layer individually, to alter its perspective or to alter the scale of its contents non-uniformly. The effect provides controls for each individual corner of the layer.
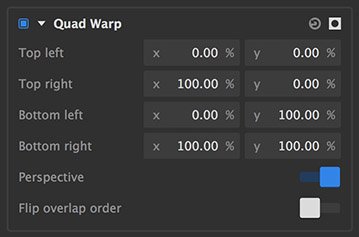
- Top left: Defines the X (horizontal) and Y (vertical) positions of the top left corner of the layer. X values run from 0 on the left to 100 on the right. Y values run from 0 at the top to 100 at the bottom.
- Top right: Defines the X (horizontal) and Y (vertical) positions of the top right corner of the layer. X values run from 0 on the left to 100 on the right. Y values run from 0 at the top to 100 at the bottom.
- Bottom left: Defines the X (horizontal) and Y (vertical) positions of the bottom left corner of the layer. X values run from 0 on the left to 100 on the right. Y values run from 0 at the top to 100 at the bottom.
- Bottom right: Defines the X (horizontal) and Y (vertical) positions of the bottom right corner of the layer. X values run from 0 on the left to 100 on the right. Y values run from 0 at the top to 100 at the bottom.
Viewer controls
The quad warp effect can also be controlled directly on the viewer, which in many cases is more intuitive and effective.
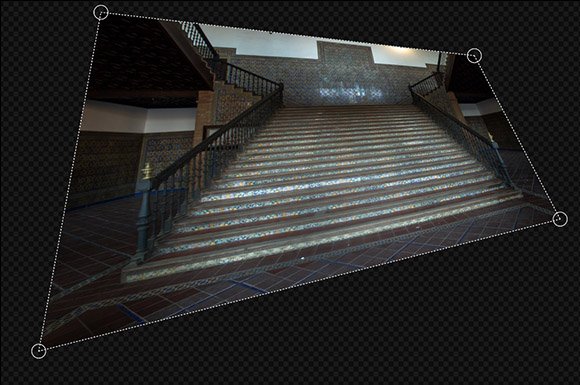
- Corner handles: On the viewer, when the quad warp effect is selected, circular control points will appear at each corner of the layer, connected by dotted lines. Dragging the corner handles to reposition them directly controls the warp effect.
Last modified:
12 July 2019
Need more help with this?
Don’t hesitate to contact us here.