
The Text panel is where you control text properties such as size and font. The text panel affects the currently selected text and any text you’ll create in the future. If you want to change the attributes of existing text, first select it in the Viewer, using the Text tool.
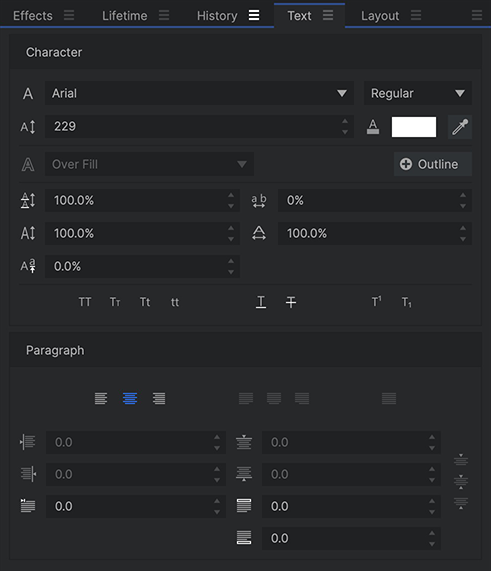
Character
The character properties modify the typeface and other specifics of the appearance of each character.
![]() Font Name: Lists all the compatible fonts available on your computer.
Font Name: Lists all the compatible fonts available on your computer.- Font Style: If your selected font includes different styles (Bold, Light, Italic, etc.), you can select your desired style here.
![]() Size: Sets the font size, to control the size of your text. In general, if you want to enlarge your text, it is better to increase the font size rather than increase the layer Scale above 100%.
Size: Sets the font size, to control the size of your text. In general, if you want to enlarge your text, it is better to increase the font size rather than increase the layer Scale above 100%.![]() Color: Allows you to select a font color.
Color: Allows you to select a font color.![]() Outline: You can add multiple outlines to your text. Click the + Outline button to add a new Outline. New controls will be displayed for each outline created, including thickness (in pixels) and color. See the subsection on Outlines further down this page for full details.
Outline: You can add multiple outlines to your text. Click the + Outline button to add a new Outline. New controls will be displayed for each outline created, including thickness (in pixels) and color. See the subsection on Outlines further down this page for full details.
![]() Line Spacing: Defines the vertical spacing between each line of text.
Line Spacing: Defines the vertical spacing between each line of text.![]() Character Spacing: Sets the horizontal spacing between each individual character.
Character Spacing: Sets the horizontal spacing between each individual character.![]() Vertical Scale: Adjusts the height of the characters, independently of their width.
Vertical Scale: Adjusts the height of the characters, independently of their width.![]() Horizontal Scale: Adjusts the width of the characters, independently of their height.
Horizontal Scale: Adjusts the width of the characters, independently of their height.![]() Baseline Shift: Moves the position of the baseline on which the text sits. Positive values move the text upwards, and negative values move it downwards.
Baseline Shift: Moves the position of the baseline on which the text sits. Positive values move the text upwards, and negative values move it downwards.
![]() All Caps: Forces all selected characters to use their full-size capital case.
All Caps: Forces all selected characters to use their full-size capital case.![]() Lower Caps: Forces all selected characters to use their capital case, but letters which were not originally capitalized will display at a smaller size, retaining their lower case height.
Lower Caps: Forces all selected characters to use their capital case, but letters which were not originally capitalized will display at a smaller size, retaining their lower case height.![]() Title Case: Forces the first letter of each word to use its capital case.
Title Case: Forces the first letter of each word to use its capital case.![]() Lower Case: Forces all characters to use their lower case.
Lower Case: Forces all characters to use their lower case.![]() Underline: Adds a horizontal line below the selected characters.
Underline: Adds a horizontal line below the selected characters.![]() Strikethrough: Adds a horizontal line through the center of the selected characters.
Strikethrough: Adds a horizontal line through the center of the selected characters.![]() Superscript: The selected characters are displayed above the baseline, at a smaller size than the standard text characters.
Superscript: The selected characters are displayed above the baseline, at a smaller size than the standard text characters.![]() Subscript: The selected characters are displayed below the baseline, at a smaller size than the standard text characters.
Subscript: The selected characters are displayed below the baseline, at a smaller size than the standard text characters.
Paragraph
The alignment of text can be adjusted using these controls. The first set of controls works for both open text layers and text boxes. For open text, each line can be aligned independently, so if you want to apply a specific alignment to multiple lines, make sure to select them all first.
![]() Left Alignment: Aligns the left edge of the text to the X position of the layer, for open text layers, or to the left edge of the text box, for text boxes.
Left Alignment: Aligns the left edge of the text to the X position of the layer, for open text layers, or to the left edge of the text box, for text boxes.![]() Center Alignment: Aligns the center of the text to the X position of the layer, for open text layers, or to the center of the text box, for text boxes.
Center Alignment: Aligns the center of the text to the X position of the layer, for open text layers, or to the center of the text box, for text boxes.![]() Right Alignment: Aligns the right edge of the text to the X position of the layer, for open text layers, or to the right edge of the text box, for text boxes.
Right Alignment: Aligns the right edge of the text to the X position of the layer, for open text layers, or to the right edge of the text box, for text boxes.
For text boxes, additional justified alignment options are available.
![]() Left Justify Alignment: Adjusts the spacing between words in each line so that each line fills the complete width of the text box. The final line of the paragraph will be aligned to the left.
Left Justify Alignment: Adjusts the spacing between words in each line so that each line fills the complete width of the text box. The final line of the paragraph will be aligned to the left.![]() Center Justify Alignment: Adjusts the spacing between words in each line so that each line fills the complete width of the text box. The final line of the paragraph will be center aligned.
Center Justify Alignment: Adjusts the spacing between words in each line so that each line fills the complete width of the text box. The final line of the paragraph will be center aligned.![]() Right Justify Alignment: Adjusts the spacing between words in each line so that each line fills the complete width of the text box. The final line of the paragraph will be aligned to the right.
Right Justify Alignment: Adjusts the spacing between words in each line so that each line fills the complete width of the text box. The final line of the paragraph will be aligned to the right.![]() Justify Alignment: Adjusts the spacing between words in each line so that each line fills the complete width of the text box. If the final line of the paragraph has only a single word, it will be aligned to the left. If there are multiple words, the final line will be justified like all other lines.
Justify Alignment: Adjusts the spacing between words in each line so that each line fills the complete width of the text box. If the final line of the paragraph has only a single word, it will be aligned to the left. If there are multiple words, the final line will be justified like all other lines.
![]() Top Alignment: Aligns the top of the first line of text to the top of the text box.
Top Alignment: Aligns the top of the first line of text to the top of the text box.![]() Middle Alignment: Centers the paragraph vertically within the height of the text box.
Middle Alignment: Centers the paragraph vertically within the height of the text box.![]() Bottom Alignment: Aligns the bottom of the last line of text to the bottom of the text box.
Bottom Alignment: Aligns the bottom of the last line of text to the bottom of the text box.
![]() Left Indentation: Indents the text from the left side of the text box, effectively creating an empty margin on the left side.
Left Indentation: Indents the text from the left side of the text box, effectively creating an empty margin on the left side.![]() Right Indentation: Indents the text from the right side of the text box, effectively creating an empty margin on the right side.
Right Indentation: Indents the text from the right side of the text box, effectively creating an empty margin on the right side.![]() First Line Indentation: Indents only the first line of each paragraph, to define the start of paragraphs and create a standard paragraph layout. Negative values will shift the line to the left. This property is available for both open text layers and text boxes.
First Line Indentation: Indents only the first line of each paragraph, to define the start of paragraphs and create a standard paragraph layout. Negative values will shift the line to the left. This property is available for both open text layers and text boxes.![]() Top Indentation: Indents the text from the top of the text box, effectively creating an empty margin above the text.
Top Indentation: Indents the text from the top of the text box, effectively creating an empty margin above the text.![]() Bottom Indentation: Indents the text from the bottom of the text box, effectively creating an empty margin below the text.
Bottom Indentation: Indents the text from the bottom of the text box, effectively creating an empty margin below the text.![]() Gap Before Paragraph: Creates a gap above the line break defining the start of the current paragraph, to separate it from the preceding paragraph. This does not affect the first paragraph in the text box. This setting can be edited per paragraph, and is available for both open text layers and text boxes.
Gap Before Paragraph: Creates a gap above the line break defining the start of the current paragraph, to separate it from the preceding paragraph. This does not affect the first paragraph in the text box. This setting can be edited per paragraph, and is available for both open text layers and text boxes.![]() Gap After Paragraph: Creates a gap below the line break defining the end of the current paragraph, to separate it from the following paragraph. This does not affect the first paragraph in the text box. This setting can be edited per paragraph, and is available for both open text layers and text boxes.
Gap After Paragraph: Creates a gap below the line break defining the end of the current paragraph, to separate it from the following paragraph. This does not affect the first paragraph in the text box. This setting can be edited per paragraph, and is available for both open text layers and text boxes.
Outlines.
You can add multiple outlines to your text. Click the + Outline button to add a new Outline. New controls will be displayed for each outline created, including thickness (in pixels) and color. Note that the three outlines created in this image each have unique widths and colors.
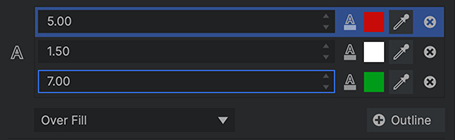
![]() Outline Size: Sets the width of the text outline. At 0px no outline will be visible.
Outline Size: Sets the width of the text outline. At 0px no outline will be visible.![]() Outline Color: Lets you choose the color of the outline. The outline will only be visible if the Outline Size is greater than 0px.
Outline Color: Lets you choose the color of the outline. The outline will only be visible if the Outline Size is greater than 0px.- Outline Stroke Position: Choose the order in which the text color and the outline color are stacked.
- Over Fill: Places the stroke outside the text shape, overfilling the text beyond its original edges.
- Under Fill: Places the stroke inside the text shape, so the original shape of the text is maintained.
- Centered: Centers the stroke on the edge of the text, so half of the stroke width is inside the text, and half is outside.