
Because composite shot timelines can be embedded in other timelines, they are also useful for creating templates. You can set up one title, for example, with any animation and effects that you want applied to it, then use that as a template to quickly create multiple titles that use the exact same styling.
Templates can be created by Publishing specific properties in the composite shot. Inside of a composite shot, right-clicking some options will reveal a Publish option. When this is toggled on, a Pin icon ![]() will appear, indicating that that property is published.
will appear, indicating that that property is published.
When a composite shot that contains published properties is added to the Editor timeline, The published properties can be edited without opening the composite shot timeline. They will be listed in the Controls panel for the composite shot, and can be edited independently for each instance of the template that is used. So if a Text layer inside the composite shot is published, for example, then you can add multiple instances of the template on the Editor, and edit the text to be different in each one.
You can also export a template to your harddrive, then import it into any other projects you create for use there.
Installed Templates
There are a number of templates installed into the software for immediate use. They can be imported into any project.
- In the Media panel, select Import > Installed Templates
- In the window that opens, select the template or templates that you wish to import.
![]()
- Click Import to import the template. You also have the option of clicking Edit to import the composite shot in its fully editable state, instead of as a template.
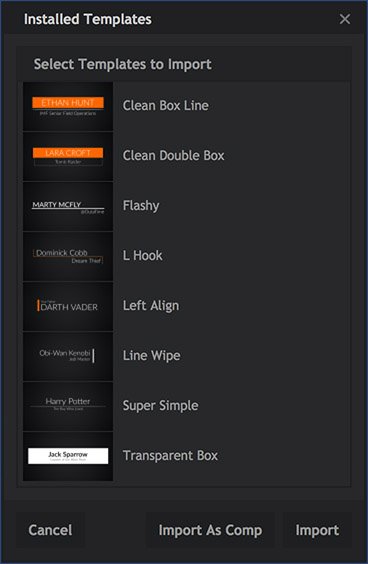
The selected template will now be available for use, in the Media panel.
- Drag the template from the Media panel onto the Editor timeline.
- Open the controls panel to access the controls for the template. Specific properties of the template are listed here, and can be edited.
Each instance of a template can be edited independently. So you can drag five instances of the same template onto the editor, for example, and use different names in each instance.
Publishing Properties
Only specific properties in a composite shot can be published. These include:
- Text Layers: Publishing a text layer allows the contents of the text layer to be edited in the template.
- Layer Visibility: In the Layer Properties controls, the Visible property of each layer can be published.
- Layer Blend Mode: In the Layer Properties controls, the Blend Mode can be published.
- Layer Transform Properties: In the transform controls for each layer, each individual property can be published.
- Mask Properties: For each mask contained in the composite shot, individual properties can be published.
- Effect Properties: For each effect contained in the composite shot, individual properties can be published.
When you right-click on any property that supports publishing, you will see an option to Publish at the bottom of the contextual menu. In the following image, Opacity has been right-clicked to open its menu.
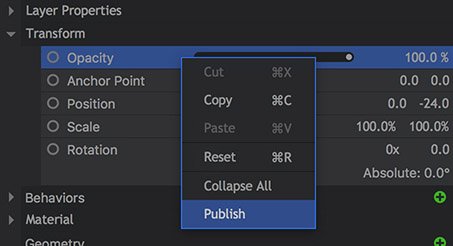
After you select the option to publish, a Pin icon is displayed next to the property, so you can easily identify which properties in the composite shot have been published.

All published properties can be edited without opening the composite shot timeline. In the Media panel, any composite shot that contains published properties will display the Template icon ![]() , as shown below.
, as shown below.

Exporting Templates
Once one or more properties inside of a composite shot have been published, you can export it to create a template which can be shared with other users or imported into other projects.
To export a Template:
- In the Media panel, right-click on a composite shot which has the template icon
![]() .
. - Select Save As… from the menu.
- A new dialog will open, with options for creating the template:
![]()
- File Name: Enter the name you wish to use for the template. Click the Folder icon to select a location for the exported template to be saved to. After selecting a location, click Save to save that directory and return to the template options dialog.
- Thumbnail: Click the folder icon to navigate to and select the image you want to use as a thumbnail for the template. Click the X icon to remove the current image.
- Published Properties: Lists all of the properties that will be editable when the template is used.
- Cancel: Closes the dialog without saving the template.
- Save: Exports a template file and saves it using the name and location you have chosen.

Importing and Using Templates
To import a template:
- In the Media panel, select Import > Composite Shot.
- Navigate to the .hfcs file that you wish to import, and select it.
- Click Open to import the template.
The template file will now be available in the Media panel, for use in your project.