
HitFilm Pro is a powerful 2D and 3D compositor. Most of your extensive compositing work is carried out using composite shots, layer-based timelines which are designed specifically for that purpose. You can find out more about advanced compositing here.
The editor timeline also includes simpler compositing capabilities, useful for picture-in-picture, fades, blends and basic visual effects.
Using Multiple Tracks
Multiple tracks can be used to combine multiple video clips on the same frame. Higher tracks will be rendered in front of lower tracks. If multiple clips of the same resolution are placed on the same frame, you will only see the top clip, unless you use transforming, effects or blending to composite the top clip with the clips below it.
To find out more about using tracks see Audio and video tracks.
Masking
Masking is the process of drawing a shape on the viewer to define what part of a layer should be visible. You can draw any shape, then specify whether the area inside the shape or the area outside the shape is removed.
Creating Masks ![]()
![]()
![]()
![]()
![]()
![]()
To create a mask you use the masking tools to draw the shape you need.
- Select one of the mask tools.
- On the timeline, select the clip you wish to mask.
- On the Viewer, begin drawing to add a mask to the selected layer.
Mask Shapes
There are six masking tools, each designed for specific shapes.
![]() Rectangular Mask: Click and drag to create a square or rectangular mask on the currently selected layer.
Rectangular Mask: Click and drag to create a square or rectangular mask on the currently selected layer.
- Hold SHIFT while dragging to create a perfect square.
- Hold ALT (OPTION on Mac) to center the mask at the original point you drag from. Releasing the mouse will set the shape.
- Double-click the rectangular mask icon to create a rectangle the exact height and width of your project.
![]() Rounded Rectangle Mask: Click and drag to create a square or rectangular mask with rounded corners on the currently selected layer. The radius of the corners can be adjusted after the mask is created.
Rounded Rectangle Mask: Click and drag to create a square or rectangular mask with rounded corners on the currently selected layer. The radius of the corners can be adjusted after the mask is created.
- Hold SHIFT while dragging to constrain the mask to a rounded square.
- Hold ALT (OPTION on Mac) to center the mask at the original point you drag from. Releasing the mouse will set the shape.
- Double-click the rounded rectangle mask icon to create a rounded rectangle the exact height and width of your project.
![]() Elliptical Mask: Click and drag to create a circular or elliptical mask on the currently selected layer.
Elliptical Mask: Click and drag to create a circular or elliptical mask on the currently selected layer.
- Hold SHIFT while dragging to create a perfect circle.
- Hold ALT (OPTION on Mac) to center the mask at the original point you drag from. Releasing the mouse will set the shape.
- Double-click the elliptical mask icon to create an oval the exact height and width of your project.
![]() Polygon Mask: Click and drag to create a geometric polygonal mask with sides of equal length. The quantity and roundness of the points can be adjusted after the mask is created. The mask will be centered at the point where you click.
Polygon Mask: Click and drag to create a geometric polygonal mask with sides of equal length. The quantity and roundness of the points can be adjusted after the mask is created. The mask will be centered at the point where you click.![]() Star Mask: Click and drag to create a star-shaped mask with arms of equal length and width. The quantity and length of the arms, and the roundness of the inner and outer points can be adjusted after the mask is created. The mask will be centered at the point where you click.
Star Mask: Click and drag to create a star-shaped mask with arms of equal length and width. The quantity and length of the arms, and the roundness of the inner and outer points can be adjusted after the mask is created. The mask will be centered at the point where you click.![]() Freehand Mask: Draws a sequence of straight or curved line segments, to create any shape you desire. Clicking and dragging creates a curved line, while clicking and releasing creates a linear, straight line. The shape of curved points can be further adjusted using the extension handles.
Freehand Mask: Draws a sequence of straight or curved line segments, to create any shape you desire. Clicking and dragging creates a curved line, while clicking and releasing creates a linear, straight line. The shape of curved points can be further adjusted using the extension handles.
- Click to add a new linear point to the mask path.
- Click-drag to add a curved point to the mask path. The direction and distance you drag will define the curve of the mask segment.
For complete details on creating, editing, and animating masks, see the Masking page of this user guide.
Transforming Clips
Clips can be transformed on the editor timeline, meaning you can change their position, scale and rotation. When you select a clip on the timeline, the transform widget for that clip will be displayed in the Viewer:
![]()
- Constrained Movement: Dragging a widget arrow arrow will move the clip on the horizontal or vertical.
- Free Movement: Click anywhere on the clip and drag to move it freely within the Viewer.
- Rotation: Dragging on the blue square will rotate the clip.
- Resize: At the 4 corners of a clip are handles which can be dragged to resize it.
- Constrain Aspect Ratio: Holding SHIFT while resizing maintains the original aspect ratio of the clip.
- Rotation: Holding ALT (OPT on Mac) while dragging one of the corner handles rotates the clip.
The Controls panel provides fine control over the clip’s transform properties:
![]()
- Numeric Entry: Clicking once on a property lets you type in a new value.
- Drag Editing: Positioning the cursor over the value displays an arrow icon. Click and drag on a value to increase or decrease it.
You can also apply simple transformations using the clip’s menu on the timeline. This is an easy way to resize the clip to fit the frame or be centered.
- Right-click the clip on the timeline, and select Transform.
- Fit To Frame: Matches both the height and width of the clip to match the frame resolution. If the clip’s original aspect ratio differs from the timeline resolution, then the clip will be distorted to fill the frame.
- Fit To Frame Width: Resizes the clip so its width matches the frame width, while maintaining the clip’s original aspect ratio.
- Fit To Frame Height: Resizes the clip so its height matches the frame height, while maintaining the clip’s original aspect ratio.
- Center In Frame: Repositions the clip so that its anchor point is at the center of the frame. The scale of the clip is not affected.
Anchor Points
Every clip has an anchor point. This is the origin around which the clip rotates. The default anchor point for clips is in the center. For most purposes this is the most useful location for the anchor point but there are some circumstances where moving the anchor point would be beneficial. For example, if you had a simple rectangular plane and wanted to rotate it around one corner instead of its center, you would move the anchor point to that corner then use the normal rotation controls. The Layout Panel provides additional controls for easy positioning and alignment of clips.
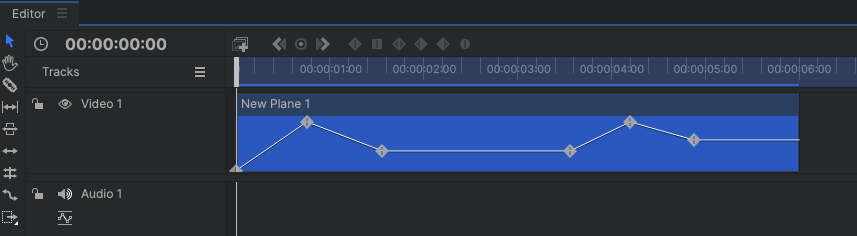
Opacity ![]()
![]()
A clip’s opacity can be changed over time. This lets you create simple, manual fades or to turn a clip semi-transparent, so clips below it on the timeline are revealed. Opacity can be adjusted in the Controls panel, or directly on the timeline.
The Timeline Opacity Bar
Every clip on the timeline has an opacity bar which can be dragged up and down. By default, the opacity bar will change the opacity of the entire clip. If you want to change the opacity of a clip over time, you can add keyframes by holding Ctrl (Cmd on Mac) and clicking on the opacity bar. Each keyframe can contain a different opacity setting, and HitFilm will automatically ramp the frames between keyframes from one value to the next.
- Drag the opacity bar to change the opacity of the entire clip, if no keyframes are present.
- When keyframes are present, drag any segment of the bar to move the keyframes at either end of the segment in tandem.
- Hold CTRL (CMD on Mac) and click the opacity bar to add a keyframe. The opacity value for the keyframe can then be edited without altering the values of any other keyframes on the clip.
- Drag a keyframe vertically to edit its opacity value.
- Drag a keyframe horizontally to change its timing.
- Hold Shift while dragging to constrain movement of keyframes to the horizontal time axis.
Keyframing can also be turned on and off in the controls panel by clicking the keyframe button to the left of the Opacity property.
Blending Clips
By default, clips are simply rendered on on top of the other, such that higher layers completely obscure lower layers. Blend modes are used to mix multiple clips together in more interesting ways. You can change the blend mode of a clip by selecting it on the timeline and then viewing its Clip Properties in the Controls panel, or by right-clicking the clip on the timeline and using its contextual menu.
See Blend modes for details of each blend mode.
Keying Green Screen Clips
HitFilm includes a wide range of compositing effects, which are found in the “Keying”:“https://www.manula.com/manuals/fxhome/hitfilm/2021.3/en/topic/keying folder of the Effects panel. Many of these effects work on the editor timeline as well as in composite shots. For example, the “”:https://www.manula.com/manuals/fxhome/hitfilm/2021.3/en/topic/color-difference*Color Difference Key* is a simple but effective effect for removing green screen backgrounds. To apply it to a clip, simply drag it from the Effects panel onto the clip containing the green screen video. You can then refine the settings in the Controls panel.
To create a simple green screen composite, place your keyed green screen clip on the track above the background (which can be either a video or an image).
For more information on HitFilm’s Keying tools, see the Keying chapter of this manual.