Transforming a layer means to change its position, scale or rotation.
In composite shots this can be done in 2D or 3D. The interfaces are largely the same, with 3D layers gaining the Z (depth) dimension. See “ in 3D for more details.
To transform a layer, first select it on the timeline. You can then control it on the timeline, in the Viewer or in the Controls panel.
In the Viewer you will see a transform widget:

Dragging on the arrow will move the layer on the horizontal or vertical, while dragging on the blue square will rotate it. You can also click anywhere else on the layer to move it freely.
At the 4 corners of a layer are handles which can be dragged to resize it. Holding SHIFT maintains the aspect ratio, while holding ALT (OPT on Mac)) rotates the layer. Holding CTRL (CMD on Mac) will set the control point to the opposite corner, and resize the layer from that corner, rather than from the center.
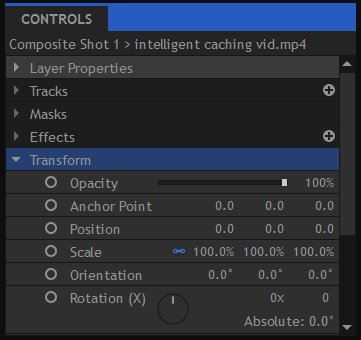
The Controls panel provides fine control over the layer’s transform properties:

Clicking once on a property lets you type in a new value. Dragging on a value increases or decreases it.
Holding CTRL (CMD on Mac) and clicking on a positive Transform value will switch it to a negative value and vice versa (eg, -500 will become 500).
Anchor Points
Every layer has an anchor point. This is the layer’s origin around which it rotates.
The default anchor point for layers is in the center. For most purposes this is the most useful location for the anchor point but there are some circumstances where moving the anchor point would be beneficial.
For example, if you had a simple rectangular plane and wanted to rotate it around one corner instead of its center, you would move the anchor point to that corner then use the normal rotation controls.
2D Properties
- Opacity: The transparency of the clip.
- Anchor Point: Sets the location of the anchor point, with 0,0 being the center of the layer.
- Position: Moves the layer along the X and Y axes.
- Scale: Enlarges or shrinks the layer. The X and Y scales are linked by default so that your layer retains its original shape. You can unlink them using the chain icon.
- Rotation: Rotates the layer around its anchor point. Rotation is presented as number of turns and degrees, making it easy to keyframe multiple rotations.
Some additional properties are available for 3D layers. These are discussed in the Working in 3D section.
