
Exporting creates a new video or image sequence from your project. The exported media can then be used and played outside of HitFilm. The Export Screen is where you manage all of your export tasks. Exporting is handled as a background task in HitFilm, so once you start an Export task processing, you can return to the Edit screen and continue working on your project.
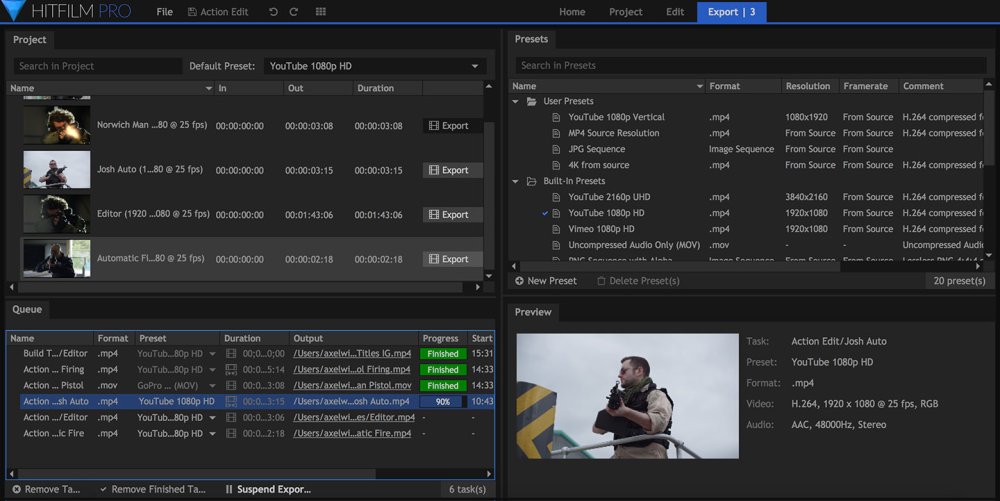
The Project panel lists all of the timelines contained in the currently open project. The Presets Panel shows all the Built-in export presets, as well as any user-created presets you have saved. The Export Queue panel lists all of your current export tasks. The Preview Panel shows the progress of the current export while it is being rendered.
The Export Screen tab shows the number of currently queued timelines which are waiting to be exported. The tab in the image above shows three task waiting in the queue.
The Export Screen
The HitFilm Export screen is where you manage your exports. It is divided into four main sections, each of which is explained in detail below.
The Project Panel
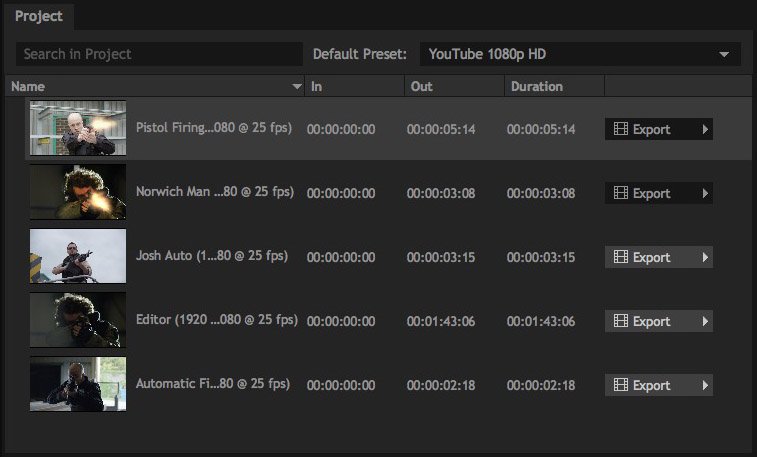
The project panel shows all of the timelines contained in the project that is current open. The name and thumbnail image of each timeline make it easy to identify each timeline within the list. In addition you can view the In and Out point for each timeline, as well as its Duration.
The Export menu on the right allows you to add any timeline to the Export Queue. Either the entire Contents of the timeline, or the In-Out Area can be added.
The In point and Out point for any timeline can be edited directly within the Project Panel. Either click-drag the timecode to change it, or click the timecode and type in a new value. This enables you to quickly queue up multiple sections of the same timeline. Adjusting the In and Out points in the Export screen does not change the work area in the Edit screen.
The Presets Panel
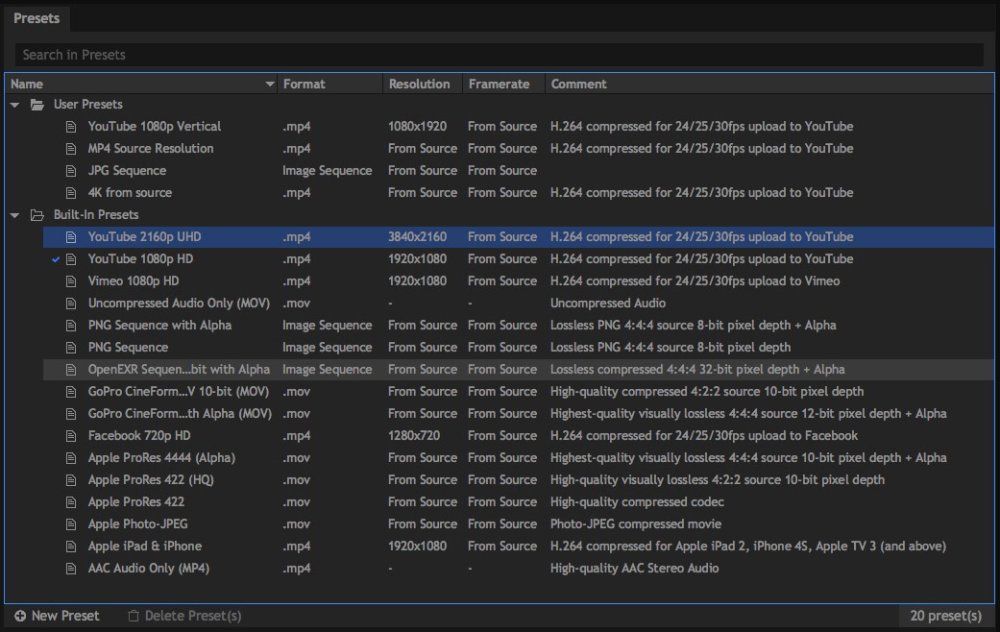
The Presets portion of the Export screen lists all your available export presets. Export Presets are divided into two categories.
- User Presets: Contains any presets you edit and save yourself. You have full control over the resolution, format, and compression settings used during export, so if you have particular settings you want to use, you can create a preset for those settings and save it here. There is no limit to how many user presets you can save.
- Built-In Presets: All of the Export Presets that ship with the software are listed here. The included presets provide a variety of settings suitable for most export situations, but you are not limited to only exporting using these settings. Depending on your platform and version of the software, your Built-in Presets may differ from those shown here.
You can create your own presets at any time. Click the New Preset button below the presets list, then select the format you wish to use: MP4, Image Sequence, AVI (Windows), or MOV. Once you select a format, the options for that format will be shown, so you can select the specific settings you wish to use in your preset. Details of all available options for each export format are available in the Export Formats page of this manual.
The preset which will be used for each export can be selected within the Export Queue. The Default Preset, which is labeled with a check mark, will automatically be applied to each new Export Task, but you can select any of your available presets for each export task. Double-click any preset in the Export Preset list to set it as your default preset.
You can delete a preset by selecting it in the list, and then clicking the Delete Preset button at the bottom of the screen.
The Export Queue Panel

The Export Queue is a list of all the timelines which are waiting to be exported. Timelines can be added to the Queue from the Edit screen or from the Project panel, as explained above. You can view the list of queued timelines here, and select the export details used by each task. The details of each task in the queue are also listed.
- Name: The name of the task to be exported. The resolution and frame rate of the timeline are also display4ed here for reference.
- Format: The format to be used for the export. This is determined by the preset that is selected.
- Preset: Presets contain a specified set of format and compression details which will be used to create the exported file. The presets panel on the right side of the Export screen can be used to manage your presets, and is discussed above. For each export task, you can select any preset you desire from the list in this menu.
- Duration: Indicates the total duration of the exported file. If the work area of the timeline differs from its contents, then the icon next to the duration becomes a toggle so you can switch the task from one to the other after it is added to the queue. If the work are and contents are the same, then the button will be greyed out.
- Output: Here is where you can set the name and location that will be used by the exported file. Click on the Output field to enter a name to be used by your exported file, and to choose the location to which it will be saved.
- Progress: Once you click the Start Exporting button, the progress of the task will be shown here, so you can see how much is completed, and how much of the render remains.
- Start Time: The time of day at which the file began rendering for export.
- Elapsed: The amount of time that has been spent processing the task so far. During the export, this number will change dynamically based on how long the task has taken. Once the export is complete, this will display the total time spent on rendering the exported file.
- Remaining: An estimate of the amount of time it will take to complete the export.
At the bottom of the Queue there are several buttons for managing the task list.
- Remove Task(s): Removes the selected task (or tasks) from the render queue
- Remove Finished Task(s): When a render task is completed, it remains listed in the queue. You can select completed tasks and use this button to remove them when you no longer need them listed.
- Start Exporting: Begins exporting all tasks listed in the render queue. Tasks will be processed in order, from the top of the list to the bottom. Once Exporting has begun, this button will change to Suspend Exporting, and can be clicked to pause the export process.
Once you Start Exporting, you can return to the Edit screen and resume working on your project. The export will continue in the background while you work.
The Preview Panel
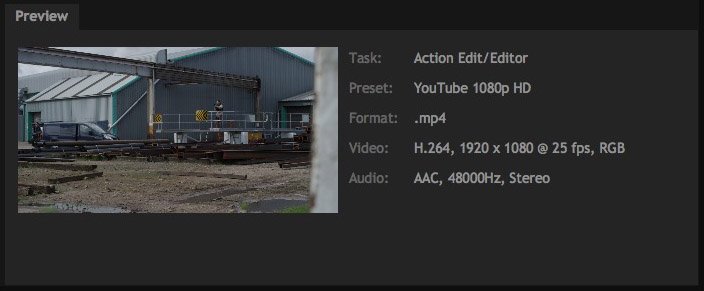
The Preview Panel shows the progress of the export. As HitFilm proceeds through the export task, the frame currently being rendered is displayed here. Alongside the frame, all the details of the video being rendered are displayed, including the task name, the preset being used, and the format and compression details contained within that preset, which will be used by the exported video file.
The images displayed are taken from the buffer of the actual export, so the Preview does not negatively affect export times. No additional rendering is required to display the preview.
Exporting From the Edit Screen
In addition to adding timelines to the export queue from the Export Screen, timelines can be added to the Export Queue from the Edit Screen. This can sometimes be faster if you wish to add a timeline and continue editing, rather than exporting it immediately. In the Edit screen, the Export Button is located at the top right corner of the timeline. 
Clicking the Export button reveals two options. Which one you select determines what portion of the timeline is added to the Export Queue.
- Export IN/OUT Area: Exports only the work area of your timeline. The work area is defined by the In and Out points you set. To set the work area, move the playhead to the frame where you want the work area to begin, and press the I key (for “in”) on the keyboard. Then, move the playhead to the frame where you want the work area to end, and press the O key (for “out”). Pressing P will automatically set the work area to include the entire contents of the timeline. Once the work area is set, click the Export IN/OUT Area button to add the work area to the render queue.
- Export Contents: Exports the entire contents of the timeline. Everything from the first frame that contains content to the last frame that contains content will be included. If your timeline extends beyond the content, so there are empty frames at the end, those empty frames will not be included in the export.
Exporting Multiple Media Items to Individual Clips
You can select multiple clips on the editor timeline, or multiple layers on a composite shot timeline, and then right-click on any of the items and select Add To Export Queue. This will add each selected item to the Export queue as a separate task, so that you can export them individually.
This can be useful for batch converting multiple files to a new format, or for exporting the individual elements of a scene for further compositing or editing in another application. When items are added to the Queue in this way, the name of each task will indicate the source video clip and the timecode at which it is located on the source timeline.