
HitFilm provides the most efficient and high quality method for creating lightsword effects, reducing the rotoscoping requirements and automating key visual elements such as the motion blur ‘streak’.
 Expanded Ultra versions of the Lightsword effects are available in the VFX: Neon Lights Pack.
There are six lightsword effects, depending on the needs of your VFX shot.
- Lightsword (2-Point Auto) provides a rapid method requiring the placing of a point on the hilt and a point on the blade tip. Once these points are rotoscoped to the movement of the lightsword blade, HitFilm will automatically calculate the appropriate motion blur based on the speed at which the blade is moving.
- Lightsword (4-Point Manual) allows precise positioning, with two points defining the edges of the hilt and two points defining the edges of the blade tip. Precisely positioning each corner gives you full control over the exact shape of the blade on every frame. This can be useful for artificially enhancing the motion blur of the blade movement, to create the classic ‘fanning’ effect.
- Lightsword (Glow Only) applies the effect’s custom glow behavior to any layer, without providing an interface for easy lightsword generation. This is useful for creating other neon and laser effects.
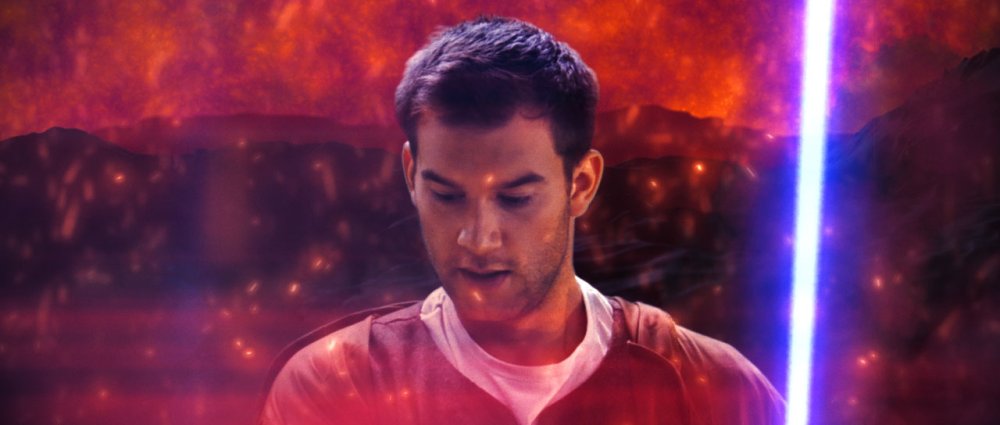
- Lightsword Ultra (2-Point Auto) provides a rapid method requiring the placing of a point on the hilt and a point on the blade tip. Once these points are rotoscoped to the movement of the lightsword blade, HitFilm will automatically calculate the appropriate motion blur based on the speed at which the blade is moving. The Ultra version of the effect integrates a variety of distortion types into the effect, which can be used to alter the core shape, to alter the glow shape, and to distort the appearance of the background through the effect.
![]() Lightsword Ultra (2-point Auto) is available in the VFX: Neon Lights Pack.
Lightsword Ultra (2-point Auto) is available in the VFX: Neon Lights Pack.
- Lightsword Ultra (4-Point Manual) allows precise positioning, with two points defining the edges of the hilt and two points defining the edges of the blade tip. Precisely positioning each corner gives you full control over the exact shape of the blade on every frame. This can be useful for artificially enhancing the motion blur of the blade movement, to create the classic ‘fanning’ effect. The Ultra version of the effect integrates a variety of distortion types into the effect, which can be used to alter the core shape, to alter the glow shape, and to distort the appearance of the background through the effect.
![]() Lightsword Ultra (4-point Manual) is available in the VFX: Neon Lights Pack.
Lightsword Ultra (4-point Manual) is available in the VFX: Neon Lights Pack.
- Lightsword Ultra (Glow Only) applies the effect’s custom glow behavior to any layer, without providing an interface for easy lightsword generation. This is useful for creating other neon and laser effects. The Ultra version of the effect integrates a variety of distortion types into the effect, which can be used to alter the core shape, to alter the glow shape, and to distort the appearance of the background through the effect.
![]() Lightsword Ultra (Glow Only) is available in the VFX: Neon Lights Pack.
Lightsword Ultra (Glow Only) is available in the VFX: Neon Lights Pack.
The effects share the same general properties:
Hilt & Tip
The hilt and tip positions can be set inside the effect, or linked to reference layers via the Position menu. This makes it possible to link the shape to auto-tracked points.
The width of the hilt and tip can be set separately, which can be useful for creating perspective on the blade or creating tapered shapes.
Extension
The lightsword extension can be animated to create the ‘ignition’ animation, whereby the lightsword blade extends out of the hilt, or contracts back in.
Core
The core is the central part of the effect which directly covers the prop blade.
- Width: The Width of the core can be adjusted, as a percentage of the width values set in the Tip and Hilt controls above.
- Color: The core Color should generally be set sightly off white, in the direction of the color that will be used for the glow.
- Feather: The edges of the core can be softened with the Feather control.
- Stability: Lowering the Stability causes the core shape to fluctuate in size.
Distortion
The Core Distortion controls allow you to procedurally alter the shape of the core to create a variety of animated results.
- Distortion: Controls the strength of distortion that is applied to the core.
- Type: There are four types of distortion available, each of which gives a different result. They are Energy Distortion, Heat Distortion, Liquid Distortion, and Smoke Distortion.
- Noise: The noise that defines the shape of the distortion can be modified using these properties. They correspond to the controls in the standalone Distortion effects.
- Animation: The movement of the noise that defines the shape of the distortion can be modified using these properties. They correspond to the controls in the standalone Distortion effects.
- Blend on Top: enabling this option will apply the glow above the core, potentially altering the core’s color.
- Use in Glow: enabling this option will adaptively shift the shape of the glow of the effect to match the distortion of the core shape.
Flicker [Ultra Only]
The Flicker controls will affect the movement of the overall effect.
- Mount: Controls the amount of flicker applied to the effect.
- Probability: Adjusts how regular the flicker is. Higher probability settings will make a more regular flicker.
- Frequency: Adjusts the timing between the flickering, Higher values will increase the speed of the flicker.
- Seed: Changing the seed will randomize the pattern of the flicker.
Inner Glow
Two glows are built-in to the effect. This makes it possible to create an intense inner glow, with a low width so that it is close to the core, and a wider, diffuse, less bright outer glow.
- Width: The width of the inner glow can be adjusted, in pixels.
- Color: The inner glow color should generally be set to a bright, vibrant color.
- Alpha: adjusts the transparency of the inner glow layer.
- Stability: lowering the stability causes the glow shape to fluctuate in size.
- Flicker: sets the intensity of brightness flicker applied to the glow. This does not alter the shape of the glow.
- Falloff: alters the range over which the glow edges are feathered. Lower numbers will create a harder edge to the glow.
- Mask: controls whether masks applied to the layer affect the glow. Disable will allow the glow to naturally wrap around the mask edges, for a softer result. Enable will cut the glow off exactly at the edge of the mask. Invert will reveal the glow outside the mask, while removing it inside.
Distortion
The Inner Glow Distortion controls allow you to procedurally alter the shape of the inner glow to create a variety of animated results.
- Distortion: Controls the strength of distortion that is applied to the core.
- Type: There are four types of distortion available, each of which gives a different result. They are Energy Distortion, Heat Distortion, Liquid Distortion, and Smoke Distortion.
- Noise: The noise that defines the shape of the distortion can be modified using these properties. They correspond to the controls in the standalone Distortion effects.
- Animation: The movement of the noise that defines the shape of the distortion can be modified using these properties. They correspond to the controls in the standalone Distortion effects.
Outer Glow
Two glows are built-in to the effect. This makes it possible to create an intense inner glow, with a low width so that it is close to the core, and a wider, diffuse, less bright outer glow.
- Width: The width of the outer glow can be adjusted, in pixels.
- Color: The outer glow color can be set to a similar color to the inner glow color, for a traditional look, or to an entirely different color to create a gradient in the glow.
- Alpha: adjusts the transparency of the inner glow layer.
- Stability: lowering the stability causes the core shape to fluctuate in size.
- Flicker: sets the intensity of brightness flicker applied to the glow. This does not alter the shape of the glow.
- Falloff: alters the range over which the glow edges are feathered. Lower numbers will create a harder edge to the glow.
- Mask: controls whether masks applied to the layer affect the glow. Disable will allow the glow to naturally wrap around the mask edges, for a softer result. Enable will cut the glow off exactly at the edge of the mask. Invert will reveal the glow outside the mask, while removing it inside.
Distortion
The Inner Glow Distortion controls allow you to procedurally alter the shape of the inner glow to create a variety of animated results.
- Distortion: Controls the strength of distortion that is applied to the core.
- Type: There are four types of distortion available, each of which gives a different result. They are Energy Distortion, Heat Distortion, Liquid Distortion, and Smoke Distortion.
- Noise: The noise that defines the shape of the distortion can be modified using these properties. They correspond to the controls in the standalone Distortion effects.
- Animation: The movement of the noise that defines the shape of the distortion can be modified using these properties. They correspond to the controls in the standalone Distortion effects.
Path interpolation
During rapid movement the hilt and tip will fan out, creating a trail. Path interpolation is used to create a natural curve along the hilt and tip ends.
Reducing the scale to zero will remove all interpolation, resulting in straight lines drawn at the hilt and tip ends of the blade. Increasing the scale will create interpolation and curved ends.
The Hilt and Tip angles can be used to further customize the interpolated curve at each end of the shape.
Motion Persistence
The 2-point Auto version automatically creates the streaking of a fast-moving lightsword based on the movement of the points. The appearance of the streaking can be customized to match the source footage.
HitFilm automatically attempts to create a natural trail shape based on the movement of the hilt and tip points, based on the expected behaviour of a blade in motion.
The duration of the trail is determined by the motion persistence. Increasing the value will cause the trail to remain visible for more frames, thus creating a larger trail. Reducing the value will create a smaller trail.
Note that motion persistence is restricted by the Auto Scale Persistence properties, if Auto Scale is activated (see below).
Persistence Shift
Persistence Shift adjusts the interpolation in time. This adjusts the trail to be either in front (1.0), behind (0.0) or in the middle (0.5) of the control point positions. At the default of 0.0 this means that on frames containing fast moving blades you should position the control points on the leading edges of the blade.
Auto Scale Persistence
Auto Scale provides additional control over the generation of the persistence trail, determining when the trail is generated. These settings can be used to match the trail to the natural motion blur found in your footage, which may vary depending on your camera settings.
The Speed and Swing thresholds can be used to restrict the activation of motion persistence. Below the thresholds, the shape will be drawn without the trail. This ensures that the blade does not look indistinct when being moved slowly. As soon as the speed and swing thresholds are exceeded, the trail will be generated according to the motion persistence setting.
The Minimum Persistence property generated a trail even if the thresholds are not met. Setting this to 0.0 ensures the blade shape is defined solely by the core, hilt and tip properties. Raising the value will generate a blur trail even during minor movements.
Disabling Auto Scale Motion switches to only using the Motion Persistence property. Therefore the trail will always be generated even during small movements. A high Motion Persistence value combined with Auto Scale turned off will create a long, unnatural trail. Increasing the motion persistence over 180 can create extreme streaking. This isn’t suitable for lightsabers but can be an interesting effect in its own right.
Distortion
A noisy, irregular edge can be applied to the shape by increasing Distortion. If Distortion is reduced to 0 the edge will be regular and smooth.