
HitFilm’s editor can have multiple audio tracks. This makes it possible to build up a soundscape of multiple audio clips, including dialogue, sound effects, music etc. For information on using tracks see Audio and video tracks.
A range of features are included to aid with editing your audio.
Audio Mixer
The audio Mixer panel provides a traditional interface for adjusting your audio to ensure everything can be properly heard without clipping.
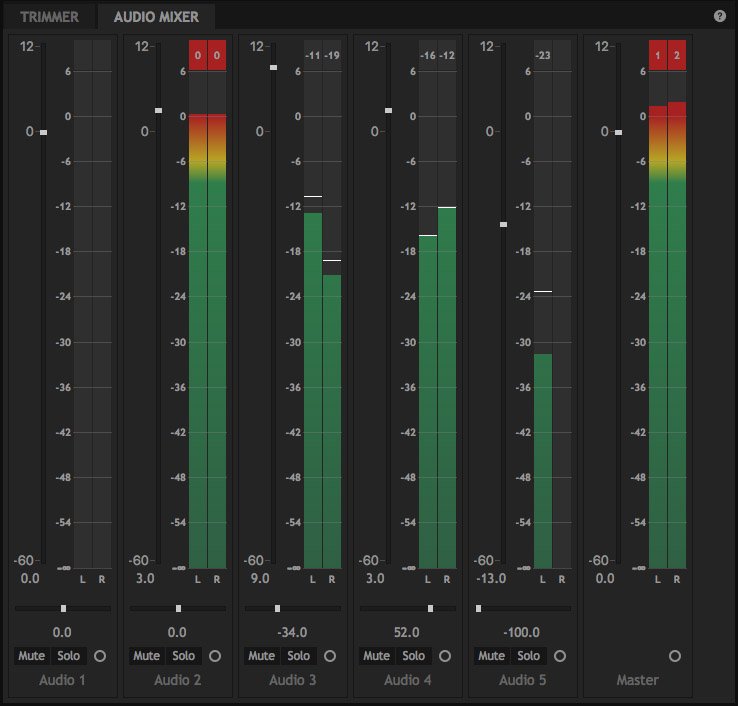
Audio peaks are drawn as green bars during playback or when moving the playhead. Each audio channel is displayed as a separate bar. Thin white lines are drawn separately indicating the peak volumes of each channel and the peak volume is displayed above the bars. These peak values are held momentarily so that you can easily identify unwanted clipping.
If clipping occurs, the peak volume readout turns red on the affected channel. This is a useful way to identify areas where the audio mix is too loud and may cause distortion on playback. Reducing the combined volume of the audio tracks in that area will avoid clipping. Clipped peaks will remain red until you start a new playback or move the playhead.
- Levels
On the left of each track’s meters is a fader for adjusting the track’s audio within a range from -60 to +12. The current settings is displayed immediately below the fader. - Balance
Each audio track is stereo. Below the meter, the panning slider controls the balance between the left and right channels. 0.0 is centered, perfectly balanced between the left and right. Panning the balance to the left or right will increase the signal on that side while reducing the signal on the opposite side. This can be used to position sounds in the sound stage to match their position within the frame. - Mute and Solo
The mute and solo buttons are useful for quickly controlling which tracks are audible.- Mute: Clicking the Mute button will silence the track, until the Mute button is toggled back off.
- Solo: Soloing a track has the same result as muting all other tracks. When any Solo button is activated, only tracks that are soloed will be audible.
- Enable Keyframing: The circle to the right of the Solo button enables keyframing for the track level. This allows you to adjust levels for the track over time using the faders in the Audio Mixer.
- Master Track
The Master Track on the right side shows the level of the overall mix, after all tracks are combined. This is the same readout shown in the Meters panel, but the Master track also provides a fader, so the master levels can be easily adjusted with a single slider.
Audio Meters
The audio meters panel shows your audio levels, so that you can adjust audio levels appropriately, ensuring your soundtrack is able to be heard while avoiding clipping.
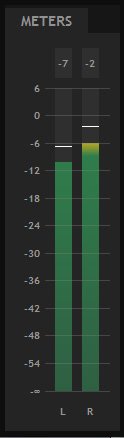
Audio peaks are drawn as green bars during playback or when moving the playhead. Each audio channel is displayed as a separate bar. Thin white lines are drawn separately indicating the peak volumes of each channel and the peak volume is displayed above the bars. These peak values are held momentarily so that you can easily identify unwanted clipping.
If clipping occurs, the peak volume readout turns red on the affected channel. This is a useful way to identify areas where the audio mix is too loud and may cause distortion on playback. Reducing the combined volume of the audio tracks in that area will avoid clipping. Clipped peaks will remain red until you start a new playback or move the playhead.
Understanding the Meter Scale
The meter scale is dBFS (decibel full scale), which means that 0dBFS is the maximum possible audio level before clipping occurs.
Peak bars are drawn using a color spectrum to make them easier to read quickly. The bars will be green when below -9dBFS, to indicate safe levels. When levels surpass -9dBFS, the color gradient shifts from green to yellow, indicating that the levels are still acceptable, but approaching the acceptable maximum. When the gradient shifts to red, the level has exceeded 0dBFS, and the signal will be clipped. Since clipping will create distortion in the audio signal, you want to adjust your audio levels to avoid red.
The scale extends to +6, which gives you an indication of how far past 0dBFS audio is peaking, so that you can make appropriate adjustments to avoid clipping. If your peak is clipping at +3, for example, then you will want to reduce the level of your audio by at least 3dB to get it into the acceptable range.
Static vs Dynamic Peaks
The audio meter’s menu has an option to hold peaks. This prevents the peak indicators from ever lowering during playback, known as static peaks. Therefore by the end of playback you will have a definite readout for the maximum peak level during that section of the timeline, without needing to observe the audio meters for the duration of playback.
With the hold peaks option turned off the audio meters use dynamic peaks, which update every two seconds. After two seconds the bars will fall back down if the peaks have been lower than an earlier peak.
Waveforms
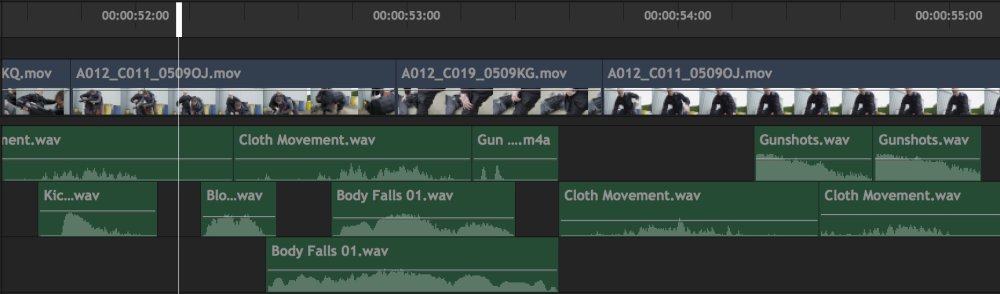
The Editor timeline, composite shot timelines, and Trimmer display waveforms for audio. This provides a visual representation of the audio over time, making it easier to position clips based on audio content.
- Options
The Options screen lets you choose between several waveform types.- Channel List: Displays individual waveforms for each channel in the audio stream and is a common representation of audio. So you’ll see one waveform for mono audio, 2 waveforms for stereo, and 6 waveforms for 5.1 surround sound. It can be useful in order to see where a particular channel has silence, for example.
- Channel Composite: This simply draws all waveforms from the audio stream over the top of each other. So you only ever see one waveform even if the source has stereo or 5.1. This view isn’t particularly useful for detailed work but can be helpful if there is limited screen space and you still want to see a waveform plotted.
- RMS Amplitude: Similar to Channel Composite, this displays a single graph of all channels in the audio stream, but instead of plotting a waveform it shows the average levels of the audio signal over time. Viewing an average of audio levels in this way is a better method to determine its volume than inspecting a waveform because it is a better approximation of how our ears and brains perceive loudness.
p(banner tip). Note that RMS amplitude is still only a loose correlation or rough guide. There are many factors which affect human perception of loudness which are not included in an RMS graph, such as the frequency of sounds. (Our ears are more or less sensitive to different frequencies, meaning that the same power does not always result in the same perceived loudness.)
- Editor Waveforms
Waveforms will be displayed by default on all Editor audio tracks when the audio size is set to Medium, Large or Extra Large. Small tracks will not display waveforms. For more information on adjusting the Audio track Size, see Audio and Video Tracks.
![]()
- Composite Shot Waveforms
Layers that contain audio can display waveforms in composite shot timelines. This option can be enabled on a per-layer basis, so only the waveforms you want to see are displayed.
![]()
To enable waveforms for any layer that contains audio, open the Layer Properties in the Controls Panel, and enable the Show Waveform option. You can also access this option by right-clicking the layer on the timeline, and selecting Options > Show Waveform from the contextual menu.

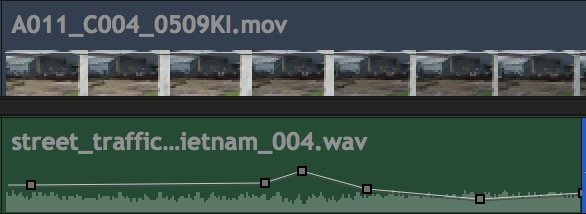
Adjusting Volume ![]()
![]()
A clip’s volume can be changed over time. By adjusting the volume of multiple clips you can build up a more interesting soundtrack.
Volume can be adjusted in the Audio Mixer, in the Controls panel, or directly on the timeline. Every audio clip on the Editor timeline has a volume bar which can be dragged up and down. By default the volume bar will change the volume of the entire clip. You can add keyframes by holding CTRL (CMD on Mac) and clicking on the volume bar.
Keyframing can also be turned on and off in the controls panel by clicking the keyframe button to the left of the Volume property.
With the audio property selected in the Controls panel you can jump between keyframes using the keyframe navigation buttons at the top of the timeline.
Audio Effects
HitFilm includes several effects to further adjust your audio. These are found in the Effects library in the Audio folder.
To add an audio effect to an audio clip drag it from the Effects panel onto the clip. You can then customize the effect in the Controls panel.
For information on individual audio effects, see the Audio effects chapter.
Syncing Video and Audio
If your video and audio are recorded in separate files, you can sync them in the HitFilm media panel. See Audio and Video Sync for instructions and more information.