
Linking your Xplan account
Advant Plus now allows you to send fully formatted emails to your Xplan contacts.
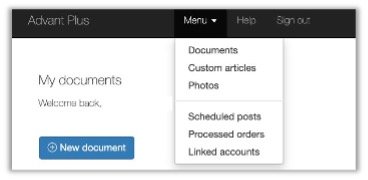
1. To link your Xplan account, start by clicking the Menu tab at the top of your screen and select Linked accounts from the drop-down menu.
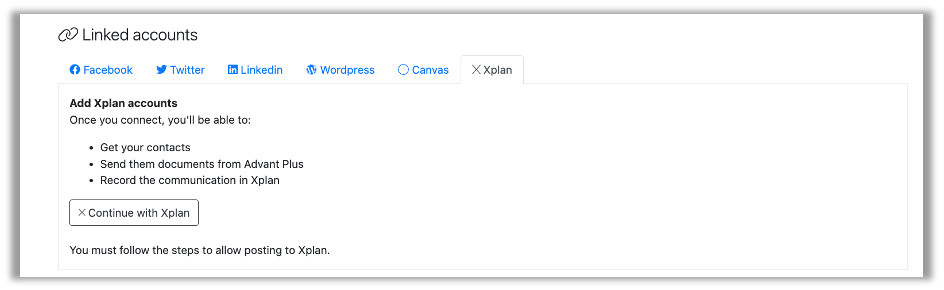
2. When you reach the Linked accounts page, click the Xplan option, then Continue with Xplan.
3. Enter your Xplan URL into the initial pop up and select Submit.

4. Allow Advant Plus to connect with your Xplan account.

Advant Plus will not have access to any of the passwords or personal details you have stored in your social media accounts. We will also never post to your pages without your permission.
Importing contacts
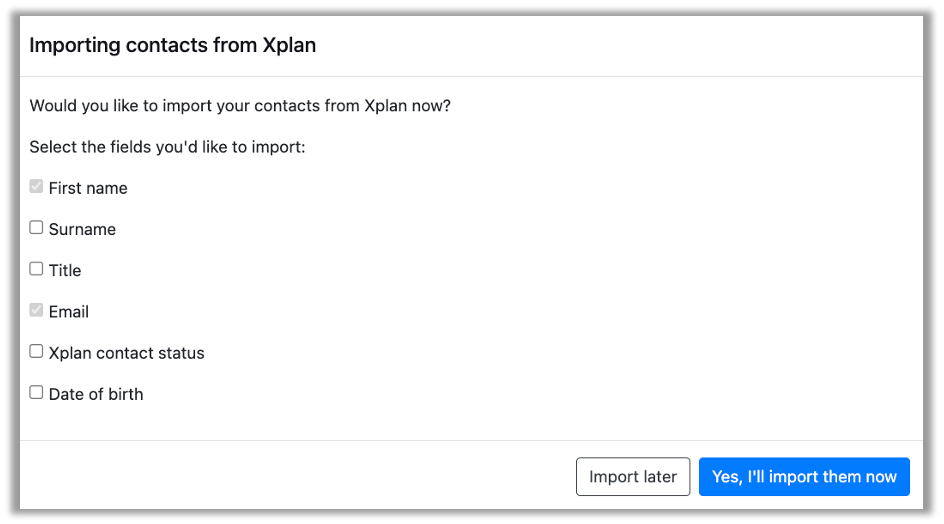
1. Once you have linked your Xplan account, a pop up will appear in Advant Plus asking you to import your contacts. You can choose to import immediately or later.
2. You can select the fields you would like to include with your import. The different fields may help when trying to tag your clients in the next step.
Subscriber management
All of your Xplan clients will be imported to Advant Plus.
If you are wanting to group your clients so that you can email different audiences, you can add contact groups in the subscriber management. Simply select the check box next to each client you would like included in the group, then enter or select the contact group in the drop-down bar at the top of the page.
Multiple contact groups can be added to an individual client.
To remove a contact group from a client, simply select the ‘X’ next to the contact group tag.
Sending a document
Advant Plus will send your publication directly through to any of the following Xplan contacts and the communication will be recorded in Xplan under the client’s document notes.
You’ve created your newsletter or snapshot and you’re happy with how it looks and reads.
Select the Manage tab and click Send via Xplan.

1. Your email communication details
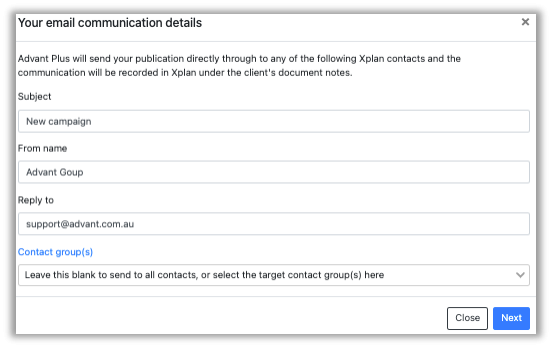
Subject
Give your email communication a subject to let clients know what they are receiving.
From name
Fill in the name you would like your clients to see in their inbox.
Reply to
Fill in the email address you would like appear if a client wishes to reply.
Contact group(s)
Select who you would like to send the email communication to.
If you leave this section blank, the communication will be sent to your full contact list. If you wish to send the communication to multiple groups, you can select these here or send them individually.
Select Next
2. Send a test email
You are required to send a test email before proceeding.

Send this to yourself so you can preview what your clients will receive. The test email will appear in your inbox (check your Junk inbox) with the subject line Test: ______
3. Send your email communication
Review the details of your email communication before sending.

If you are happy with all the details, select Send. You also have the option of scheduling your email communication to be sent at a later date and time.
Congratulations – Your communication has been sent!
Campaign reports
Select Menu, then Campaign reports.
In this section, you can view the analytics of each communication you have sent.
The analytics will refresh every 15 minutes.

Post your comment on this topic.