
Click on the Skalp Icon in the Skalp Toolbar to bring up the main Skalp dialog:

1. Activate / Deactivate Skalp Sections
This green/grey slider button manages the section visibility. It does this by activating/deactivating the SketchUp section and by turning on/off the special purpose Skalp layers.
If you want to ‘remember’ this setting on the active scene, you have to use
‘Save Skalp Settings to Scene’ (7).
When this slider button is GREY and you cannot turn it to GREEN, this indicates no Skalp Section is available in the model and you have to create one first (3).
2. Manual Update
Can be used to recalculate a section. Mainly needed when you have turned OFF Skalp auto updating from the preferences in the menu. Normally not needed if automatic updating is ON.
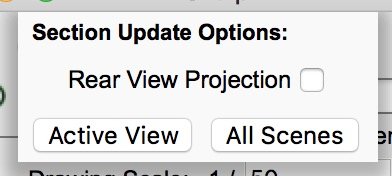
Can also be used to update the rear view projection. When the rear view projection is not up to date the update icon will be red.
You can also use the update button to update all your scenes this brings all scenes in a consistent state, accessible even when Skalp is unavailable. This is useful for models in Layout or to hand over your model to clients that don’t have Skalp.
3. Add a new Skalp Section
Adds a new Skalp enhanced SketchUp section plane to your model.
Once Skalp is running you can either add new sections with Skalps ‘+’ button or using the standard SketchUp ‘Section Plane’ tool.Both will produce the exact same result.
After placing the section plane, a dialog allows you to enter a name and create a new Scene to be associated with the Section. The Scene creation is optional. Skalp Sections can be associated to a Scene later from the main Skalp dialog as well. Multiple Scenes can be associated with one and the same Skalp Section. See ‘Using Scenes to manage Skalp Section visibility’
4. Delete a selected Skalp section
Deletes a Skalp section and removes all Scenes that are associated with the selected Skalp section. (see ‘Using Scenes to manage Skalp Section visibility’ to manage Skalp scene association.)
5. Align View
With the align view function you can align your view to the active section plane.
First click will align your view. Secondary clicks on the icon (once the view is aligned) will toggle between perspective and parallel projection.

When the icon is shown in red this means the view is not parallel to the section plane, and as a consequence causing the Depth Clipping , which can only work on aligned views, to be turned off.
6. Skalp Hiddenline Mode
Click to turn ON or OFF the Skalp Hiddenline Mode.
For more information about the Skalp Hiddenline Mode click here.
7. Save Settings to Scene
Use this to save the active section plane and the Skalp Hiddenline Mode setting into the currently selected Scene.
The Save Setting to Scene also works a bit like a normal SketchUp Scene Update. The following settings will also be updated:
- Camera location
- Hidden Geometry
- Visible Layers
- Active Section Plane
- Style and Fog
If the following properties are already been saved in the Scene they also will be updated:
- Shadow Settings
- Axes Location
8. Skalp Menu

Click here for more detailed information about the Skalp menu.
9. Show More
Opens up the lower part of the dialog to show the ‘Skalp Styles’ editor.

Click here for more more information about Skalp Styles.
10. Skalp Sections Drop Down list
Drop down list to directly access all Skalp Sections in this model.

Use – no active Section Plane – to turn OFF the Skalp section.
After activating or deactivating a section from the list you might want to store this setting onto you active scene by using Save Skalp Settings to Scene from the menu (7).
Post your comment on this topic.