Adding One or More Cameras (using Auto Mode)
| |
This is the Add icon. |
- From the list of registered cameras on the server’s Cameras tab, press the Add Camera button to access the Register Cameras screen. The software will open the Register Cameras screen in Auto mode by default. This screen displays a list of all the cameras Orchid Core VMS was able to auto-discover.

- Enter the ONVIF username and password that is setup on the camera(s) you would like to add.
- Scroll down to see which cameras are available. (You may sort this list by camera model, IP address, or registration state. Just click the appropriate column header: the camera icon, Model, or IP.)
- To add a new camera, mark the checkbox next to the camera.
- You may select multiple cameras as long as they all use the same ONVIF username and password.
- Notice that each time you mark another camera, the Register Selected Cameras button will indicate how many cameras have been selected to add.

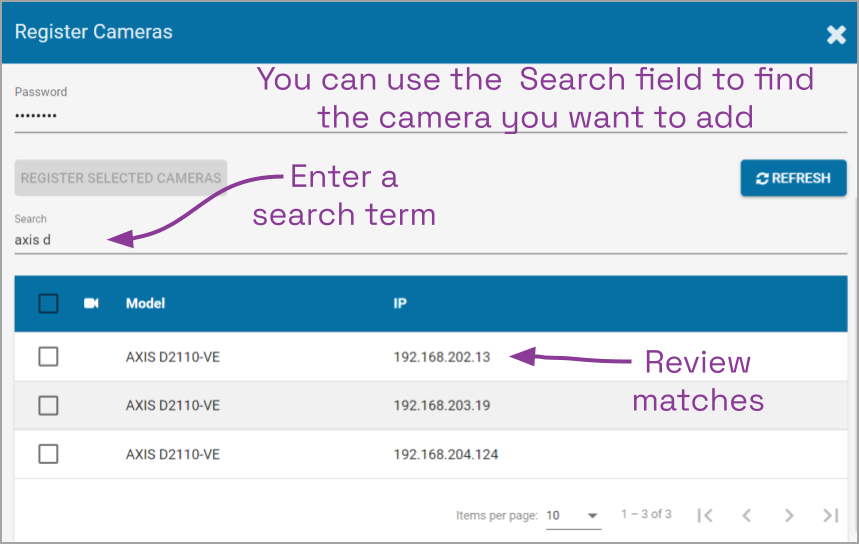
- If there are a lot of available cameras, you may want to use the search feature to find the cameras you’re looking for.
- Click into the Search field and enter a term for the search. This search only allows for one search tag, but you may use a multiple-term search tag, and it may contain words or numbers. (For example, you could search for a specific camera brand name and model, or you could search using the last number of the camera’s IP address.)

- Review your search results and select cameras, as needed.
- Once you have made all of your selections, press the Register Selected Cameras button to add the cameras to the Orchid Core VMS server.
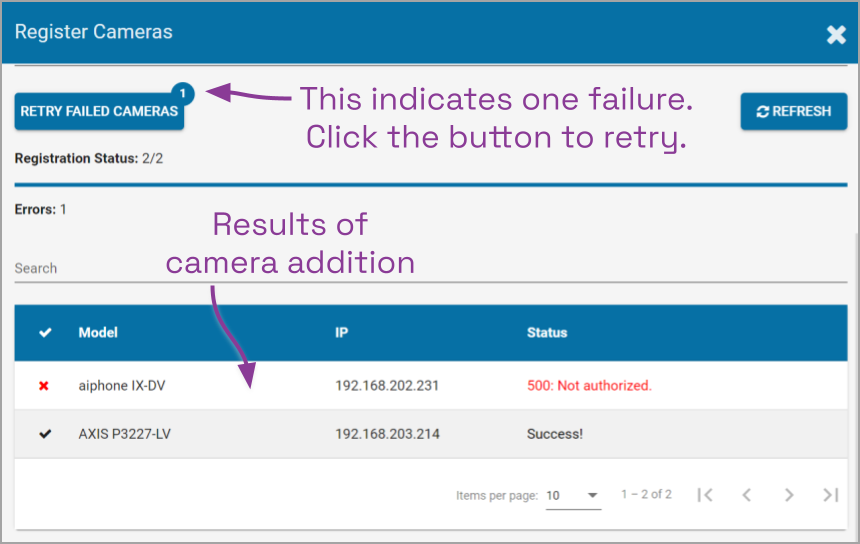
Depending on the number of cameras being added, it may take a few minutes for Orchid Core VMS to add them successfully. When complete, the software will display a list of all cameras that were successfully and unsuccessfully added. If Orchid Core VMS fails to add a camera, an error message will appear.

- If you receive an error, you may use the Retry button to try the addition again. (In the example above, since the error was Not authorized, you might try entering different credentials, then click the Retry button.)
- Go to each of the newly added cameras and enter a unique, descriptive name for each one. (Good camera names are important because they are searchable in Orchid Fusion/Hybrid VMS.) You should also review or edit the camera stream settings. (Please refer to the next several sections for details on stream settings.)
Adding a Single Camera (in Manual Mode)
If Orchid Core VMS cannot autodiscover a camera, it can be added manually.
- At the server’s Cameras tab, press the Add Camera button to access the Register Cameras screen. The Register Cameras screen will open in Auto mode.
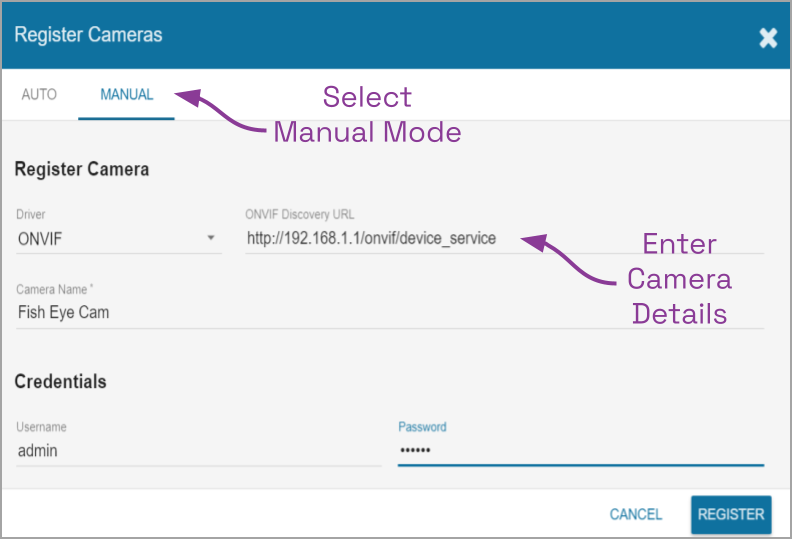
- Select Manual mode.

- Select the appropriate driver (ONVIF or RTSP) from the drop-down list.
- Enter the ONVIF Discovery URL, or the RTSP Stream URL (depending on the driver you specified) to match the correct address for the camera being added. Consult with the camera manufacturer’s user guide, as needed, for the correct syntax of the address.
- Enter a unique name for the camera. This will allow you to distinguish the camera from other cameras set up within the Orchid Core VMS server.
- Enter the username and password that is setup on the camera being added.
- Press the Register button to add the camera to the Orchid Core VMS server.
When complete, Orchid Core VMS will add the new camera to the list of registered cameras. If Orchid Core VMS fails to add a camera, an error message will appear explaining the issue. - Once the camera has been added, review or edit the camera stream settings. (Please refer to the next several sections for details on stream settings.)


Post your comment on this topic.