![]() |
This is the Add icon. |
![]() |
This is the Expand icon (used to access the Advanced SMTP settings, if needed. |
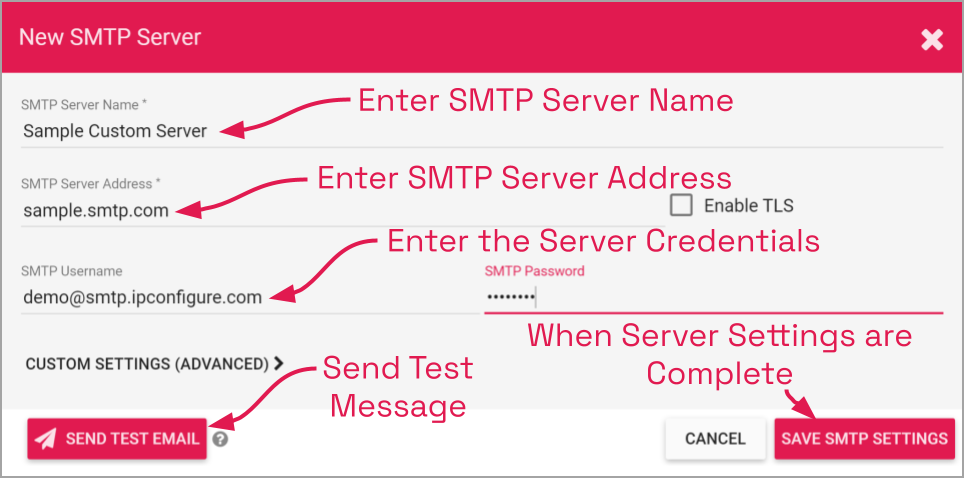
- Click the Add SMTP Server button in the top-right corner of the SMTP Servers screen. The New SMTP Server screen will open.
- First, enter a name for the new SMTP Server.
- Then enter the address for the new server. (Example: smtp.mailgun.org) If you don’t specify a port number in the address, the system will use default port number 587.
- Mark the Enable TLS checkbox if you need to add Transport Layer Security. (In order to use TLS, the SMTP Server you are adding must support a secure connection.)
- Next, enter the credentials that allow you to use the selected mail server (SMTP username and password).
- If you need to add custom settings for the SMTP server, click the Expand icon to access the Custom Settings (Advanced) fields.
- Use the Key field and the Value field to enter necessary info.
- Click the + icon to finalize the custom setting.
- Click the Trashcan icon to delete a custom setting.
*These custom settings are being made available in the unlikely event they will be needed. If you’d like to learn more about these custom settings, please reference this public resource: https://javaee.github.io/javamail/docs/api/com/sun/mail/smtp/package-summary.html
- If you want to verify the SMTP server, click the Send Test Email button.
- Enter the email address for the test message, then click the Send button.
- Once all the settings have been entered, click the Save SMTP Settings button to save the server.

Post your comment on this topic.