
The Data Source tab is the second tab on the Data Viewer Web Part dialog and allow you to build a view of your data. It consists of a number of section depending on the data source provider selected on the Web Part tab. This page describes how to configure the Data Source tab for the following data source providers:
- Microsoft® SQL Server®
- Oracle®
- ODBC
- Microsoft® SharePoint® Lists and Libraries
- OData Service
- SharePoint® External Data (Business Connectivity Services)
- XML
Microsoft SQL Server® Data Source Provider
There are two methods of using the Data Viewer Web Part to connect to a Microsoft SQL Server® database, either create an external content type and then configure the Data Viewer Web Part with the SharePoint External Data Source Provider, or complete the following steps:
- Ensure that you have selected, MSSql Data Source Provider on the Web Part tab.

- Click the Data Source tab.
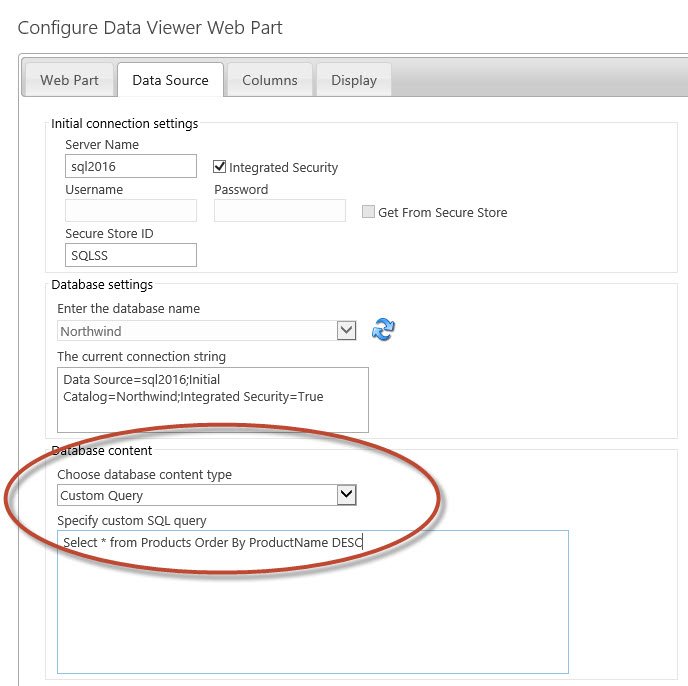
- In the Initial connection settings section:

- In the Server Name text box, type the name of an Microsoft SQL Server instance that you wish to connect to.
- Use one of the following to configure how SharePoint should connect to the SQL Server instance:
- Select the Integrated Security check box if you wish to use integrated windows authentication.
or
** In the Username and Password text boxes, type a username and password if you are using SQL authentication.
or
- Select the Get From Secure Store check box, and then in the Secure Store ID text box, type a Secure Store Target Application ID.
- Select the Integrated Security check box if you wish to use integrated windows authentication.
- In the Database settings section:
- Click Refresh
 to populate the Enter the database name list.

- From the Enter the database name list, select the database that contains the data you wish to display in the Data Viewer Web Part.

If SharePoint is able to connect successfully to the SQL Server instance, a connection string is created in The current connection string text box, which you can amend if needed.
 to populate the Enter the database name list.

In the Database content section:
Select Table, View, Stored Procedure, or Custom Query from the Choose database content type list.
From the Choose one of the database contents from the list, select the table, view or stored procedure that returns the data you wish to display in the Data Viewer Web Part.

Click the Columns tab to continue configuring the Data Viewer Web Part.
The Custom Query option enables you to type your own custom query rather than selecting an existing Table, View or Stored Procedure.
Oracle® Data Source Provider
There are two methods of using the Data Viewer Web Part to connect to an Oracle® database, either create an external content type and then configure the Data Viewer Web Part with the SharePoint External Data Source Provider or, complete the following steps:
- Ensure that you have selected, Oracle Data Source Provider on the Web Part tab.

- Click the Data Source tab.
- In the Initial connection settings section:

- In the Data Source text box, type the name of the Oracle server that you wish to connect to.
- Use one of the following to configure how SharePoint should connect to the Oracle server:
- Select the Integrated Security check box if you wish to use integrated windows authentication.
or
- In the Username and Password text boxes, type a username and password if you are using Oracle authentication.
or
- Select the Get From Secure Store check box, and then in the Secure Store ID text box, type the Secure Store Target Application ID.
- Select the Integrated Security check box if you wish to use integrated windows authentication.
- In the Database content section:
- Select from the Choose database content type list.
- From the Choose one of the database contents from the list, select the component that returns the data you wish to display in the Data Viewer Web Part.

- Click the Columns tab to continue configuring the Data Viewer Web Part.

ODBC Data Source Provider
Open Data Base Connectivity (ODBC) is a driver based connectivity option which is supported by many external data sources. You must have the correct ODBC driver installed on your SharePoint server(s) to use ODBC data source provider with the Data Viewer Web Part.
To connect to a published ODBC data source, either create an external content type and then configure the Data Viewer Web Part with the SharePoint External Data Source Provider or, complete the following steps:
- Ensure that you have selected, ODBC Data Source Provider on the Web Part tab.
- Click the Data Source tab.
- In the Initial connection settings section:
- Type the connection string to the ODBC data source in the Connection String text box, for example, Provider=Microsoft.ACE.OLEDB.12.0; Data Source=\\server\share\folder\myAccessFile.accdb;.
- If the OBDC data source does not allow anonymous access, use one of the following to configure how SharePoint should connect to the data source:
- Select the Connect as Current User check box if you wish to use integrated windows authentication.
or
- In the Username and Password text boxes, type a username and password if you are using basic authentication.
or
- Select the Get From Secure Store check box, and then in the Secure Store ID text box, type the Secure Store Target Application ID.
- Select the Connect as Current User check box if you wish to use integrated windows authentication.
- Optionally configure the Quote Prefix and Quote Suffix text boxes. The QuotePrefix and QuoteSuffix properties of some data sources are used to specify delimiters such as a left bracket and a right bracket to encapsulate the data object name, when data objects contain characters such as spaces, commas, and semicolons.
- In the Database content section:
- Select the content type from the Choose database content type list.
- Click the Refresh
 icon, and then select the content from the Choose one of the database contents from the list.
Click the Columns tab to continue configuring the Data Viewer Web Part.
SharePoint List Data Source Provider
To connect to a SharePoint list or library, complete the following steps:
- Ensure that you have selected, SharePoint List Data Source Provider on the Web Part tab.

- Click the Data Source tab.
- In the Source List section a collapsed web application tree view is displayed, which you can use to select the list of library data to display. Only one web application is displayed. This is the web application that contains the site where you have added the Data Viewer Web Part. If you want to display data from lists or libraries in another web application, use the text box below the collapse tree view to type or cut/paste the URL of the other web application in your SharePoint farm, and then click the green plus
 icon to the right of the text box. If the user who is configuring the Data Viewer Web Part, does not have permission to the root site of site collection, or no such site collection exists, then no URL is added to the tree view.

- Expand the tree view by clicking the plus sign ( + ) and then select the check box to the left of the list or library that contains the data you wish to display in the Data Viewer Web Part.


 icon to the right of the text box. If the user who is configuring the Data Viewer Web Part, does not have permission to the root site of site collection, or no such site collection exists, then no URL is added to the tree view.

- Complete the Audience Targeting Settings section as required.
- Complete the Miscellaneous section as required.
- Click the Columns tab to continue configuring the Data Viewer Web Part.
OData Service Data Source Provider
To connect to published OData services, either create an external content type and then configure the Data Viewer Web Part with the SharePoint External Data Source Provider, or complete the following steps:
- Ensure that you have selected, OData Service Data Source Provider on the Web Part tab.
- Click the Data Source tab.
- In the Service connection settings section:
- Type the URL of the OData service in the Service URL text box, for example, http://services.odata.org/Northwind/Northwind.svc/.
- If the OData service does not allow anonymous access, use one of the following to configure how SharePoint should connect to the data source:
- Select the Connect as Current User check box if you wish to use integrated windows authentication.
or
- In the Username and Password text boxes, type a username and password if you are using basic authentication.
or
- Select the Get From Secure Store check box, and then in the Secure Store ID text box, type the Secure Store Target Application ID.
- Select the Connect as Current User check box if you wish to use integrated windows authentication.
- Click the Refresh
 icon, and then select and entity from the Entity Set list.

Click the Columns tab to continue configuring the Data Viewer Web Part.
You can find out more information about OData from the web site: www.odata.org.
SharePoint External Data Source Provider
Business Connectivity Services (BCS) allows you to connect up to data stored externally to Microsoft® SharePoint®. Once you have created an external content type, you expose the data from the external system using External Lists, external data columns and if you are using Enterprise licences with Microsoft® SharePoint® Server 2013, Business Data Web Parts.
You can also use the Data Viewer Web Part to connect to connect to data external to SharePoint using an external content type. Also, forms and views on external lists suffer from the lost of the Design view in SharePoint Designer similar to internal SharePoint list, also, Business Data Web Parts, which are a form of the Data View Web Part, cannot be formatted without writing custom XSLT; therefore, you may want to use the Data Viewer Web Part.
Use the following steps to use the Data Viewer Web Part with external content types:
- Ensure that you have selected, SharePoint External Data Source Provider on the Web Part tab.
- Click the Data Source tab.
SharePoint connects to the Business Data Connectivity metadata store and displays in the External content type list, those external content types you have permissions to see.
- From the External content type list, select an external content type .
- Select the relevant external content type operations (methods) from the Finder method, Creator method, Updater method and Specific finder method for deleting lists.

- Click the Columns tab to continue configuring the Data Viewer Web Part.

XML Data Source Provider
To connect to published OData services, complete the following steps:
- Ensure that you have selected, XML Data Source Provider on the Web Part tab.
- Click the Data Source tab.
- In the XML data settings section:
- Type the URL of the XML source in the Xml url text box, for example, if you want to configure the Data Viewer Web Part to display blog posts from the Microsoft Office team, you could use: http://blogs.office.com/feed/.
- Optionally, type the URL of the XLST in the Xsl transformation url text box.
- If the XML data source does not allow anonymous access, use one of the following to configure how SharePoint should connect to the data source:
- Select the Connect as Current User check box if you wish to use integrated windows authentication.
or
- In the Username and Password text boxes, type a username and password if you are using basic authentication.
or
- Select the Get From Secure Store check box, and then in the Secure Store ID text box, type the Secure Store Target Application ID.
- Select the Connect as Current User check box if you wish to use integrated windows authentication.
- Type XPath that will evaluate to a node-set in the Items XPath text box. You do not have to specify the root node, for example, for a RSS feed, the root node is rss, so in the Items XPath text box you would type /channel/item or ./channel/item.

- Click the Preview
 icon to display the Preview dialog box. Several items will be retrieved from the data source using the XPath expressions and displayed in the dialog box.

Close the dialog box.


Click the Columns tab to continue configuring the Data Viewer Web Part.
Post your comment on this topic.